Authentication and Authorization
The sections below depend on some concepts described in the Identity & Access Management article. Be sure to check it out first.
The Identity Service supports Identity Providers based on OAuth 2.0 OpenID Connect
to facilitate the authentication & user identity requirements. The currently available
list of Identity Providers can be configured in the Admin Portal.
When it comes to authorization, the Identity Service implements a Role Based Access Control (RBAC) mechanism (read more about Access Management to understand how the roles are used).
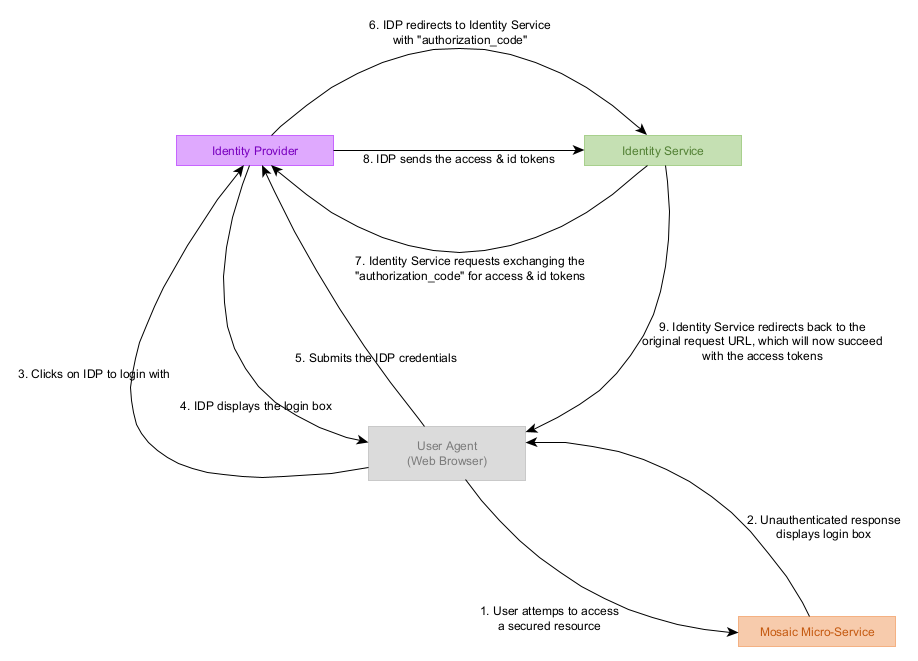
The diagram below outlines the OAuth 2.0 authorization code interaction flow when a User attempts to access a secured resource via the Management System.
OAuth 2.0 authorization code interaction flow

Access Tokens
The Identity Service issues its own token for authenticated users rather than reusing the tokens which are issued by the respective Identity Provider. This means that the Authorization rules may also be enforced via the same tokens by enriching them with the needed payloads.
This Identity Service issued token is referred to as an access-token throughout
the documentation. It contains some payload that was received by the Identity Provider which accounts for the "user identity" aspect. Moreover, it also contains
some payload generated by the Identity Service itself which accounts for the
permissions granted to the user based on the assigned user roles.
Access Token Format
Access Tokens issued to a user and to a service account are identical (except for some properties which don’t make sense to each type). For this reason, it is possible to invoke service endpoints with either type of tokens. This is especially important for automation requirements.
The Access Token format would be the following:
{
	"tenantId": "7100c3b3-7b9e-4f3b-854f-1baa882c0bf0",
	"environmentId": "387e93d7-c584-48f2-a9f4-bb6540934e8c",
	"name": "Some User Name",
	"email": "some@domain.com",
	"permissions": {
		"some-service": [
			"PERMISSION_A",
			"PERMISSION_B"
		],
		"another-service": [
			"PERMISSION_C",
			"PERMISSION_D"
		],
	},
	"tags": [],
	"subjectType": "UserAccount",
	"iat": 1622990901,
	"exp": 1622991501,
	"aud": "*",
	"iss": "ax-id-service",
	"sub": "dd91b4fd-387e-4da7-93d7-59b2ce39c1de"
}
Access Token Validation
As all environments are isolated from one another, each environment receives its own token signing key pair when a new environment is created.
Therefore, when a user logs into the Management System of a certain environment, the issued access tokens issued are signed by the respective keys for that environment. For this reason, access tokens issued to one environment cannot be used in another environment.
For validating access tokens of each environment, the Identity Service maintains a Public JSON Web Key Store (JWKS) accessible via the following URL:
<id-service-base-url>/<tenant-id>/<environment-id>/.well-known/jwks.json
So, when a customizable-service (which is always connected to some environment)
receives a request with an attached access token, it uses the above URL to validate
the received token. This validation can be easily performed using the @axinom/mosaic-id-guard
library method setupAuthentication. Please refer to the library documentation for more details.
However, for Managed Services, this is handled differently as they are multi-tenant services. It only checks if the token signature is correct, according to the tenant & environment IDs embedded within the token (using the corresponding public key for verification).
When a service validates a JWT using the @axinom/mosaic-id-guard library, it will ensure to not fetch the
public key for every request. Instead, the library will cache previous results (the public key, per environment) for a finite duration.
This duration will be the same as the validity period of an access token.
The signing keys are not indefinitely cached as they can be revoked and rotated by an Administrator using the Admin Portal.
Service Account Authentication
We described how user authentication works in the Management System in the sections
above. However, when access tokens are needed outside of the context of a user,
service accounts can be used. This is implemented based on a simplified form of the
OAuth 2.0 Client Credentials flow that is offered via a GraphQL API.
You would first need to generate a service account in the Admin Portal and assign it the needed permissions in the same portal.
Once you have done this, you could use the @axinom/mosaic-id-link-be library method getServiceAccountToken
to authenticate and receive an access token which can be attached in future requests.
Please refer to the library documentation for more details.
Authorization
Once an access token is attached in a request, the receiving service first performs an authentication step (which is described above under access token validation). When this is successful, it checks for authorization rights to invoke the respective operation.
Each service will maintain a permission definition file according to a pre-defined structure. These
permissions can then be assigned to User Roles via the Management Portal or to Service Accounts
via the Admin Portal.
Once a user is logged in and receives an access token, the token payload shall contain
a list of permissions which were granted to the user roles assigned to the user.
From here onwards, it’s pretty straight-forward for a service to perform an
authorization step by matching those permissions against the intended operation to be executed.
To make this authorization process streamlined for GraphQL APIs, the
@axinom/mosaic-id-guard library offers a plug-in AxGuardPlugin which can be
used to wrap all GraphQL operations with a simple authorization check logic (using
the operation-to-permission mapping as input). Please refer to the
library documentation for more details.