Setting up API Gateway, and IAM Role
Introduction
When configuring AWS MediaPackage and AWS MediaConvert, you’ll need two components:
- an API Gateway endpoint to handle SPEKE key requests, and
- an IAM role that allows these services to invoke that endpoint.
This guide walks you through creating both—the API Gateway and the IAM role—step by step.
This guide outlines the main integration points with Axinom DRM and is intended to support your implementation efforts. For production use, we strongly recommend consulting the official AWS documentation to ensure best practices and a secure, scalable setup are followed.
Start
Log in to the AWS Management Console at: https://console.aws.amazon.com
Setting up the AWS API Gateway
This is the main point of integration with Axinom Key Service. The API Gateway is configured to provide an endpoint that proxies key requests between various AWS media services (such as MediaPackage and MediaConvert) and Axinom Key Service. Information is exchanged according to the SPEKE specification.
For information on SPEKE, see the AWS documentation: https://docs.aws.amazon.com/speke/latest/documentation/what-is-speke.html
-
Open the AWS API Gateway console: https://console.aws.amazon.com/apigateway
-
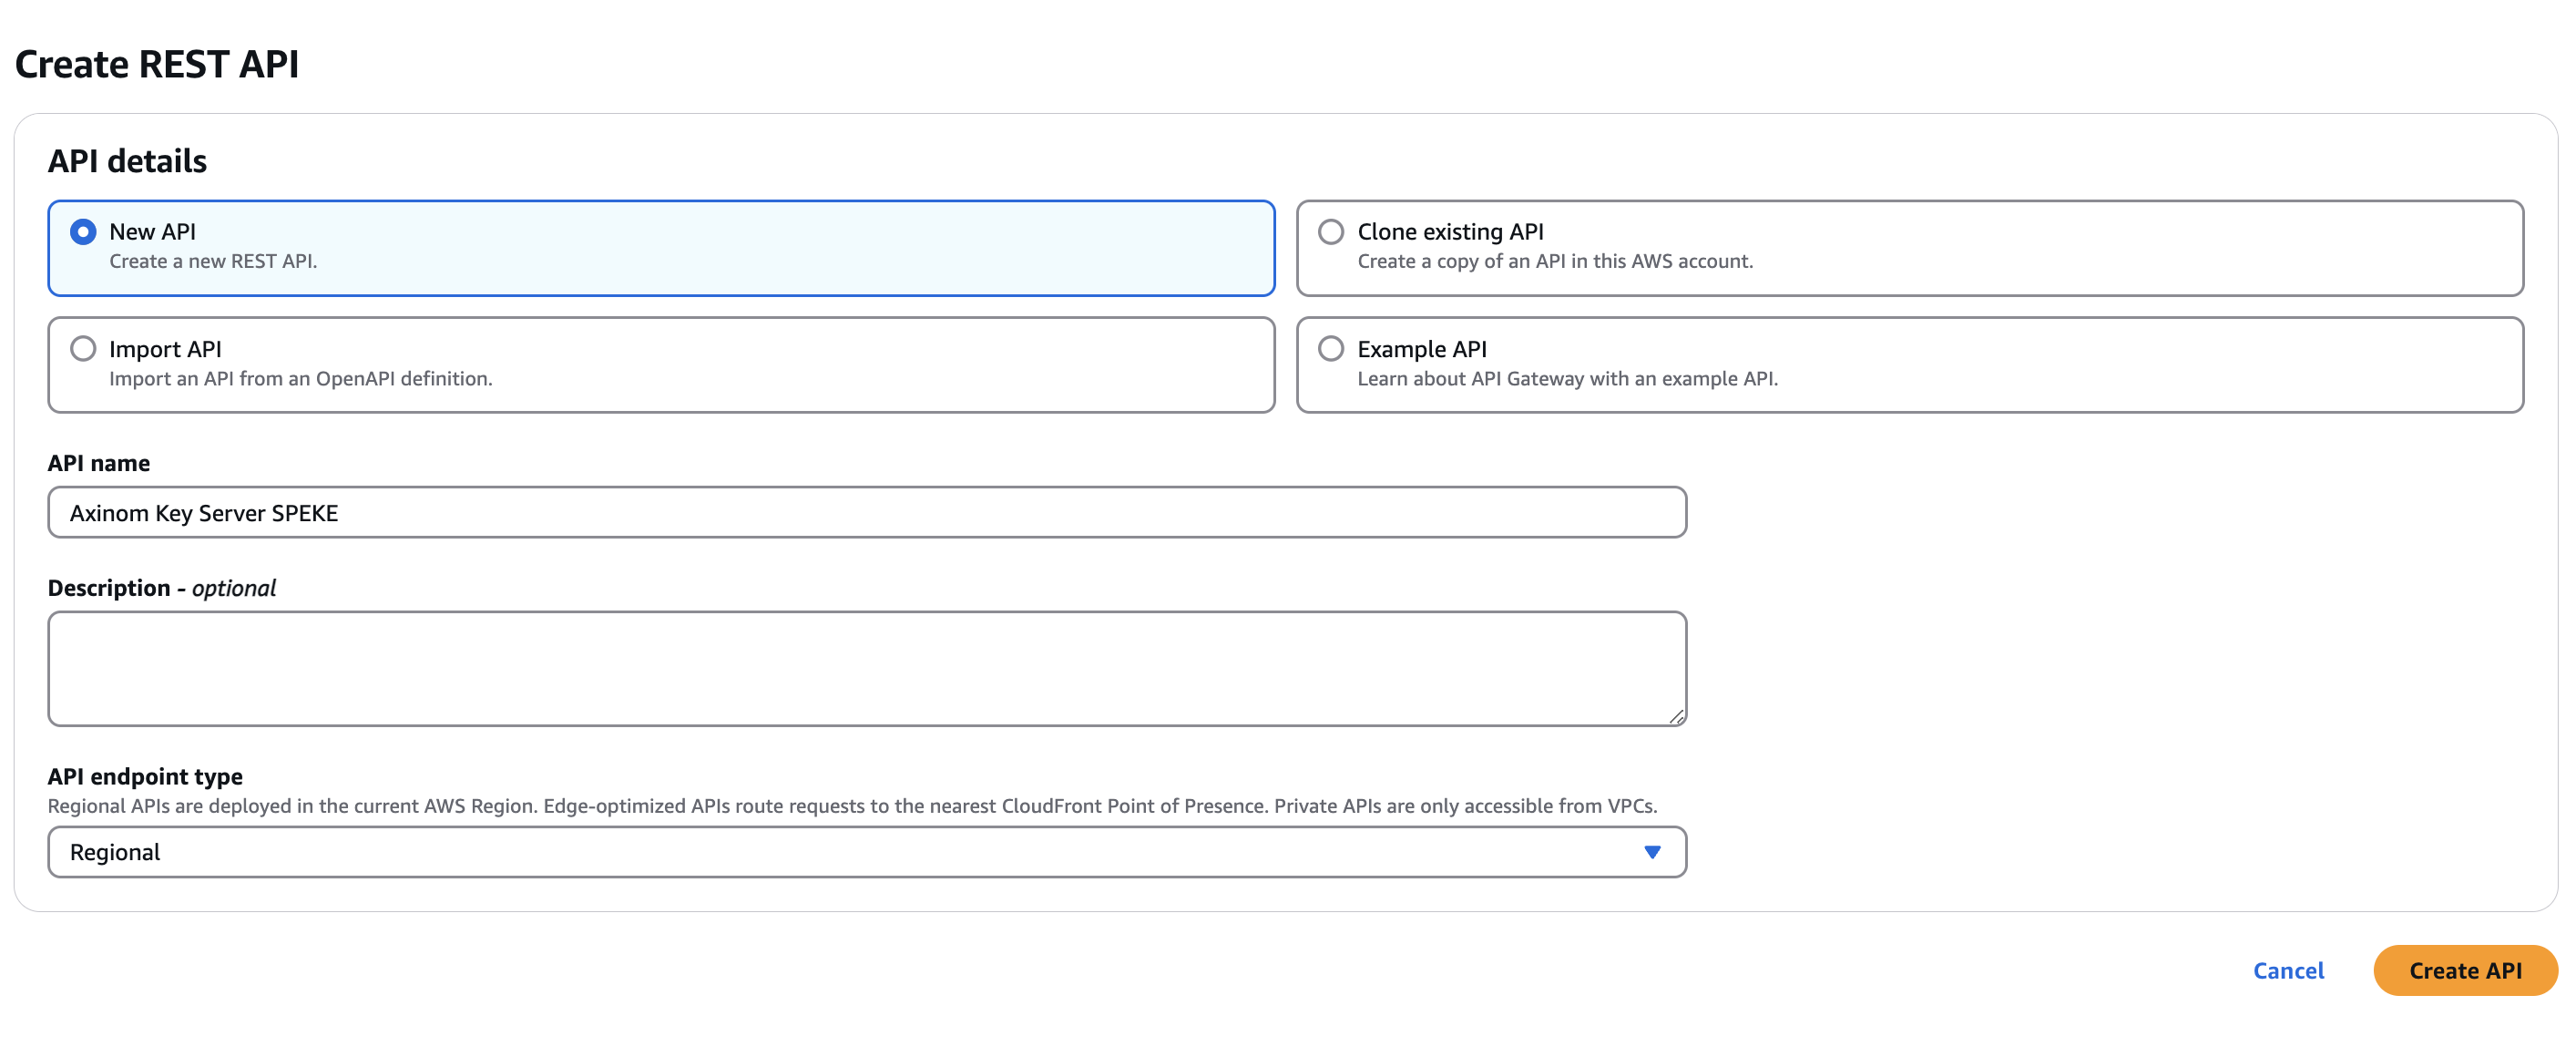
Create a new API:
-
To create an initial API, click Create API -> REST API and then Build.
-
Set general API settings:
-
API creation method: New API.
-
API name: "Axinom Key Server SPEKE".
-
Endpoint type: Regional.
-
-
Click Create API.
-
-
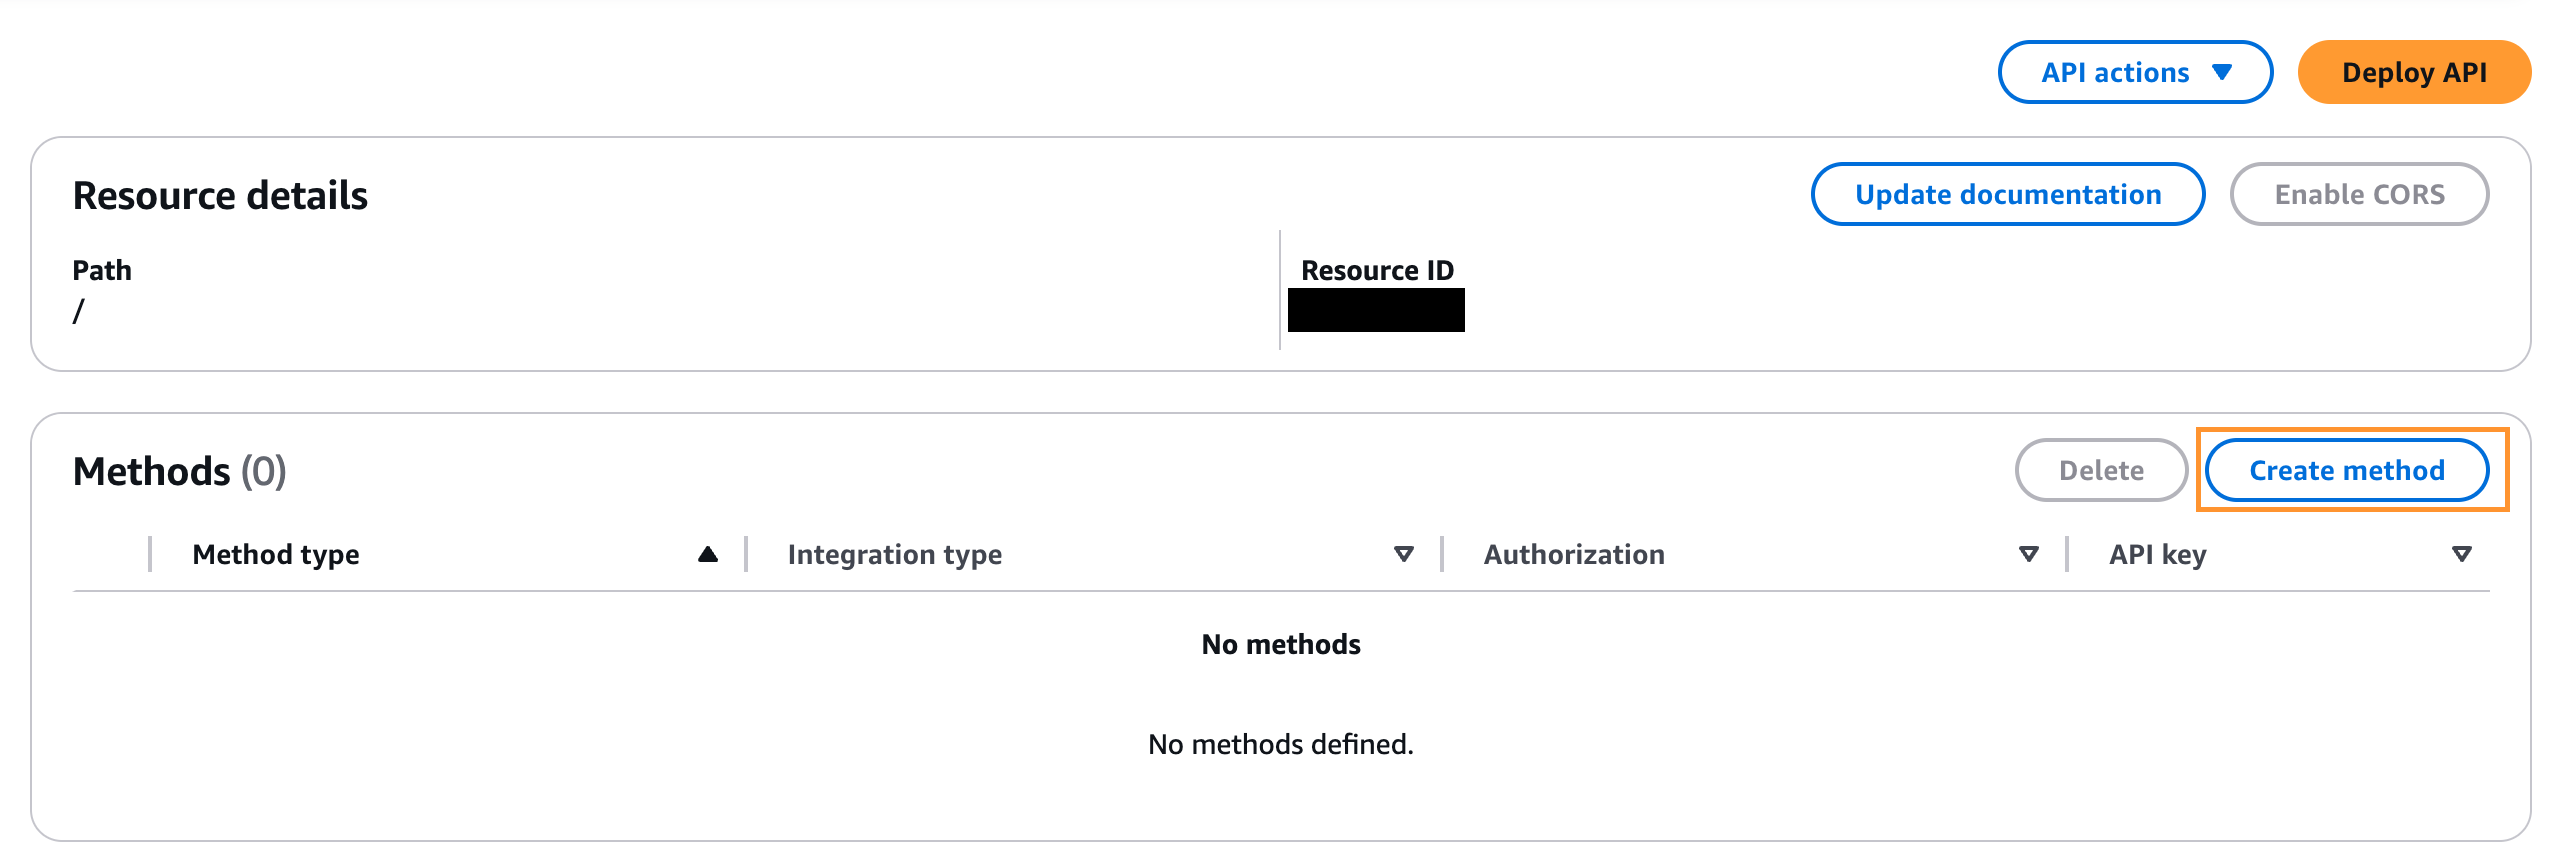
Add a POST method to the API:
-
Select Resources -> Methods -> Create Method.
-
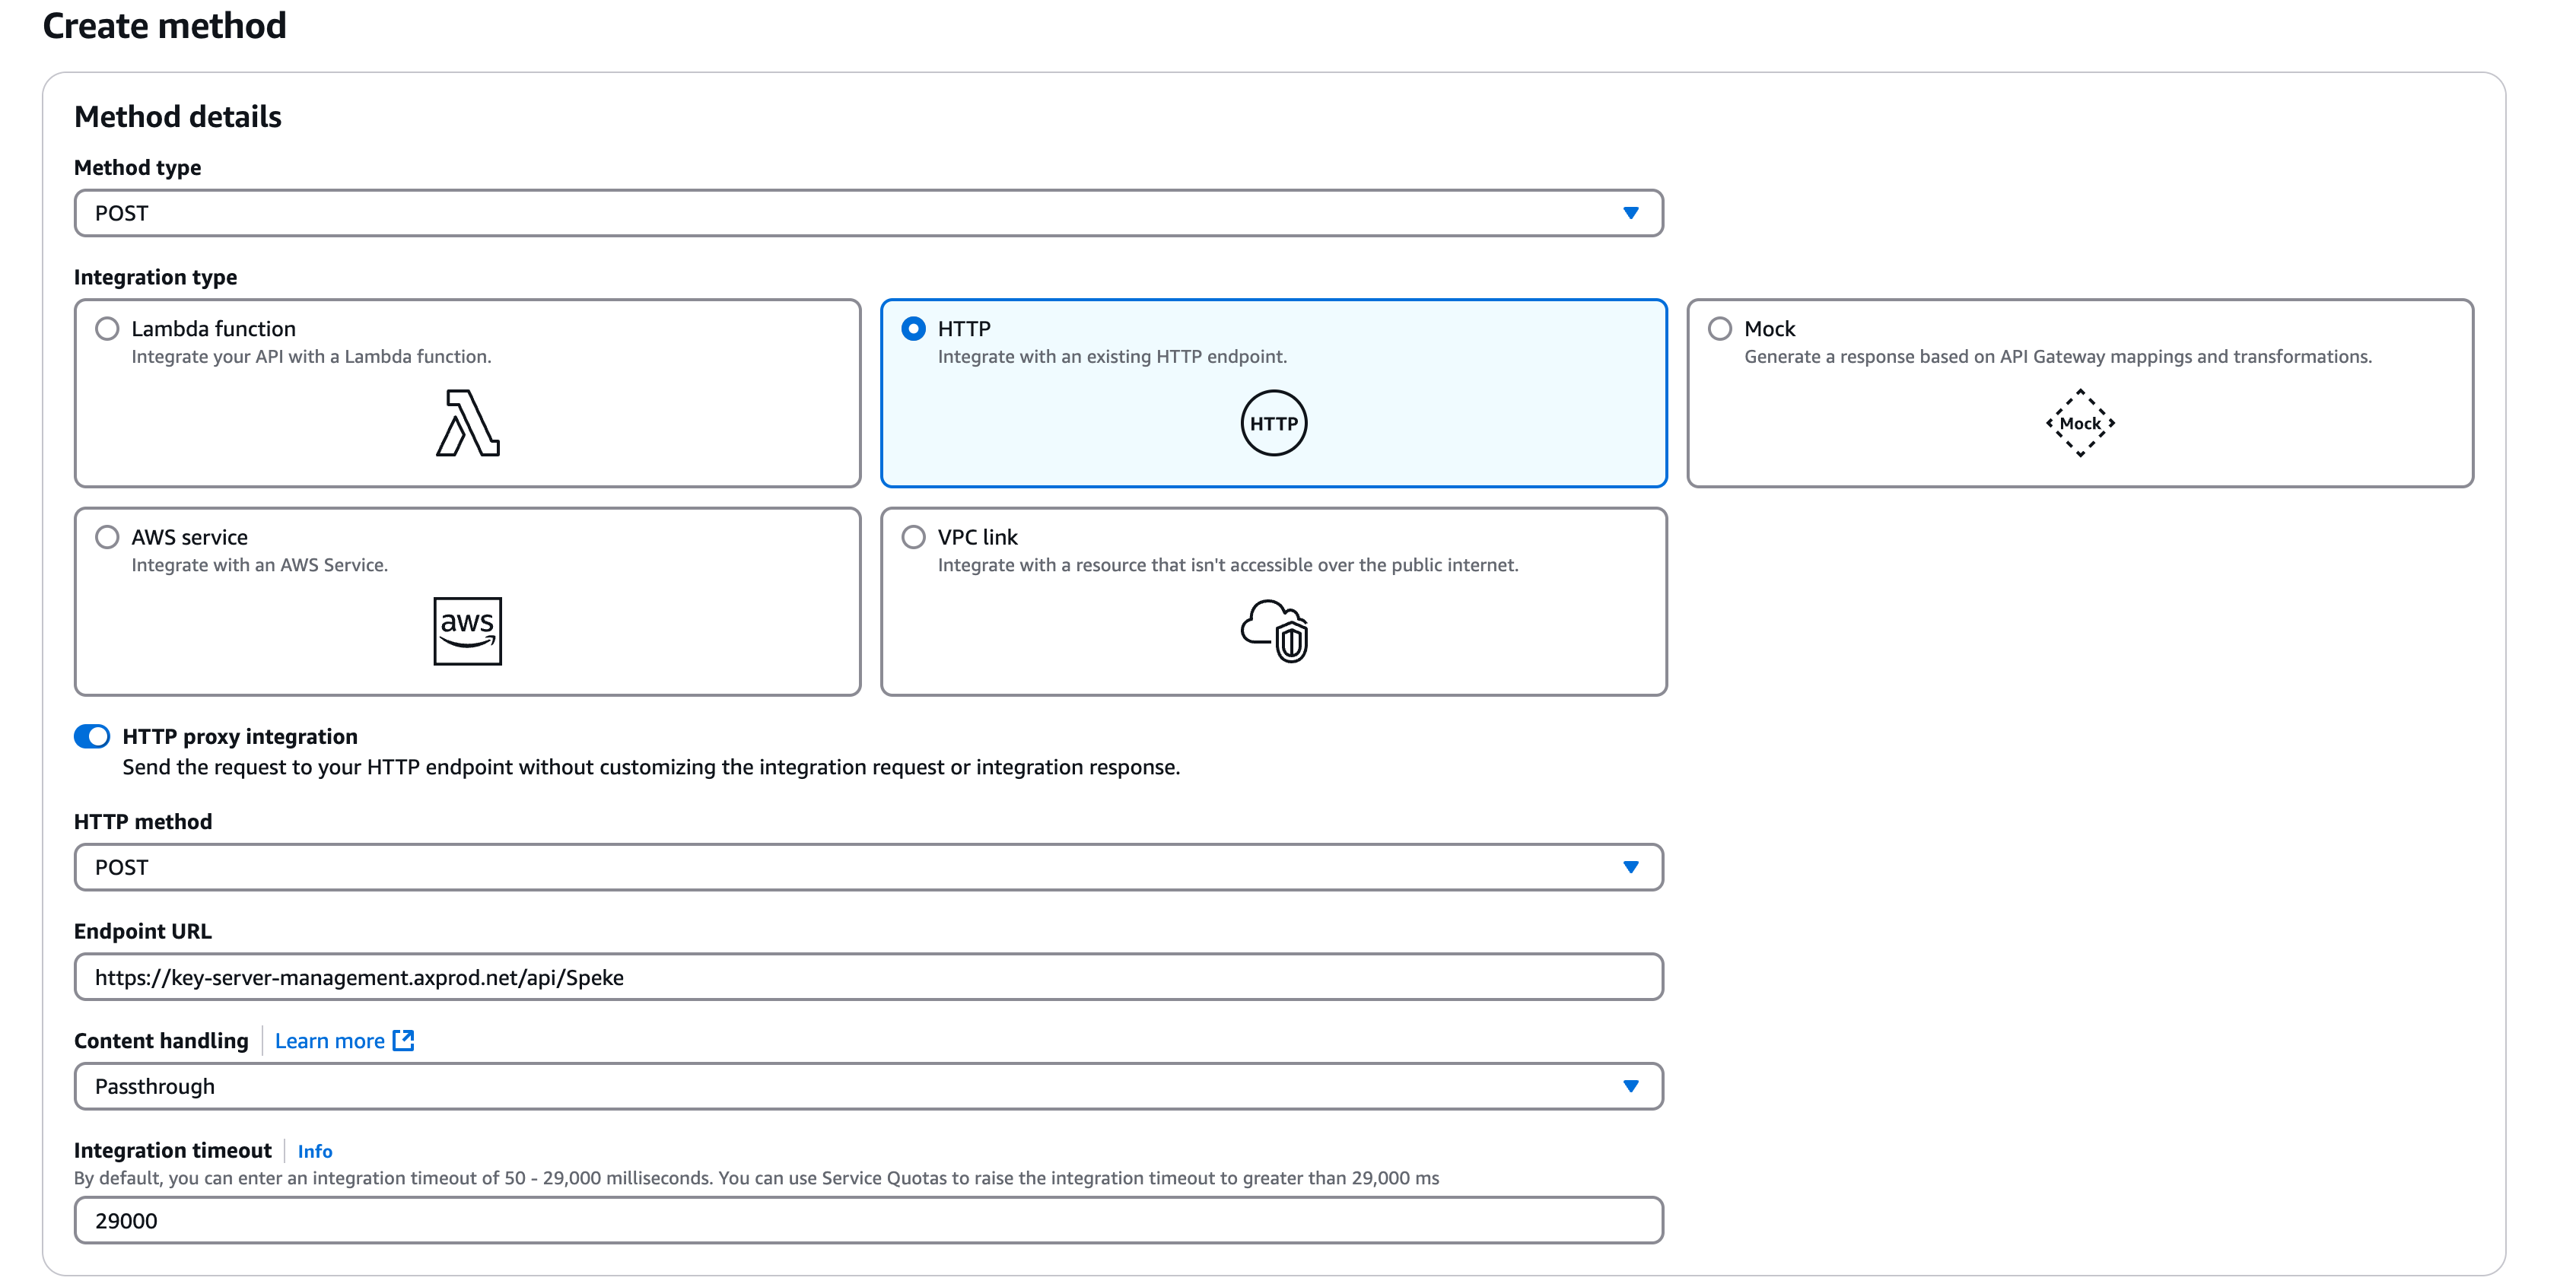
Configure the POST method:
-
Method type : POST
-
Integration type: HTTP.
-
Use HTTP Proxy integration: yes.
- If you you planning to use Media Package V2, you have to set HTTP Proxy integration: No.
-
HTTP method: POST.
-
Endpoint URL: https://key-server-management.axprod.net/api/Speke?overrideKeyIds=true (this is the Axinom Key Service SPEKE V1 endpoint, with "key override" enabled). You can find the URL valid to your tenant from My Mosaic.
noteTo start using SPEKE V2, be sure to update the endpoint in your configuration to: https://key-server-management.axprod.net/api/SpekeV2. Refer to SPEKE V2 for further details.
-
Content Handling: Passthrough.
-
Keep Integration timeout to 29000.
-
Choose Create Method.
-
-
-
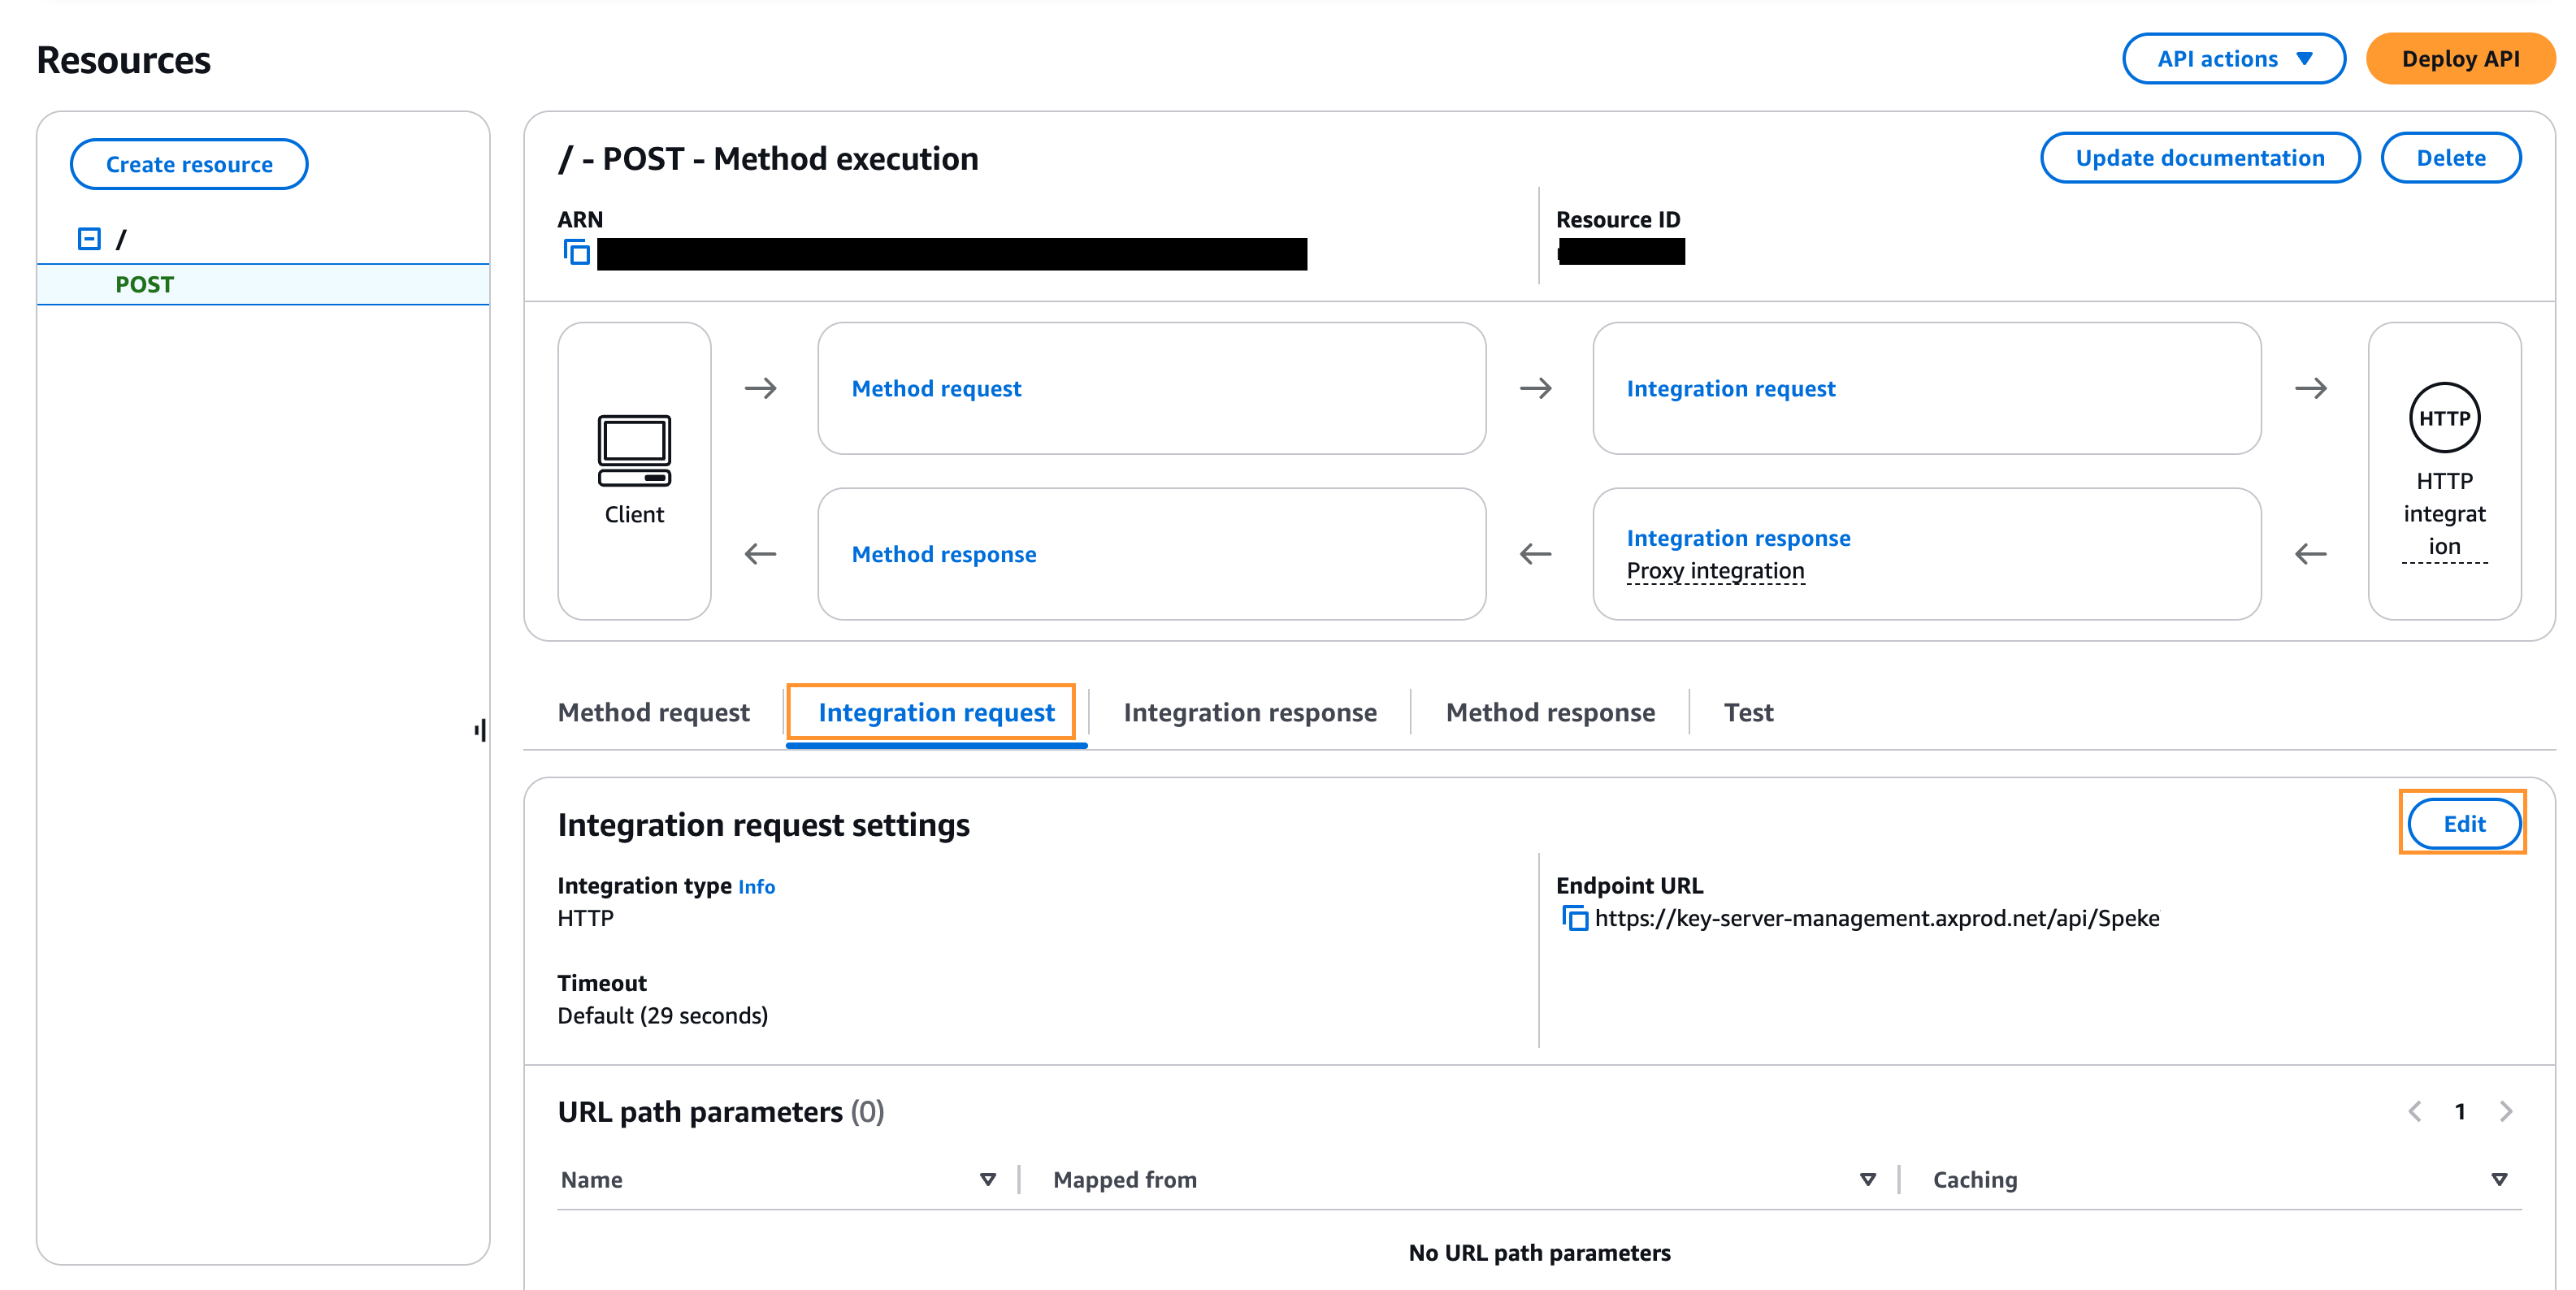
Add an authorization header to the POST method:
-
Choose Integration Request under the POST - Method Execution pane.
-
Click Edit
-
Expand URL request headers parameters and choose Add request header parameters.
-
Specify the Basic HTTP authentication header using your Axinom Key Service Management API credentials:
-
Name: "Authorization".
-
Mapped from: 'Basic <credentials>', where <credentials> is the base64 encoding of your Tenant ID and key service Management Key value as GUID strings joined by a colon( :). The single quotes must be included in the header. (you can use our Base64 conversion tool for this.)
Example:
If the Tenant ID is
2028718f-1edd-482a-b6b5-8067e93cfbfaand the Management Key ise0b81b34-dd82-4897-89f2-bdf32d7023f7then the resulting "Mapped from" value should be ’Basic MjAyODcxOGYtMWVkZC00ODJhLWI2YjUtODA2N2U5M2NmYmZhOmUwYjgxYjM0LWRkODItNDg5Ny04OWYyLWJkZjMyZDcwMjNmNw=='`.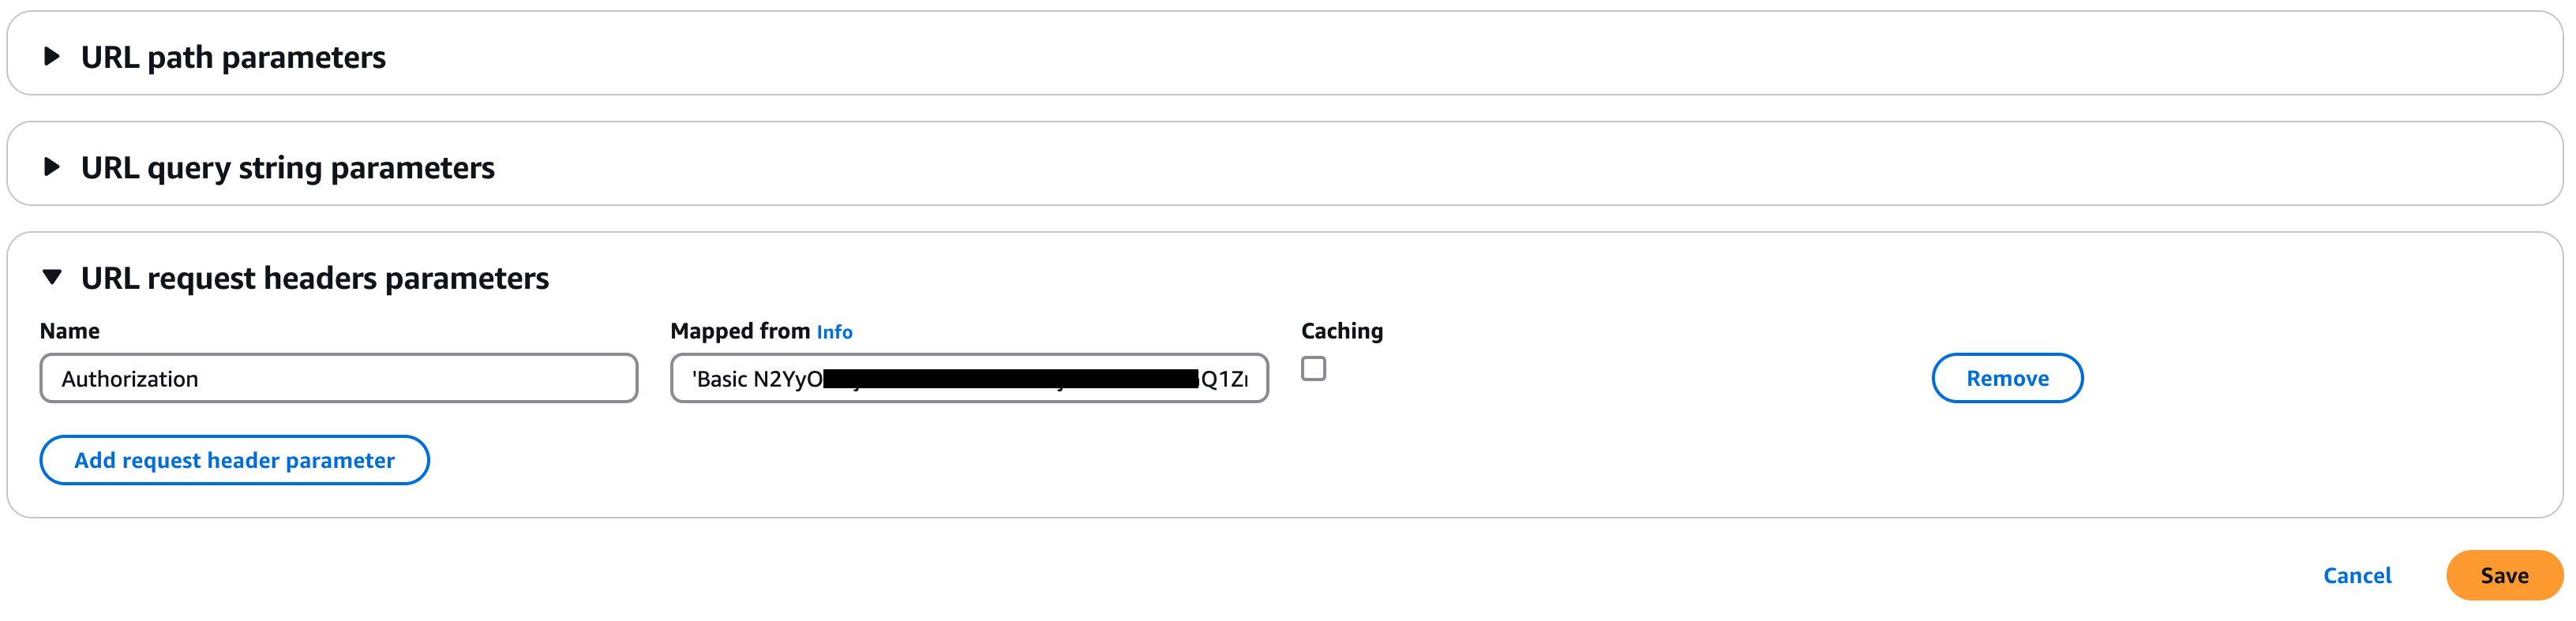
-
-
Add
X-Speke-Version: 2.0header if you are using Media Package V2. -
Save the changes.
-
-
Test the API configuration:
-
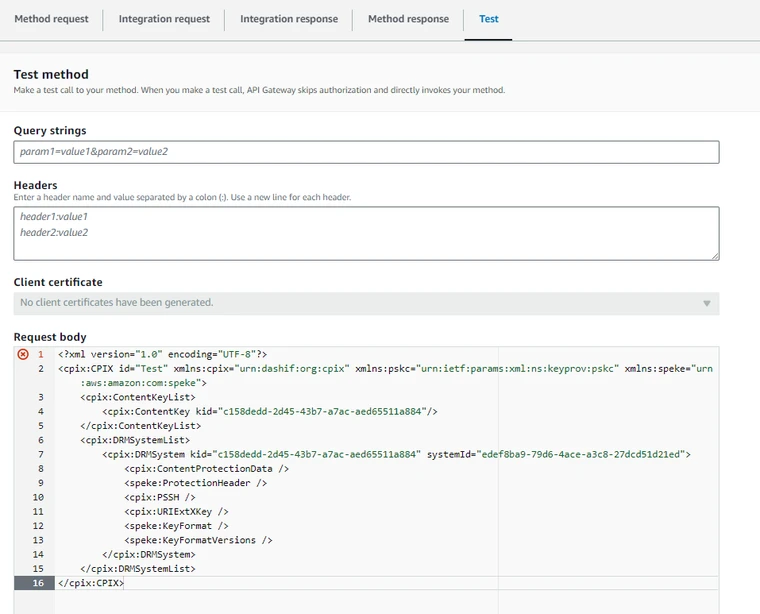
Choose TEST in the pane.
-
Paste a valid SPEKE request inside the Request Body box.
An example of a valid SPEKE v1 request
<?xml version="1.0" encoding="UTF-8"?><cpix:CPIX id="Test" xmlns:cpix="urn:dashif:org:cpix" xmlns:pskc="urn:ietf:params:xml:ns:keyprov:pskc" xmlns:speke="urn:aws:amazon:com:speke"><cpix:ContentKeyList><cpix:ContentKey kid="c158dedd-2d45-43b7-a7ac-aed65511a884"/></cpix:ContentKeyList><cpix:DRMSystemList><cpix:DRMSystem kid="c158dedd-2d45-43b7-a7ac-aed65511a884" systemId="edef8ba9-79d6-4ace-a3c8-27dcd51d21ed"><cpix:ContentProtectionData /><speke:ProtectionHeader /><cpix:PSSH /><cpix:URIExtXKey /><speke:KeyFormat /><speke:KeyFormatVersions /></cpix:DRMSystem></cpix:DRMSystemList></cpix:CPIX>note-
If you are using SPEKE V2, you can get a sample SPEKE 2.0 request from here.
-
For SPEKE 2.0 to work with MediaConvert, you need to add the following HTTP Header to your request:
X-Speke-Version: 2.0This header must inlcude in the Headers under the Test section.
-
When using Media Package V1, you have to add
X-Speke-Version: 2.0header, only for the testing purposes. Remember to remove it after this test.
-
Choose Test.
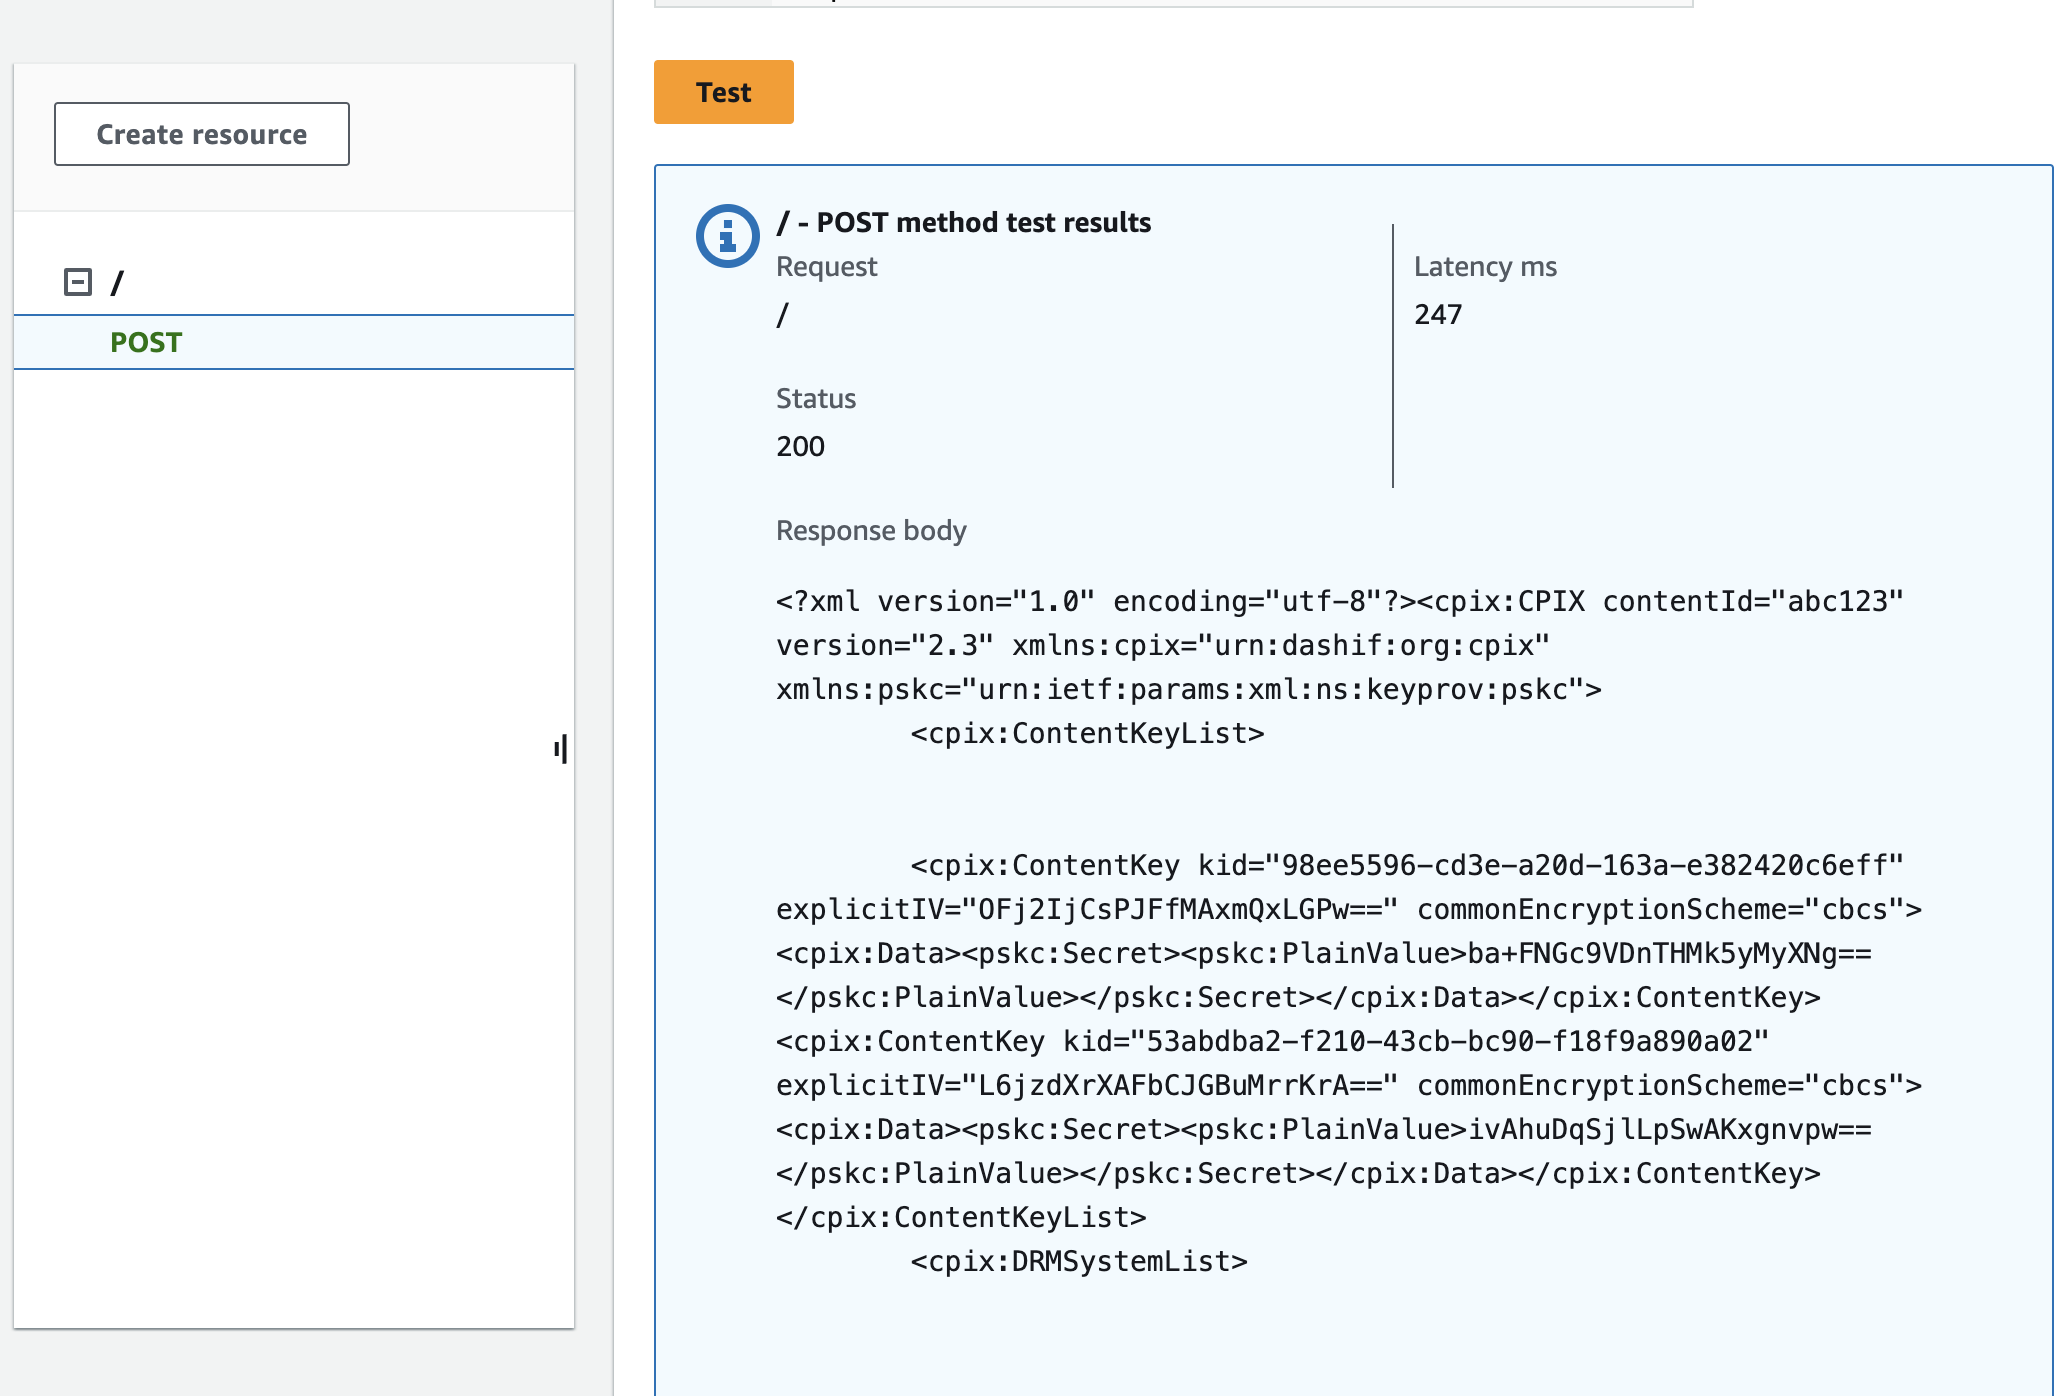
- If the configuration is correct and a valid SPEKE request was provided, Axinom Key Service returns 200 OK with the SPEKE response in the response body.
- If there’s an issue with authentication then Axinom Key Service returns 401 Unauthorized. In that case, check that the authorization header under URL request headers parameters, contains a valid Base64-encoded string as explained.
-
-
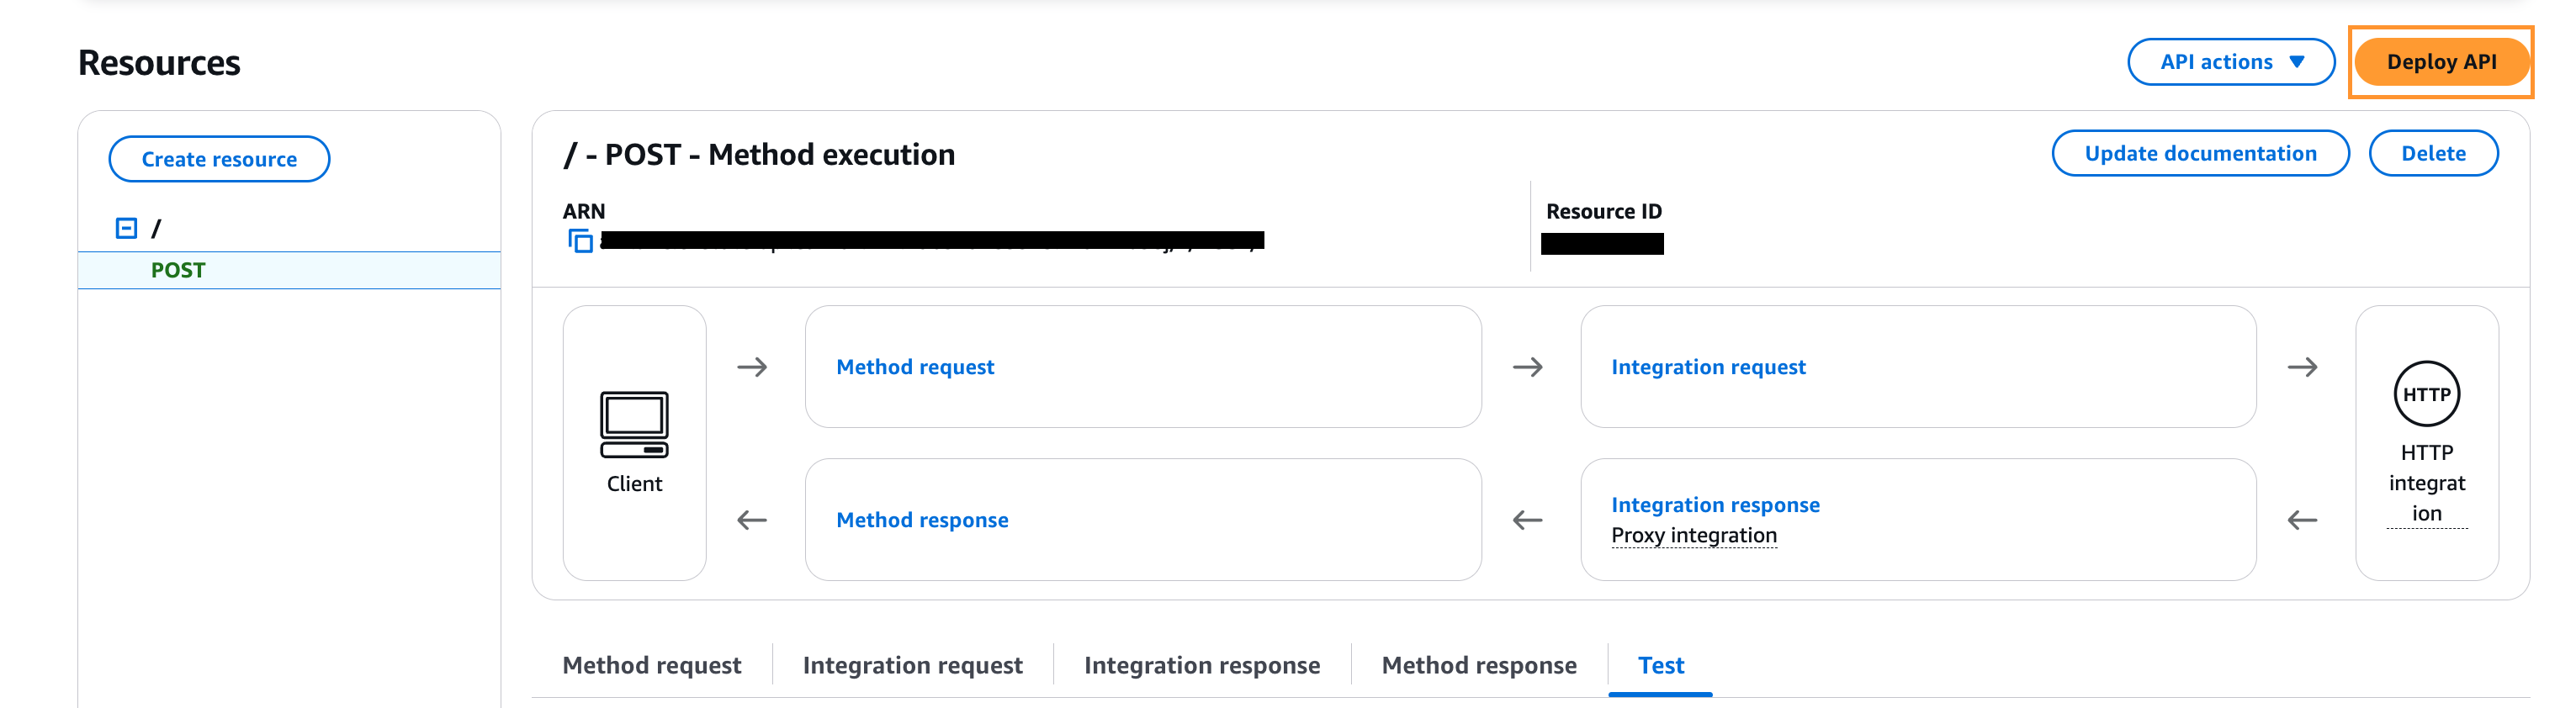
Deploy the API:
-
Click Deploy API.
-
Deployment stage: [New Stage].
-
Stage name: "TestStage".
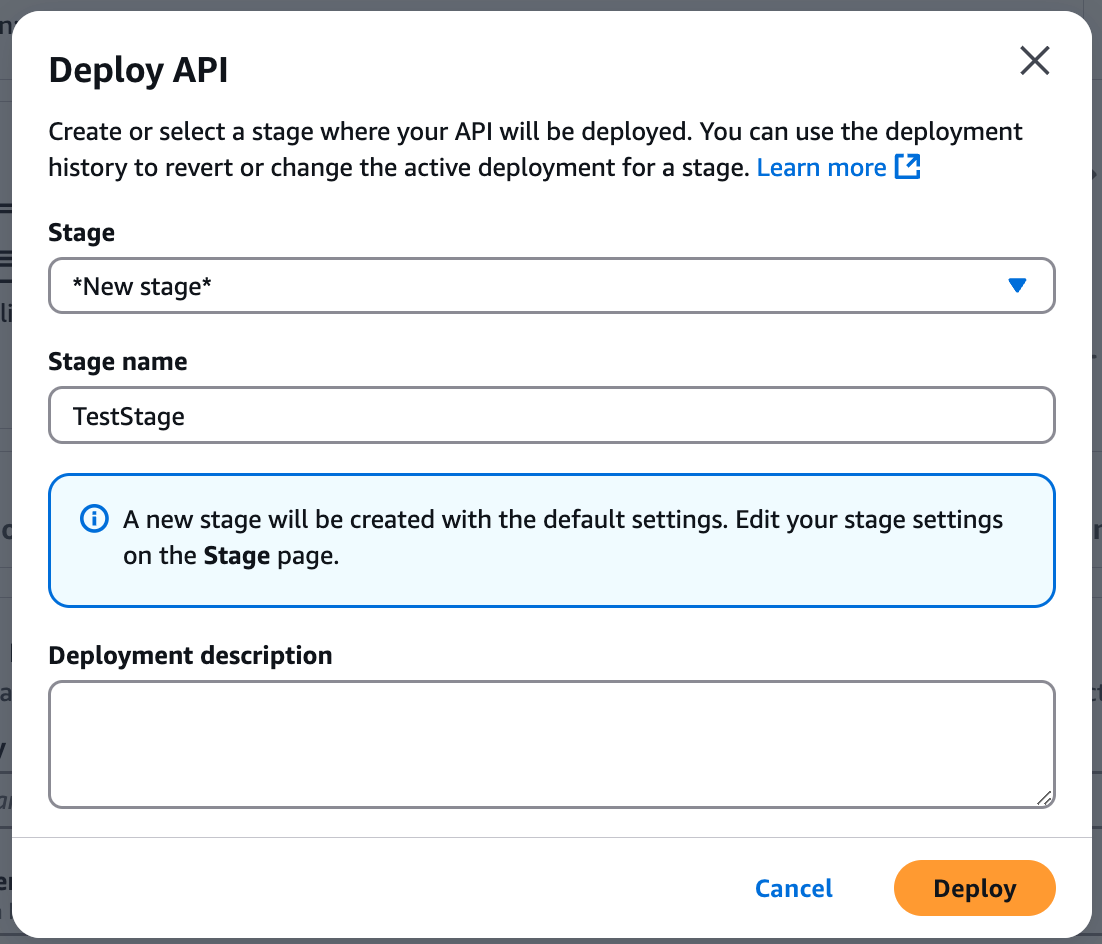
-
Choose Deploy.
- If the configuration is later changed, the API should be redeployed for the update to be visible to other services.
-
Note down the API Invoke URL. This is provided to AWS media services as the key service URL.

-
Setting up the Identity and Access Management Role
Before configuring MediaConvert and MediaPackage, it is necessary to create an Identity and Access Management (IAM) role that allows to call the API Gateway.
-
Open the AWS IAM console at https://console.aws.amazon.com/iam.
-
Create a new role:
-
Choose Roles from the left menu.
-
Click Create role.
-
For both MediaConvert and MediaPackage(we use a modified MediaConvert role since MediaPackage doesn’t have a suitable default role):
- Select AWS service entity type -> MediaConvert service -> MediaConvert use case.

-
Click Next -> Next.
-
Provide role information:
-
MediaConvert
-
Role name: "MediaConvertRole".
-
Description: "Allows MediaConvert service to call S3 APIs and API Gateway on your behalf."
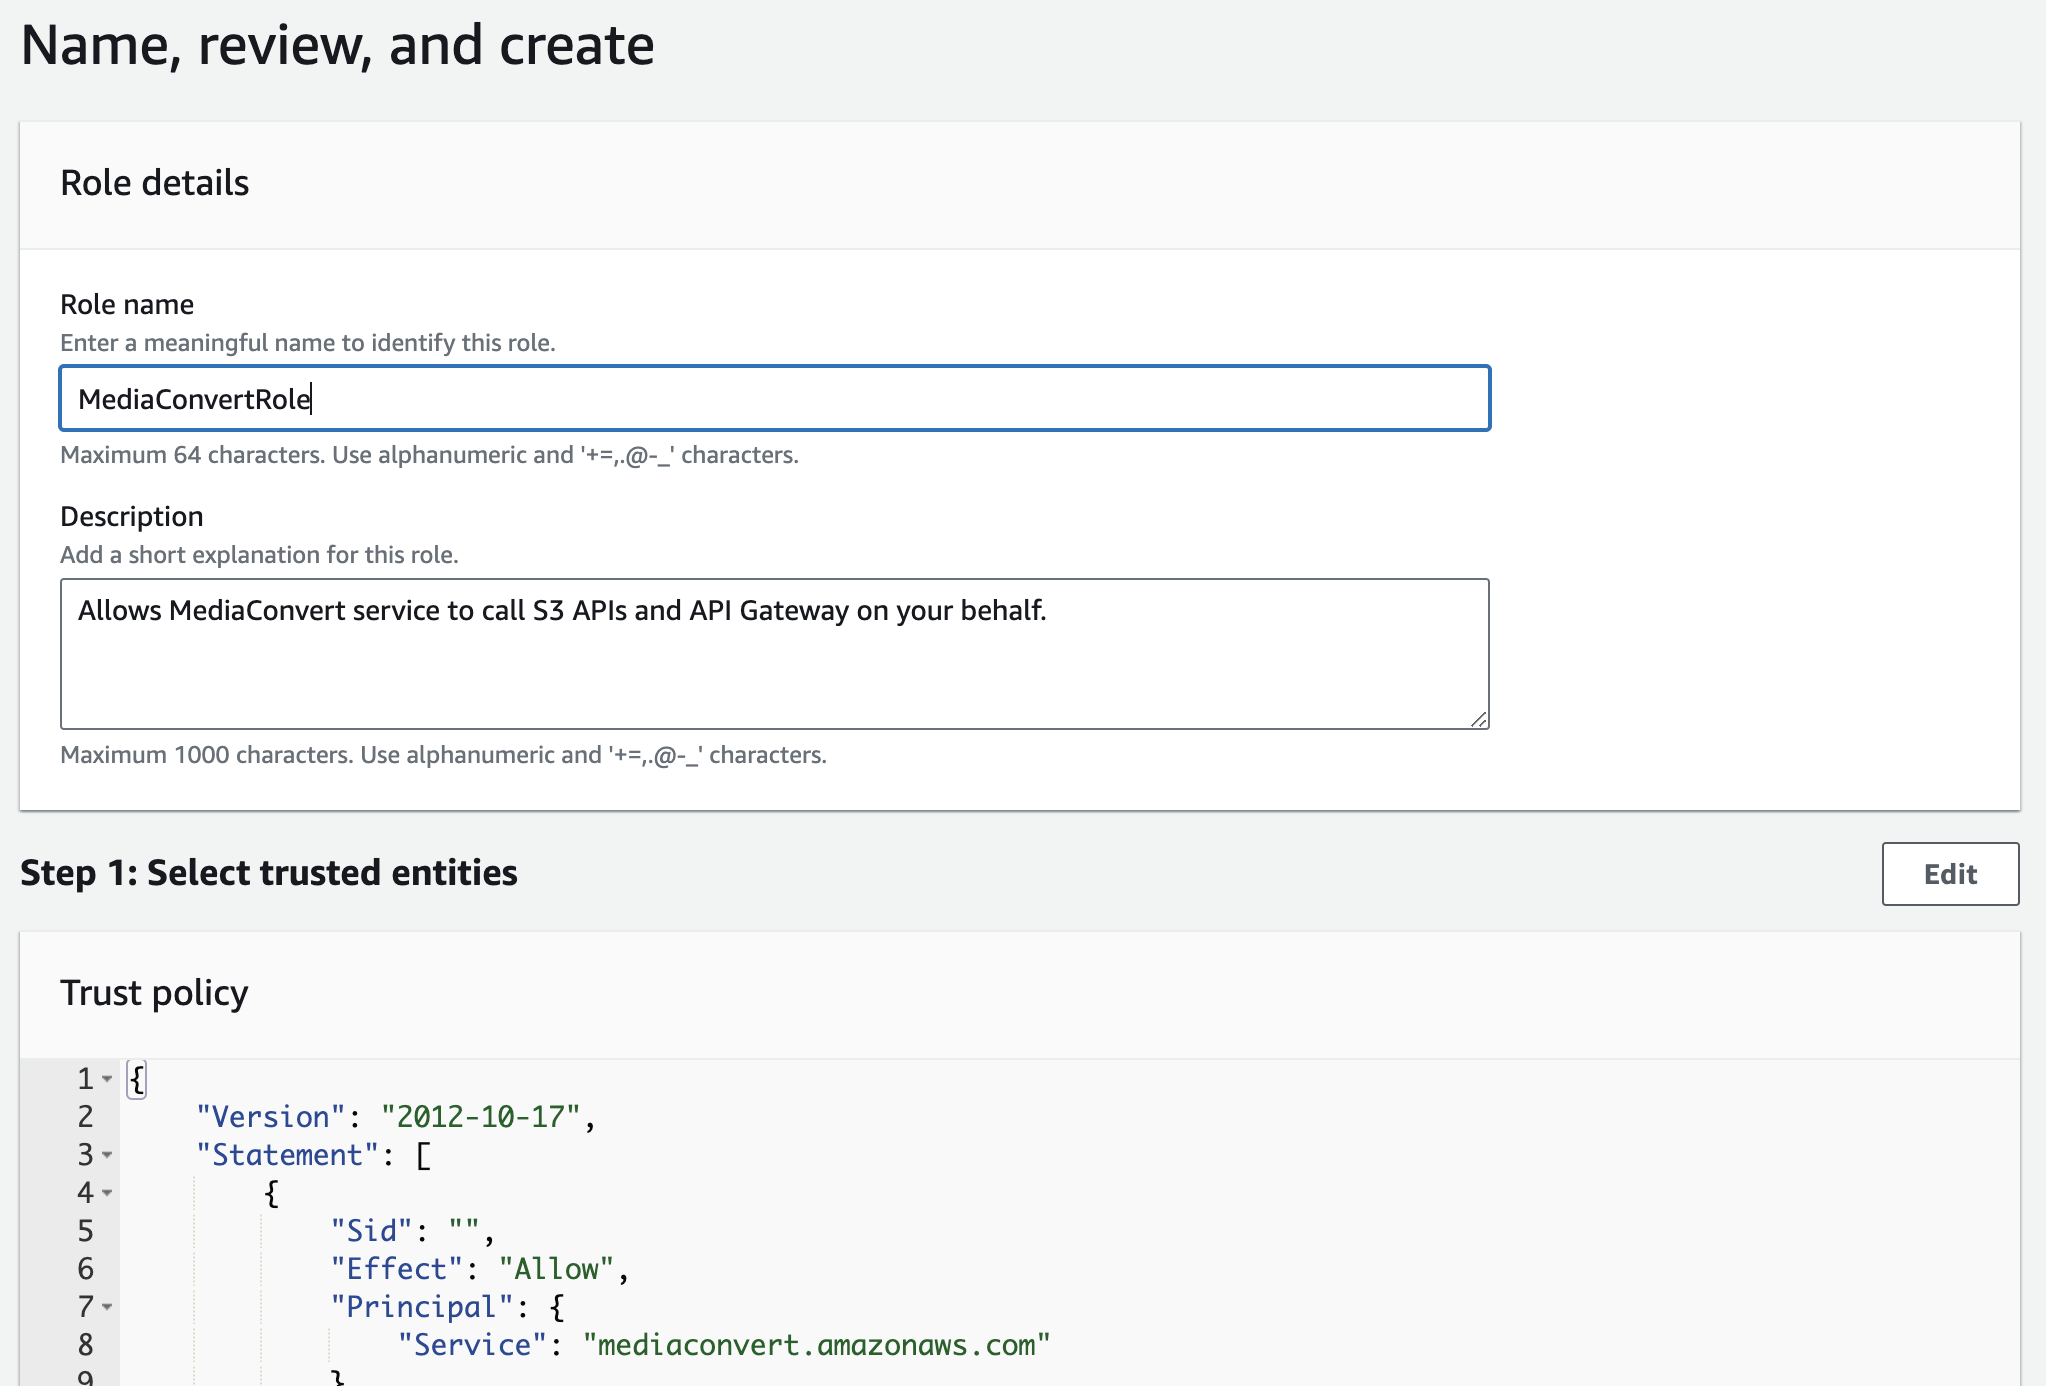
-
Click Create role.
-
Note down the MediaConvertRole Role ARN.
-
-
MediaPackage
-
Role name: "MediaPackageRole".
-
Description: "Allows MediaPackage to call API Gateway on your behalf."
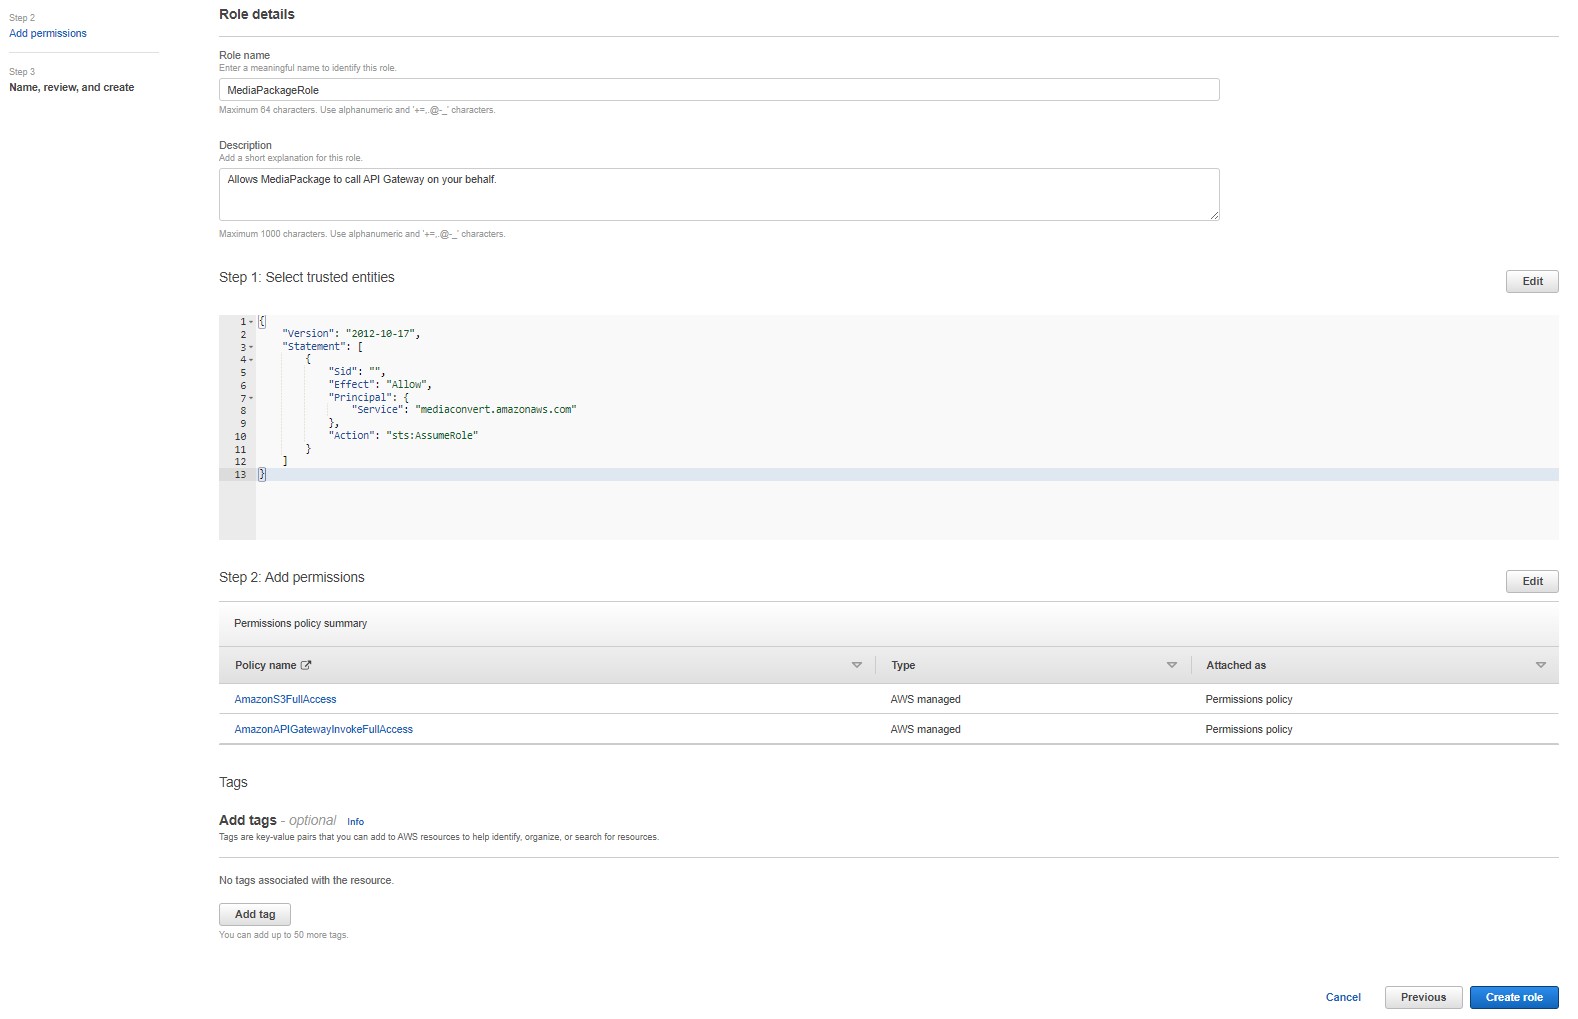
-
Choose Create role.
-
Configure the role:
-
Select the new MediaPackageRole from the list of existing roles.
-
Choose the Trust relationships tab.
-
Choose Edit trust relationships.
-
Replace "mediaconvert.amazonaws.com" in the JSON with "mediapackage.amazonaws.com".
-
If you are using Media Package V2, add "mediapackagev2.amazonaws.com".
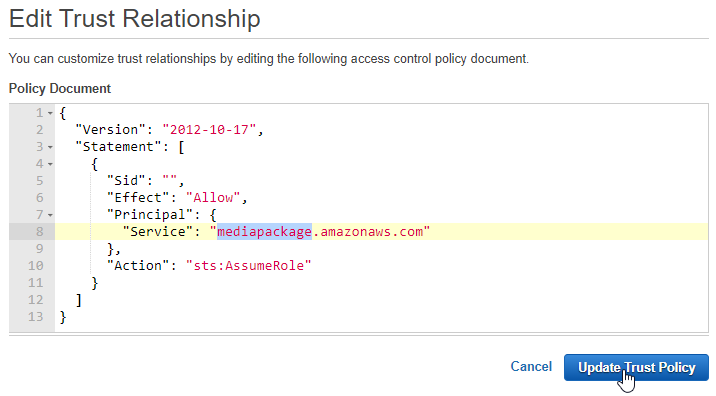
-
Choose Update Trust Policy.
-
-
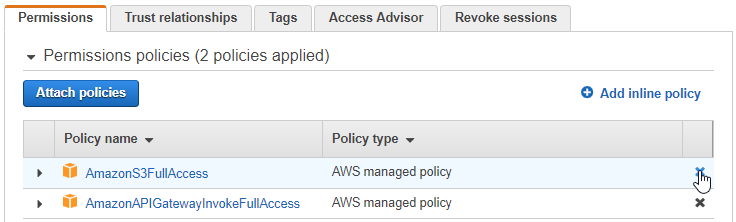
Choose the Permissions tab.
-
Detach the AmazonS3FullAccess policy. For this demo, MediaPackage doesn’t need S3 access.
-
-
-
Note down the MediaPackageRole Role ARN.

-
-
-