Integrating Axinom DRM with AWS MediaConvert
Introduction
This guide is aimed at Axinom’s customers who want to create DRM encrypted content with AWS MediaConvert. It demonstrates how to encode a video and apply DRM protection to it.
This guide outlines the main integration points with Axinom DRM and is intended to support your implementation efforts. For production use, we strongly recommend consulting the official AWS documentation to ensure best practices and a secure, scalable setup are followed.
Pre-Requisites
The prerequisites for integrating Axinom DRM Key Service with AWS MediaConvert are:
- Access to Amazon Web Services (AWS)
- A video file in the mp4 format in an AWS S3 bucket
- Setup an API Gateway endpoint to handle SPEKE key requests (Refer: Setting up the AWS API Gateway)
- Setup an IAM role that allows MediaConvert to invoke API Gateway.(Refer: Setting up the Identity and Access Management Role)
Setting up MediaConvert
MediaConvert allows encoding Video on Demand (VOD) content while applying DRM protection to it. This chapter shows how to create a simple DRM-protected MediaConvert job with an mp4 video input.
-
Open the AWS MediaConvert console at https://console.aws.amazon.com/mediaconvert.
-
Create a new MediaConvert job by clicking Get started under Create a job section.

-
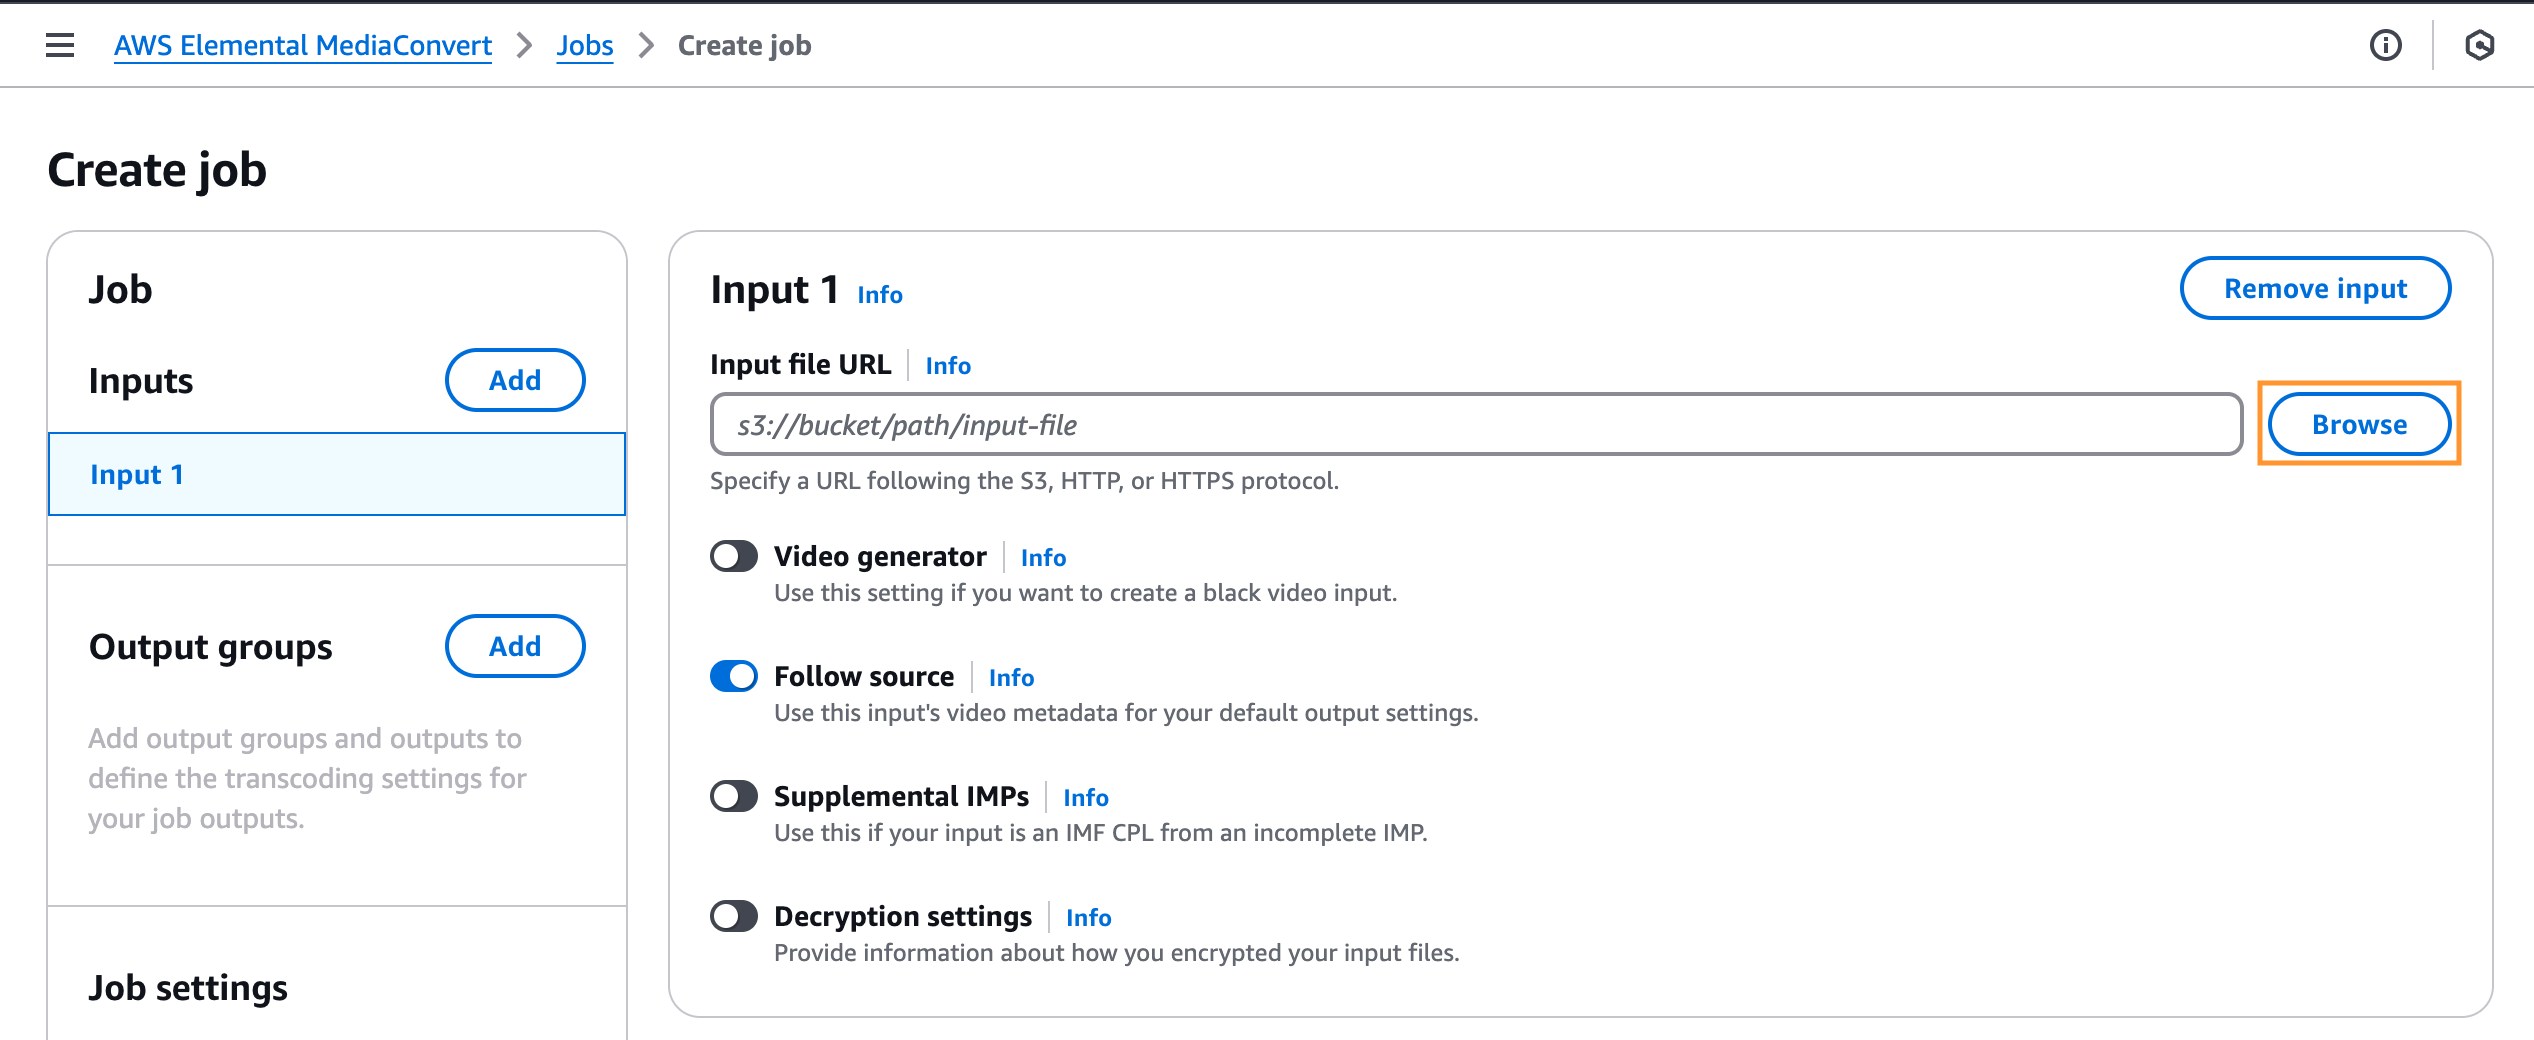
In the Input pane, click Browse and choose an input file from an S3 bucket.
-
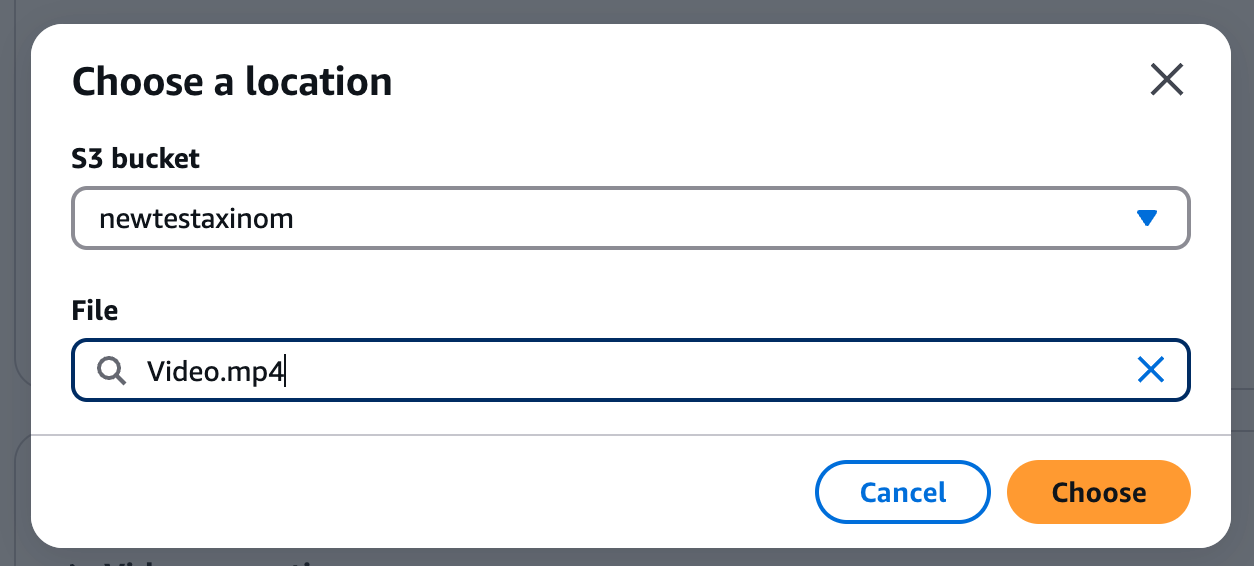
From the S3 bucket menu, choose the location of the input file by clicking the drop-down arrows. Once the file is chosen, click Choose.
-
-
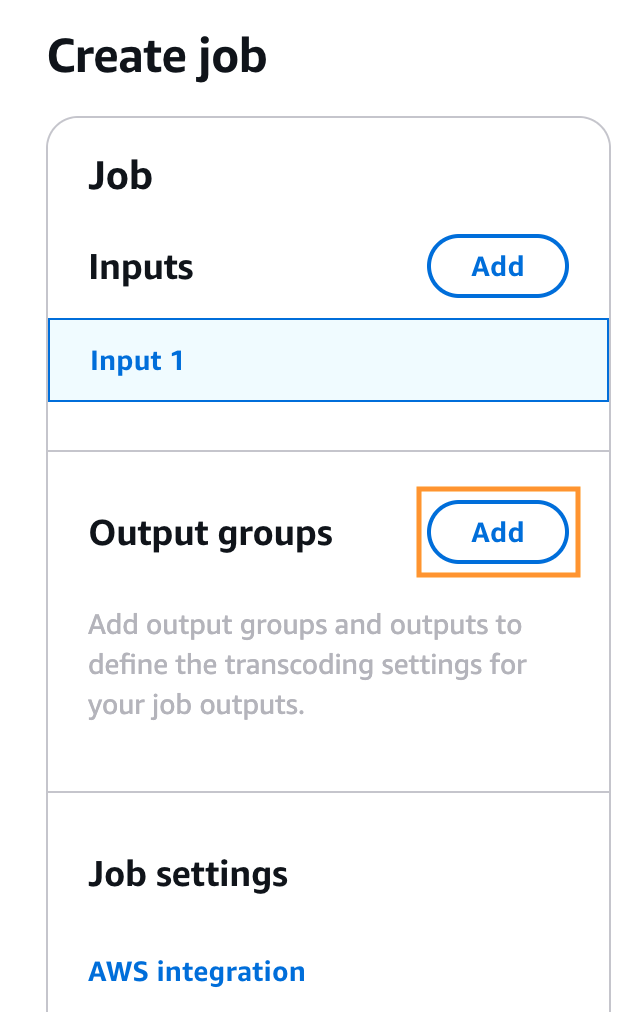
In the Create job pane, in the Output groups section, click add to add an output group. Output groups are different files that are present once the job finishes. Most output groups are audio or video files.
-
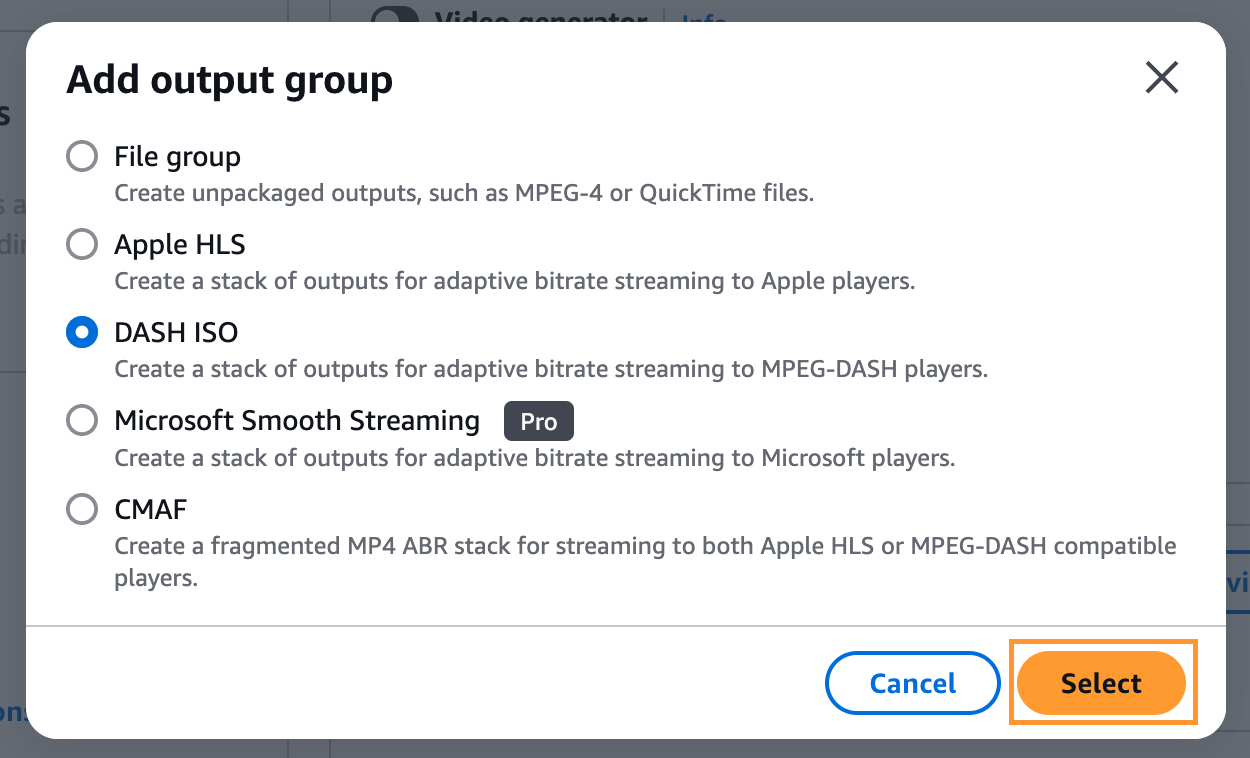
From the list in the Add output group, choose the preferred output group and then click Select. In this example we are selecting DASH ISO.
 tip
tipOur recommendation for generating Output content from AWS media convert Widevine, PlayReady and FairPlay.
If CMAF in the CBCS scheme is used, Axinom will support all three SystemIDs(Widevine, PlayReady, FairPlay). However, this combination is not widely used, and only a few PlayReady devices support the CBCS scheme. Therefore, the most widely used approach is to have two output groups in AWS. This could be DASH ISO + Apple HLS or DASH ISO + CMAF in AWS MediaConvert. By having two output groups, we can cover all the possibilities.
To explain further, Apple FairPlay only supports CBCS and HLS, while PlayReady is widely available for DASH with CENC. Widevine can support DASH/HLS and both CENC/CBCS. So, to reach a maximum audience, it is best to have two endpoints. In common practice, we could use DASH+CENC for PlayReady and CMAF+CBCS for Widevine and Fairplay.
-
-
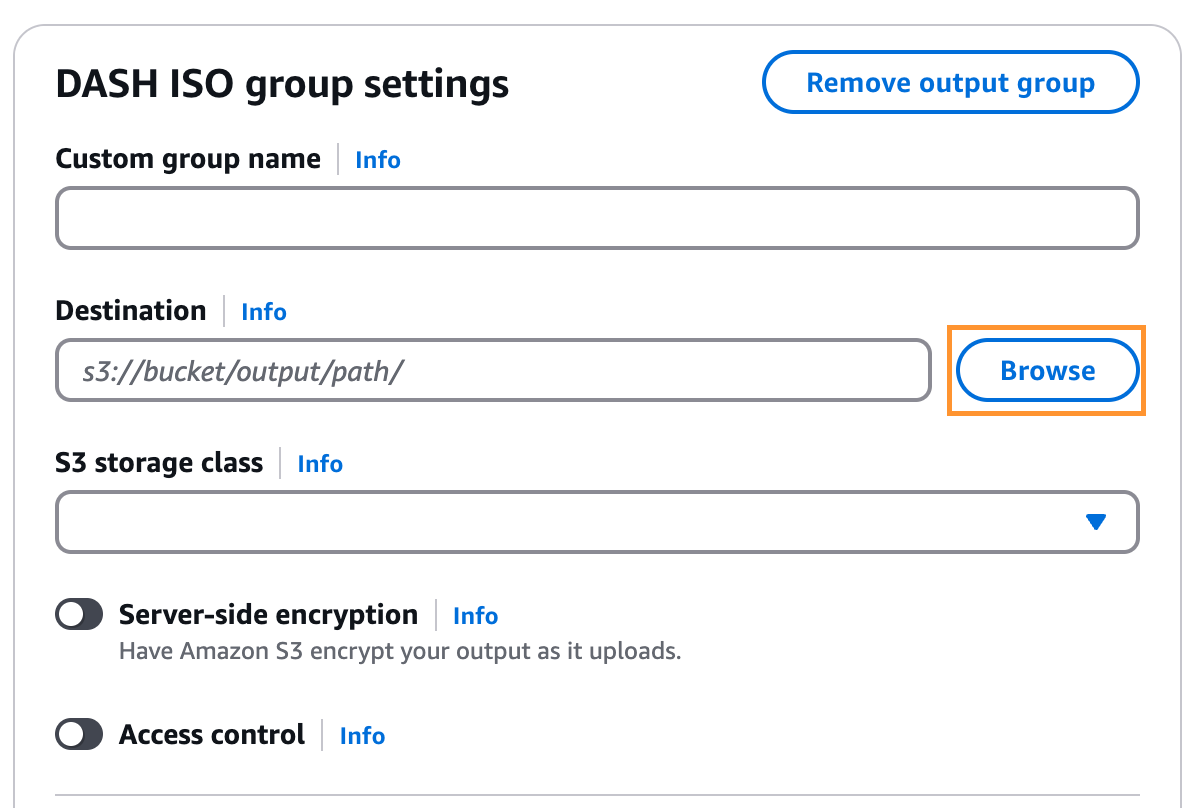
In the group settings of the relavent output group next to the Destination value, click Browse and select a destination for the output of the convert job.
-
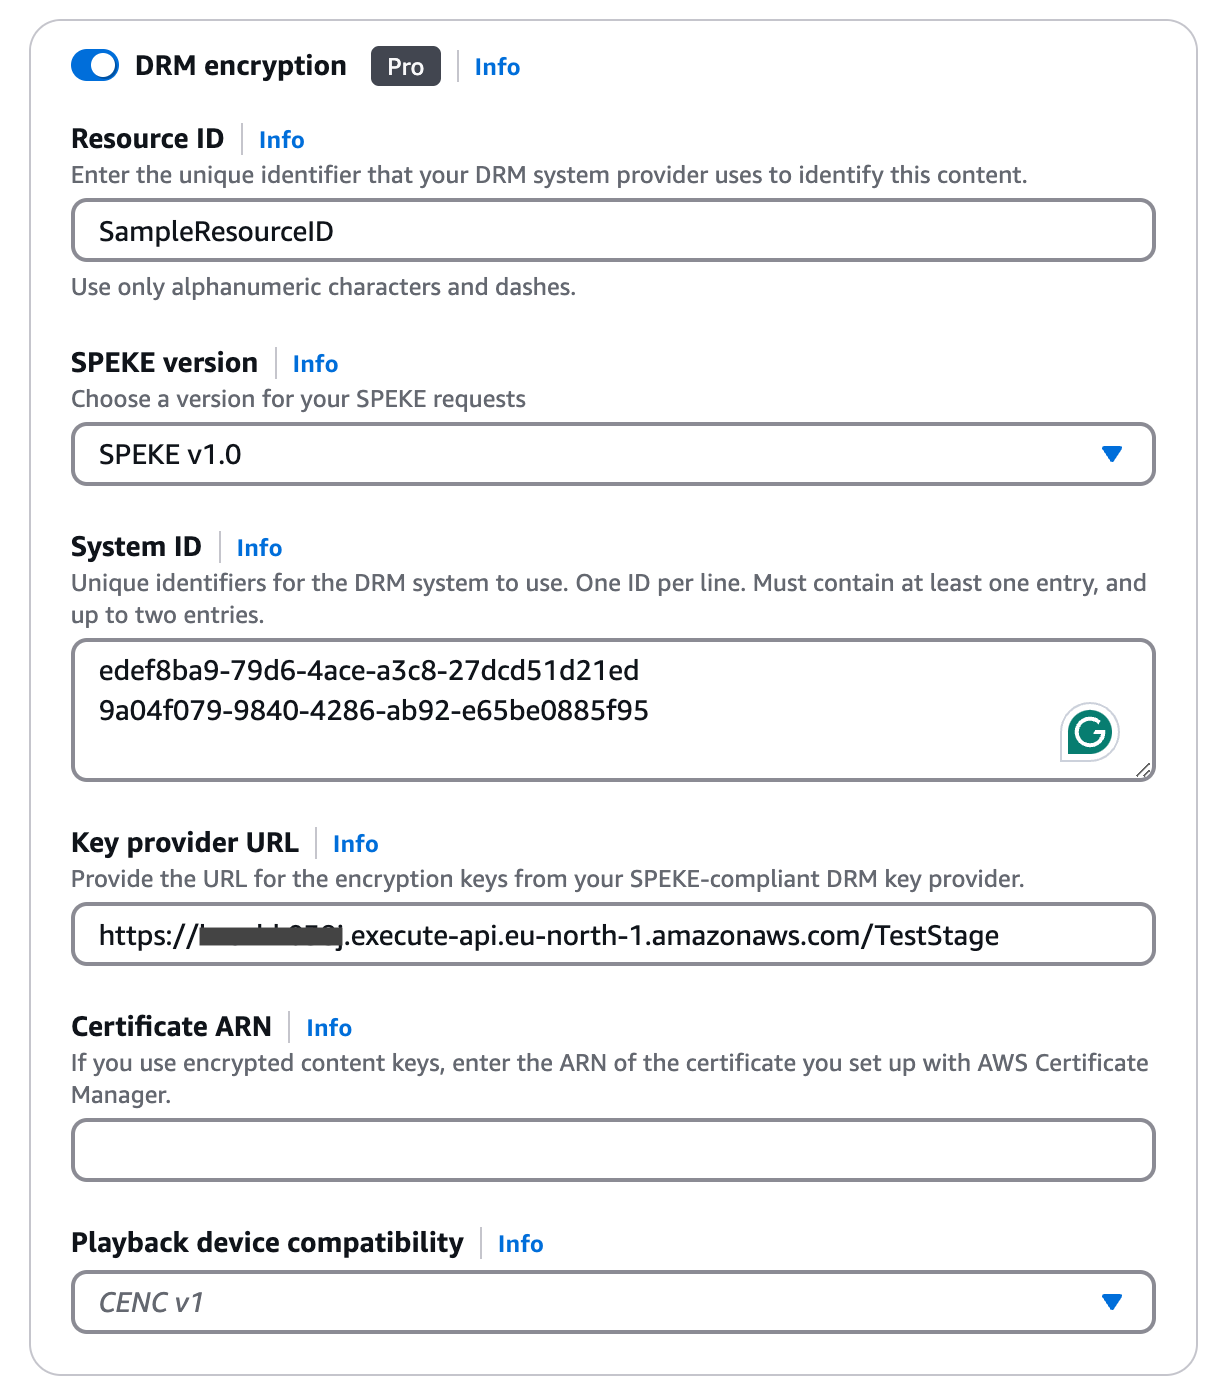
Add DRM information by clicking the small slider next to DRM encryption and fill in the following fields.
-
If you choose DASH ISO as the output group in the previous step, you need to pass a Resource ID, System ID and Key provider URL.
-
Resource ID is an arbitrary value that MediaPackage uses to generate content key IDs. Enter any value, e.g. "SampleResourceID". It will be passed in the CPIX document on the root element in the attribute "id".
-
System ID is a DRM system-specific identifier, see DRM systems. AWS MediaConvert does not allow more than two entries.
-
Key provider URL- use the Invoke URL created in the Setting up the AWS API Gateway.
noteIf you are using SPEKE V2, SPEKE version as SPEKE v2.0 from the drop down
-
Other settings can be left to defaults.
-
-
If you choose Apple HLS as the output group in the previous step, you need to select the "Encryption method" from the drop down in the DRM encryption section. Select "Sample AES" from the drop down where "AES-128" method cannot be used with FairPlay.
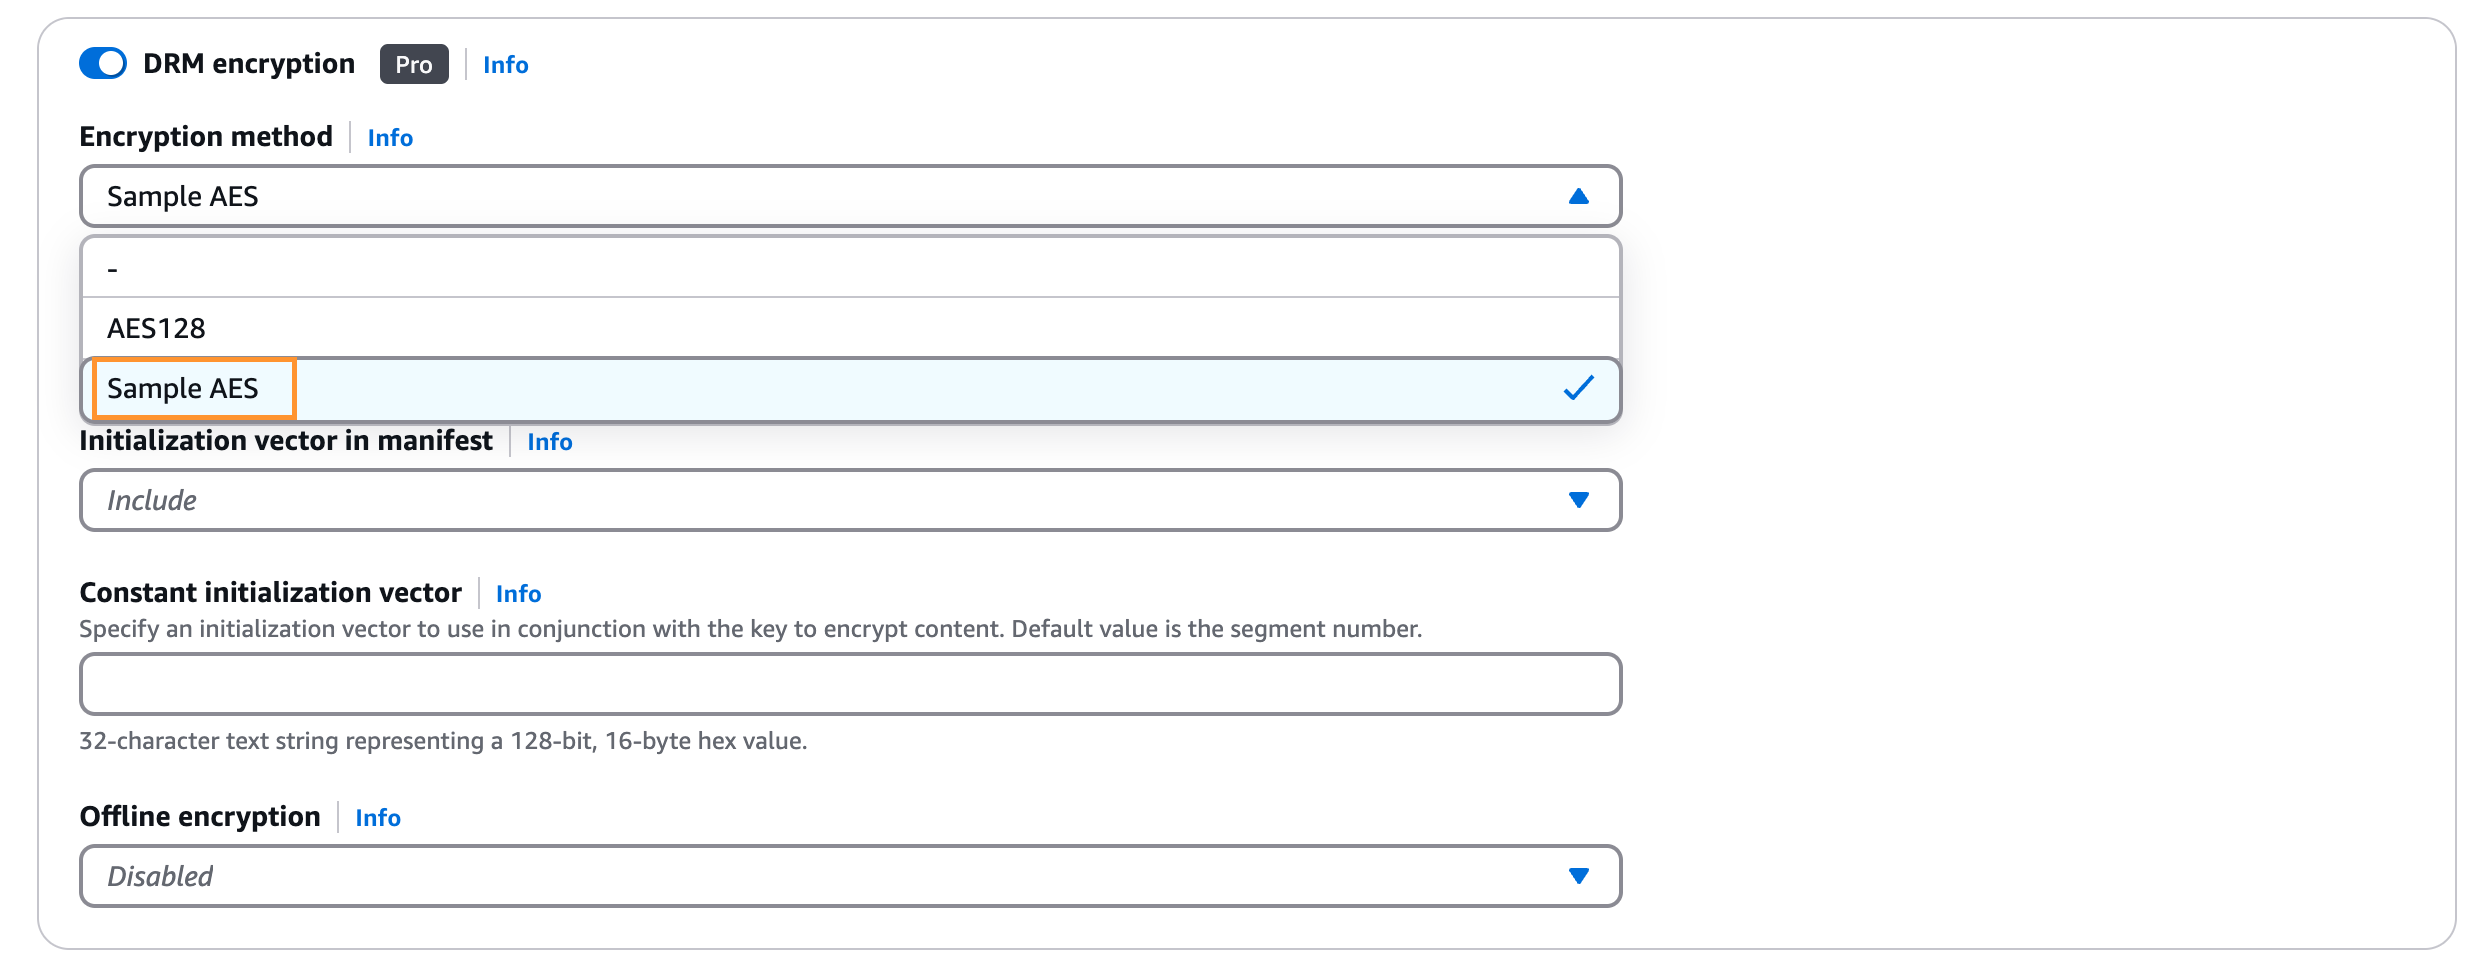
- Initialization Vector is a drop-down for you to decide whether you need to include the 128-bit encryption initialization vector in the HLS and DASH manifests.
- Constant initialization vector is an optional value. You can provide a 128-bit, 16-byte hex value represented by a 32-character text string. If this parameter is not set then the Initialization Vector will follow the segment number by default.
-
If you choose CMAF as the output group in the previous step and If you are using SPEKE V1, with the encryption method 'AES-CBC subsample', the optional 'protectionScheme' parameter in the Key Service URL must be set to 'cbcs' as below. This Key Service URL is needed when setting up the API Gateway.(under Setting up the AWS API Gateway). If you are using the Key Override functionality, please use the
overrideKeyIds=trueparameter too.SPEKE V1:
https://key-server-management.axprod.net/api/Speke?protectionScheme=cbcs
-
-
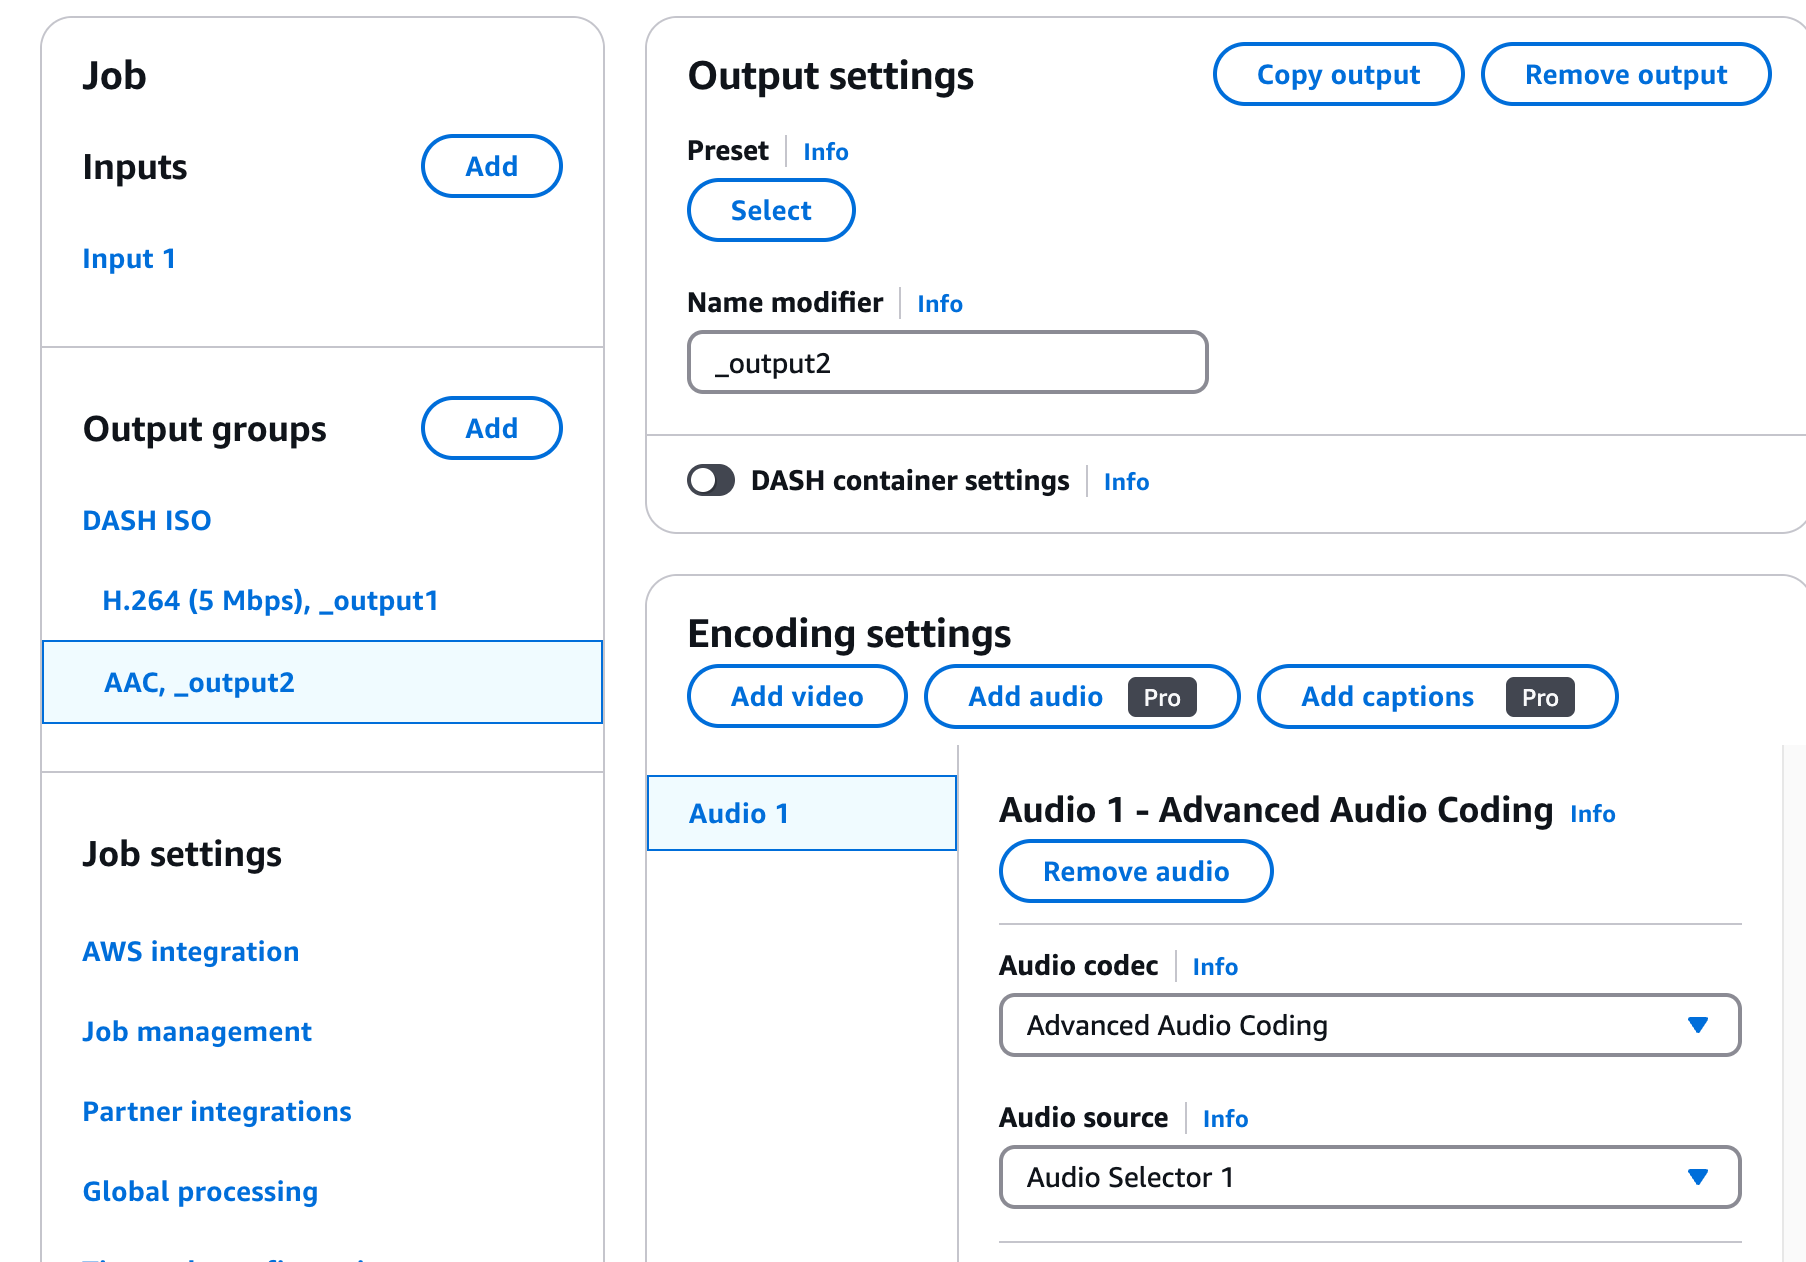
At the bottom of the page, you can see two default outputs for audio and video in the Outputs section. Having separate outputs for audio and video is a standard practice in the streamed media that many players require.
- If you want to add another output, click Add output and add a "Name modifier".
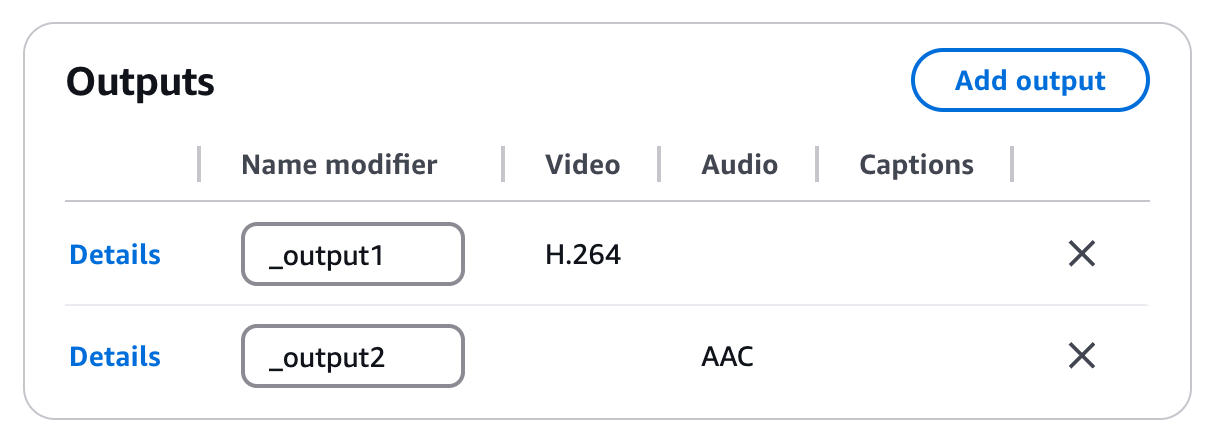
- If you want to add another output, click Add output and add a "Name modifier".
-
In the Output groups section, click H.264,_0utput1.

- You can select Video codec, and other video settings here.
- Make sure Bitrate (bits/s) is defined. You can use "5000000", for example.

-
In the Output groups section, click AAC_output2 and select the audio settings.
-
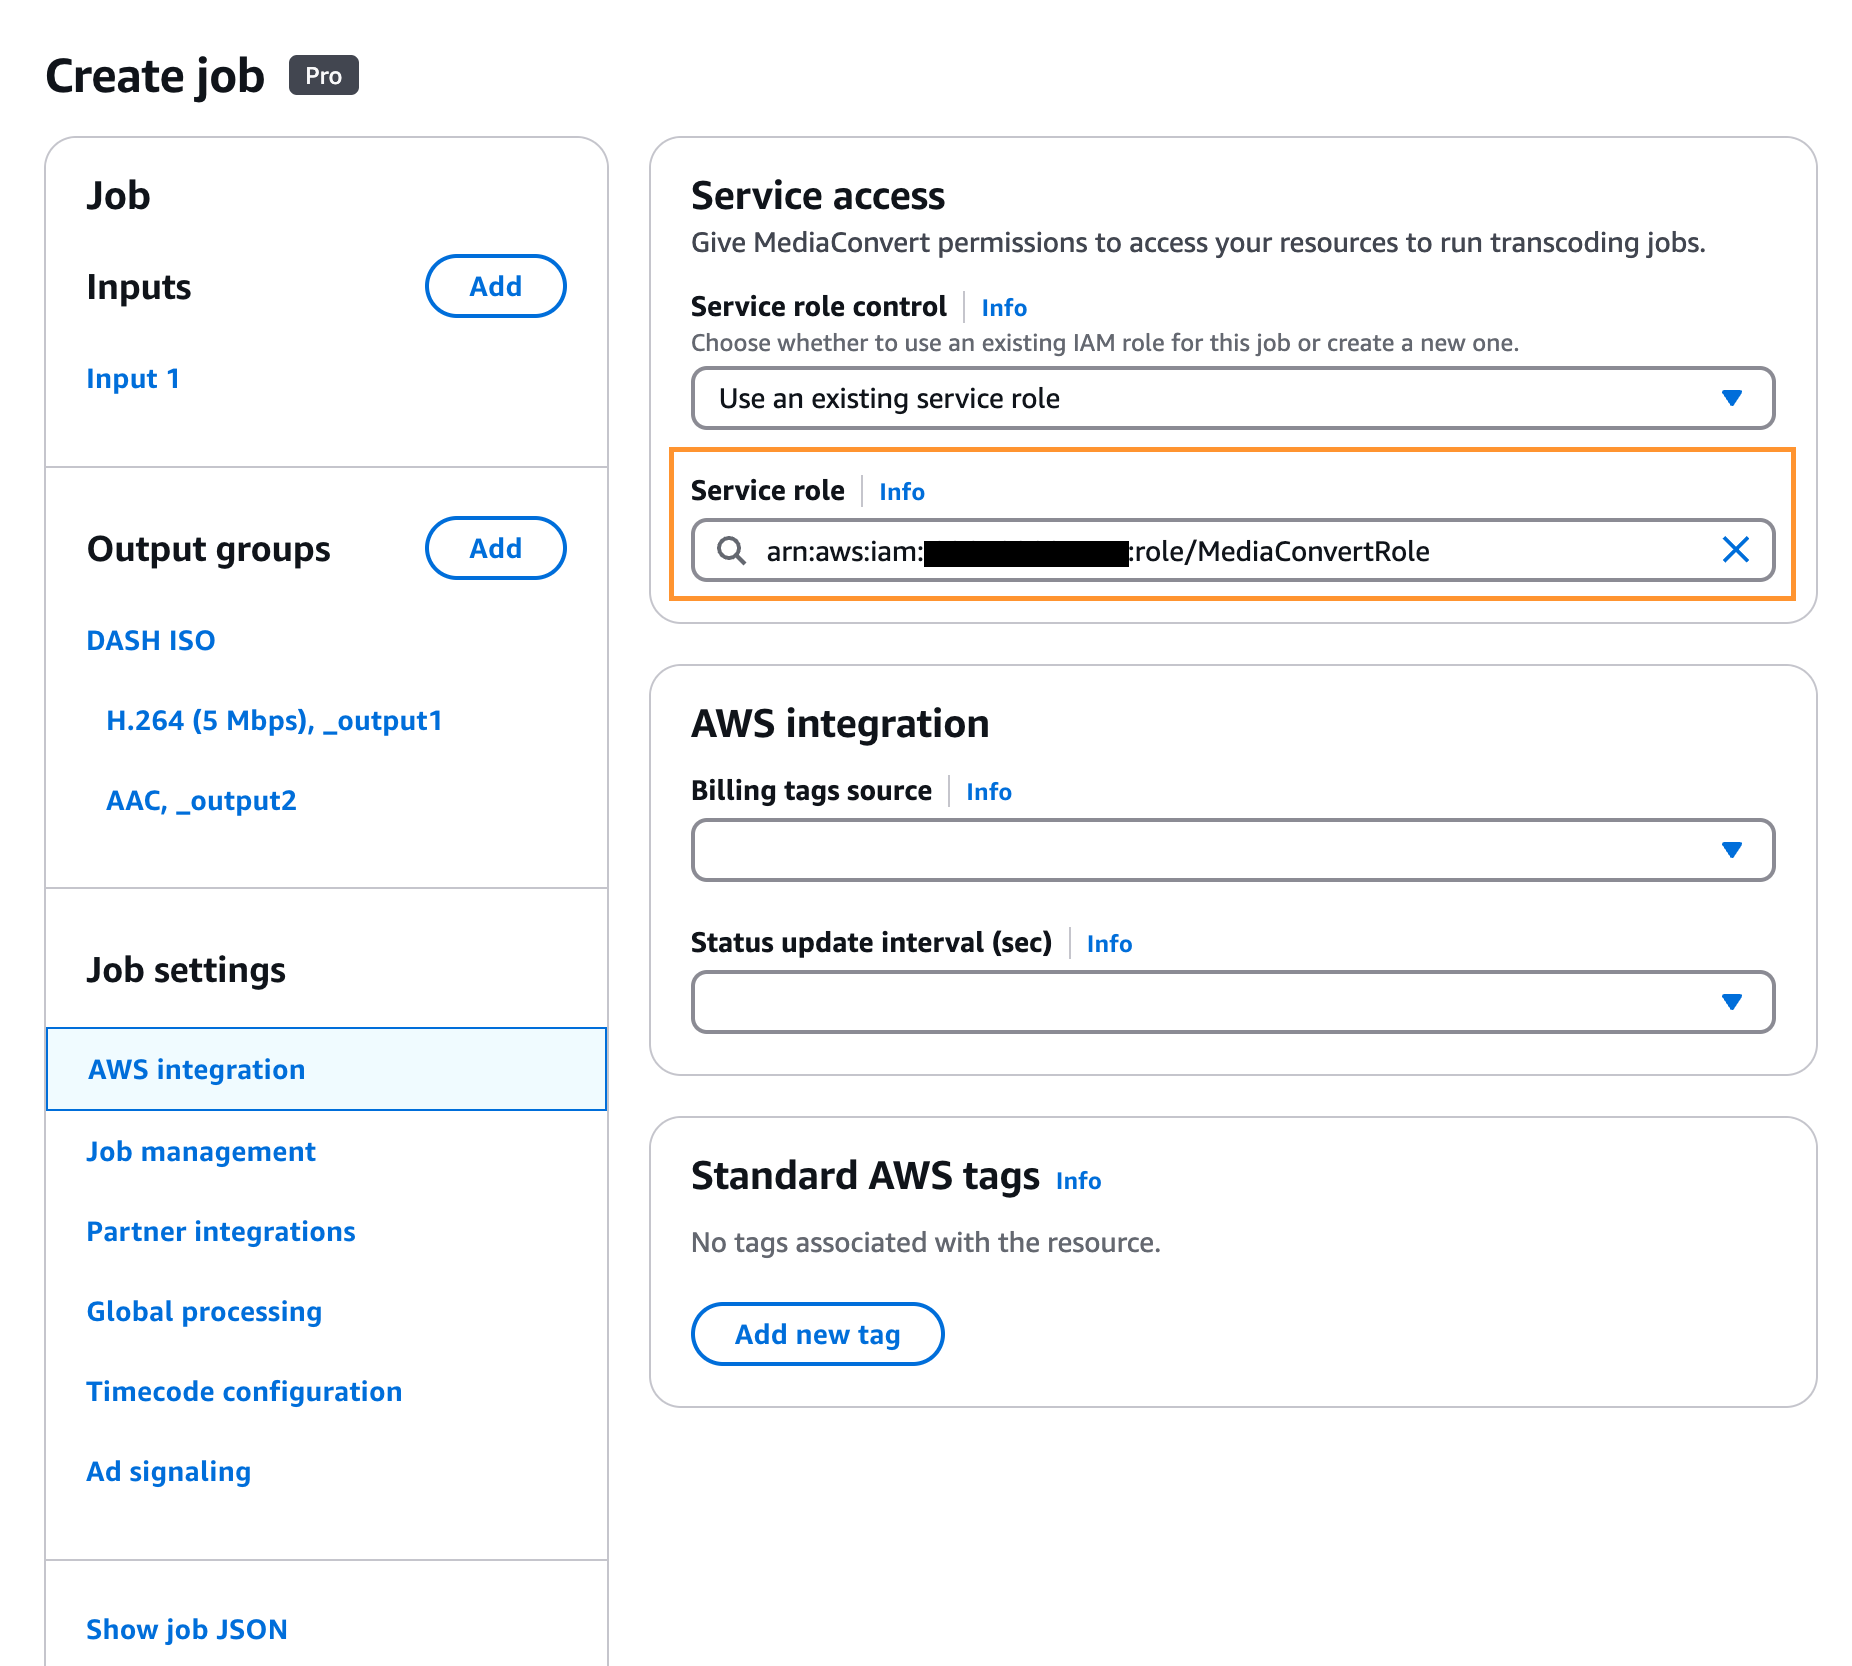
In the Job settings section, click AWS integration and add the IAM role by clicking the drop-down labeled Service role and choose the role created in Setting up the Identity and Access Management Role.
-
-
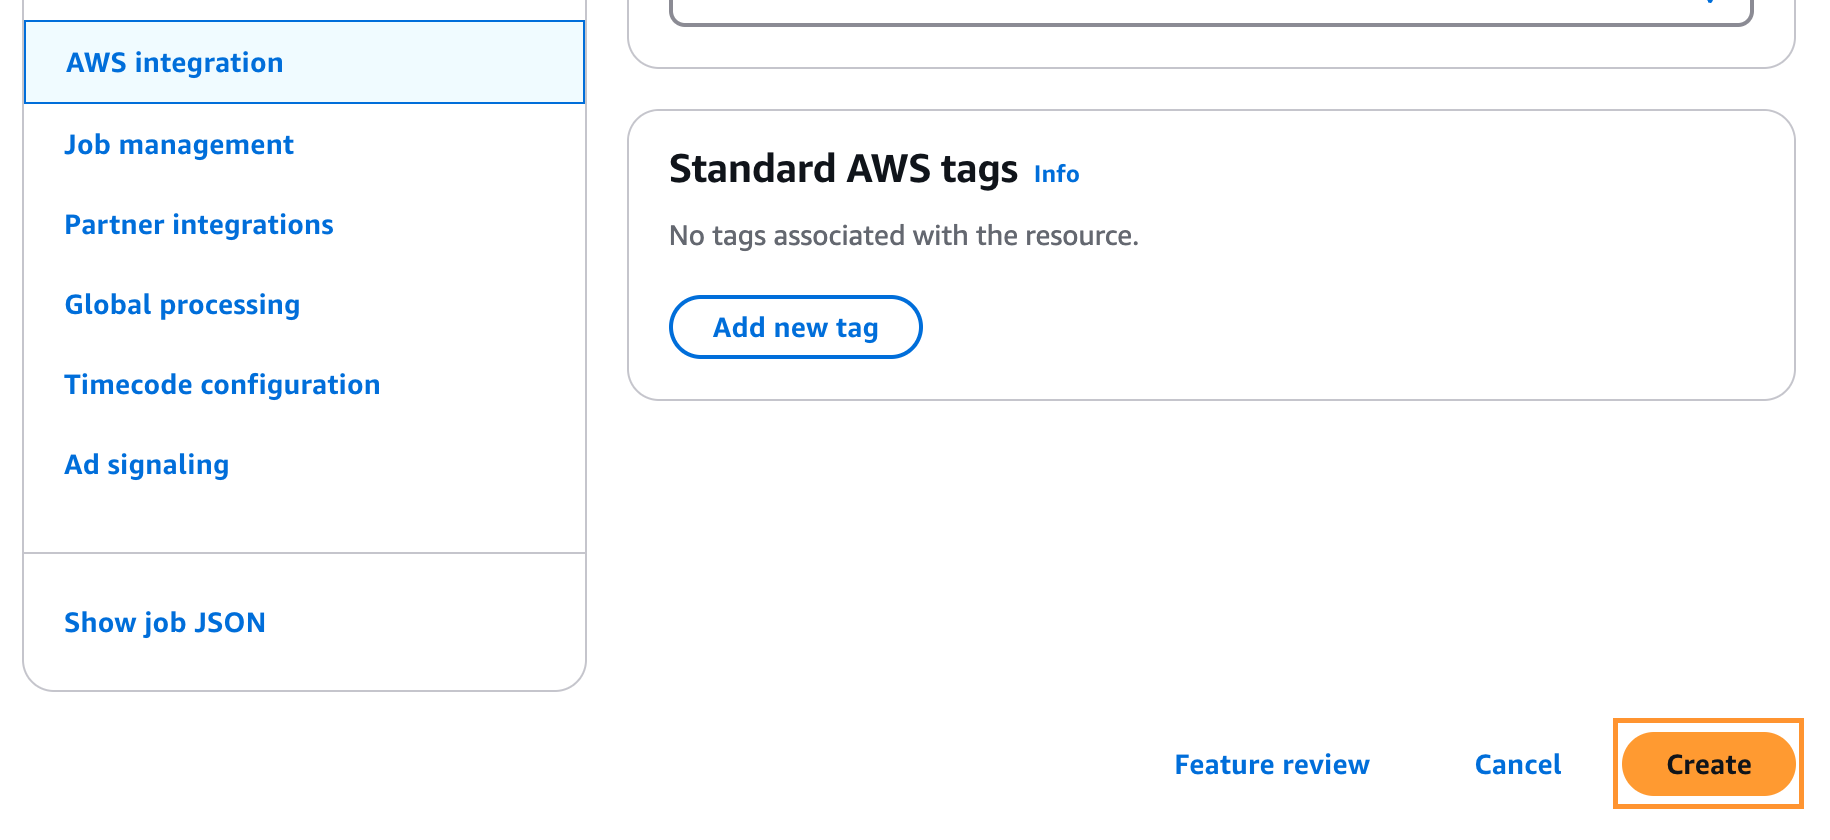
To create an encoding job, click Create in the bottom-right of the page.
-
The page that opens displays the "Submitted" job status. Wait for some time and reload the page by clicking the Refresh button. The time that it takes for the MediaConvert job to complete depends on the size of the input file.
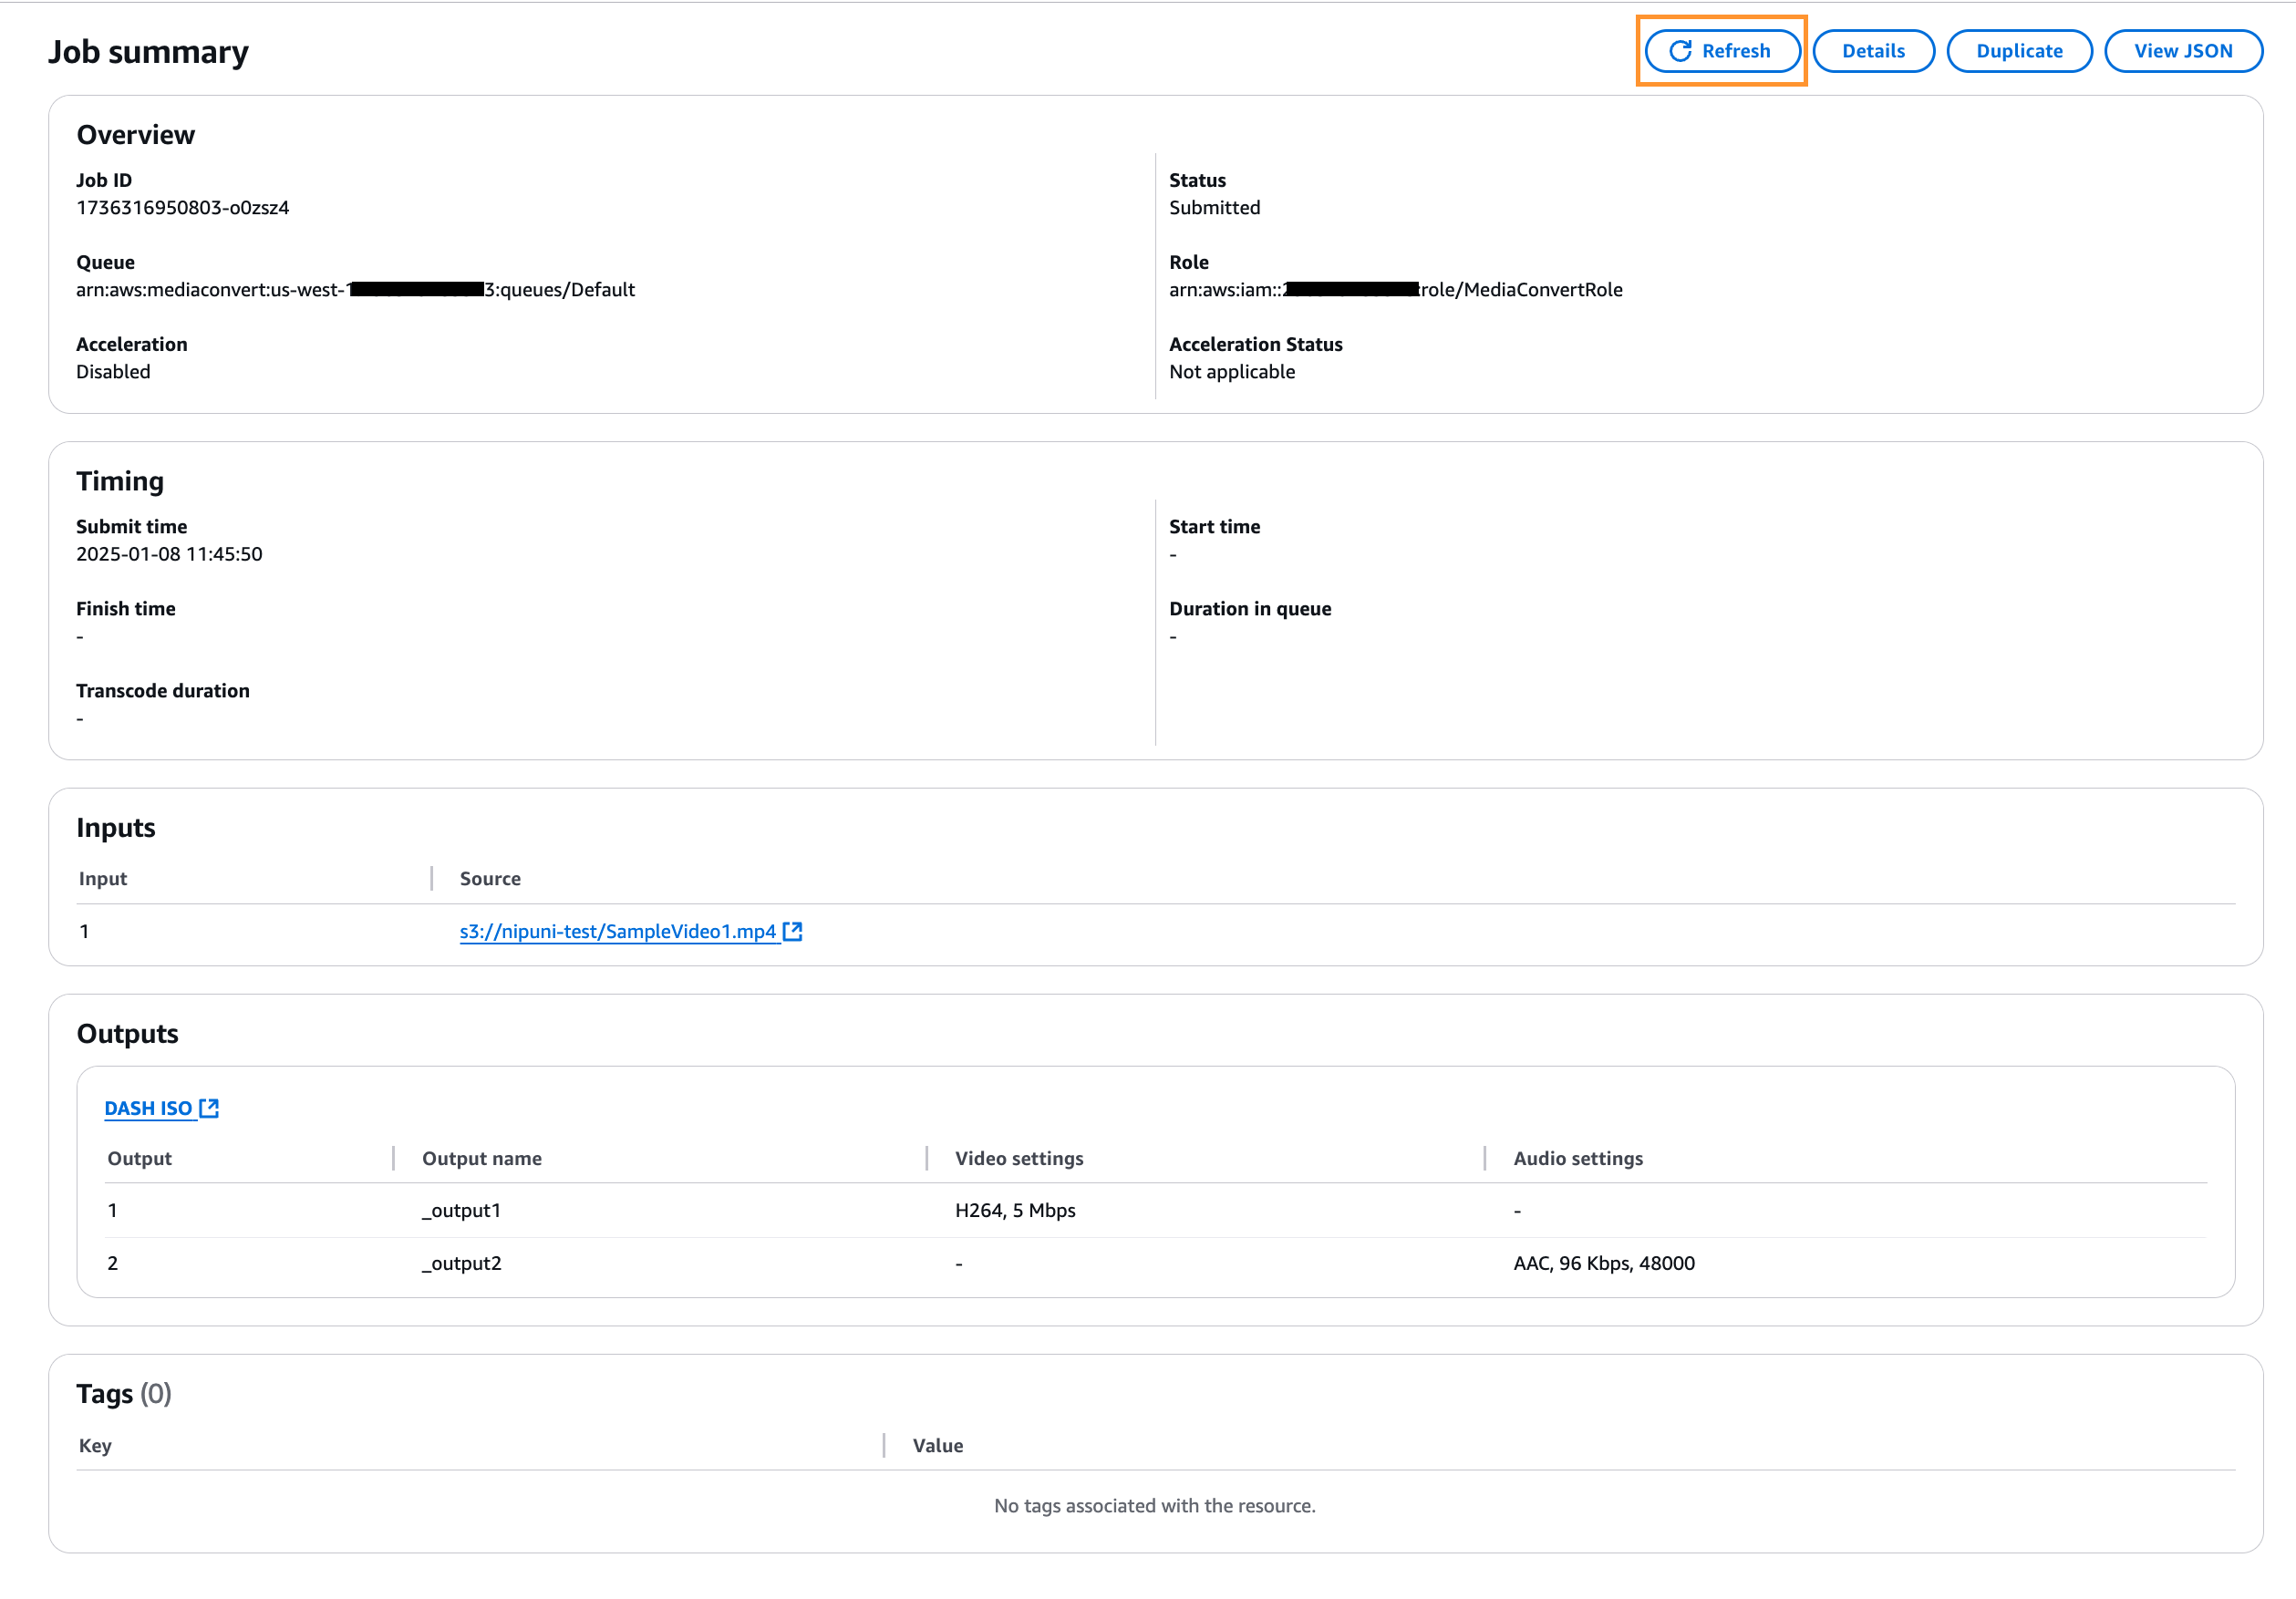
- Wait for the job to finish. The job is finished when the status changes to "Complete".
-
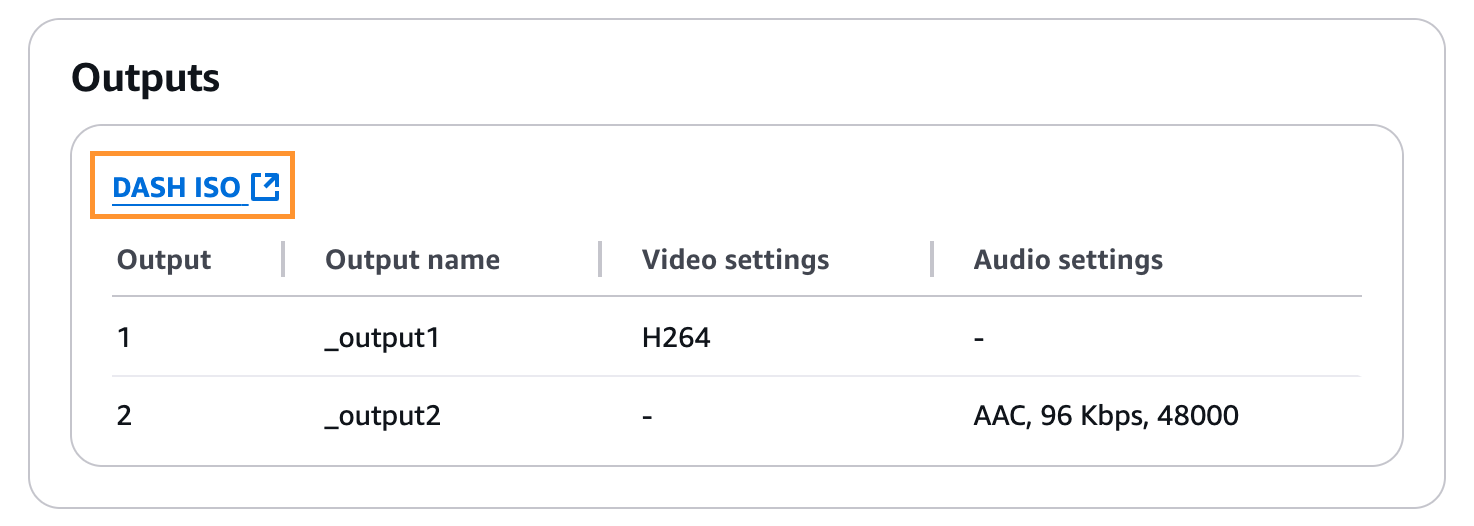
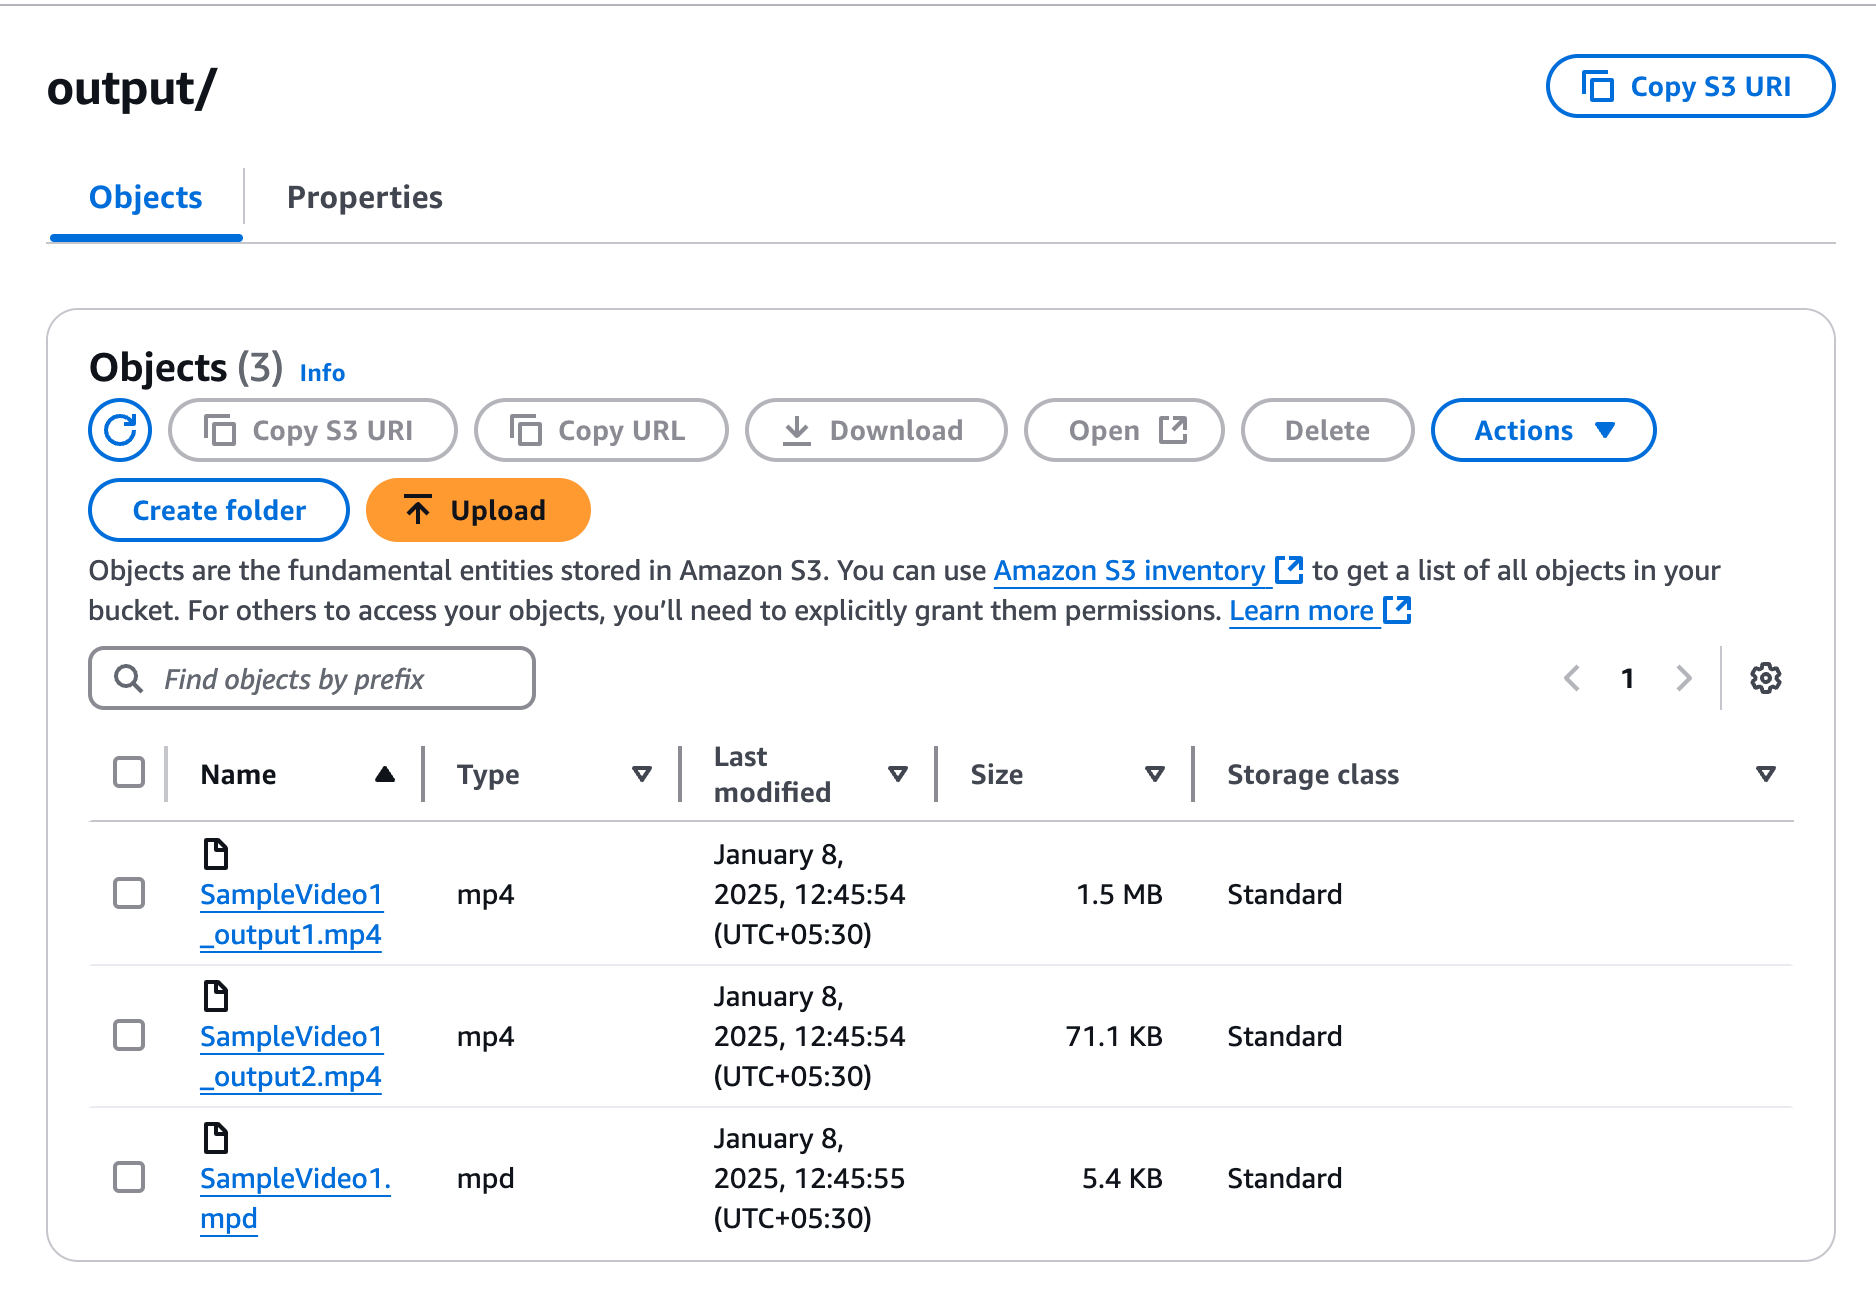
To view the output of the job, click the DASH ISO link in the Outputs pane.
-
In the Output folder, there should be the output files and the .mpd manifest.
-
Test the playback of the encrypted DASH content with any player that has been integrated with Axinom DRM. For example, you can use Axinom Media Tools, accessible at https://tools.axinom.com/.
- Host the output files and the manifest file at a location that can be accessed via a network connection, either locally or from the Internet. Provide an Axinom DRM License Server Message (license token) in the Token field in the selected Player of the Axinom Media Tools. For more information on the license token (JWT), refer to the Axinom DRM License Service Message document.
-