Chromecast
Chromecast provides screen mirroring and media content casting to HDMI enabled devices (via the dongle) or Android TVs (built-in).
Unlike Miracast, Chromecast requires an internet connection, the devices must be on the same network. While Chromecast support both screencasting and media casting, this article will only discuss the media casting which is relevant for playing DRM protected content through the Chromecast.
Integration
How Chromecast works
There are two application components involved during a media cast.
- Sender application - written for Android, iOS, or Cast-supported web platforms (e.g. Chrome desktop browser) which is developed on top of the Google Cast SDK APIs.
- Receiver application - handles the communication between the sender app and the Chromecast device. The receiver application will be running on the Chromecast device. In simple terms, it can be thought of as a web app rendered on a Chrome browser outputting the view through HDMI. A receiver application is not limited to just loading media, but it can be a more featured app like catalogue browsing, etc. There are three options to implement the receiver application:
- The Default Media Receiver presented with the Google Cast branding and styling. No custom development is needed. DRM protected content will not work other than the Google sample DRM content.
- The Styled Media Receiver for which you can develop the styles and branding.
- A custom receiver handles custom messages from your sender app to the Chromecast. A custom receiver is required to handle DRM protected content.
The above three options are implemented as HTML/JavaScript applications that will run on the Chromecast. For more information read https://developers.google.com/cast/docs/web_receiver#web_receiver_application
Additionally, Android TVs can implement their own Android application based on the Android TV Receiver SDK.
Casting Workflow
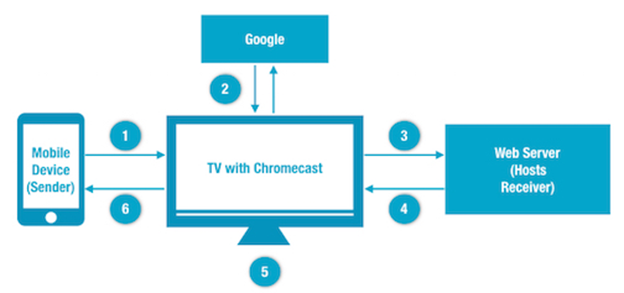
- Sender device requests to cast with media data with the receiver application ID to be loaded in the Chromecast.
- Chromecast retrieves the receiver app hosted URL.
- Chromecast requests the receiver app. (This is a standard HTTP request).
- Response from the receiver app hosted web server.
- Chromecast loads and renders the receiver app in its built-in Chrome engine.
- The receiver app will intercept the sender cast massage and extract the necessary data to load the media (optional, but required for DRM content).
- Chromecast responds to the sender device with status and any other control options if available.
Getting Started
Setup the Chromecast
-
Setup the Chromecast device and connect the device/TV to the same network as the development workstation.
-
Register the testing device in the Google Cast SDK Developer Console. (You must have a paid developer account for this). https://developers.google.com/cast/docs/registration#devices Visit for more information.
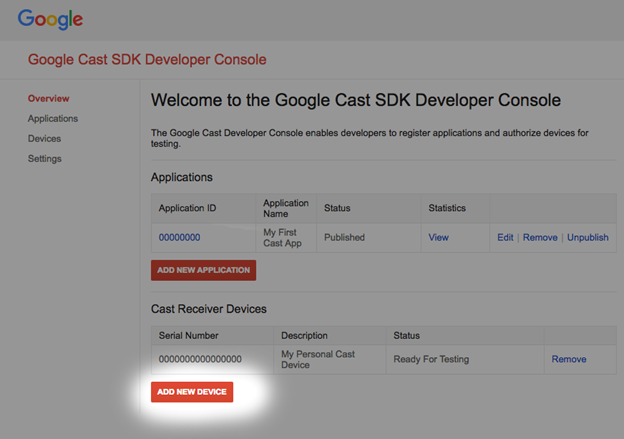
-
Enter the device serial number.
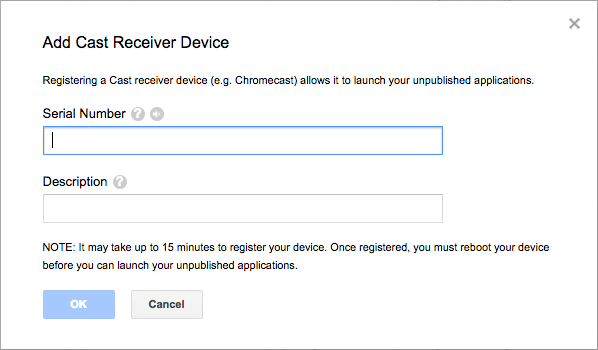
Setting up the Receiver Application
-
Download and extract the sample Axinom DRM receiver application (
axinom-custom-receiver). -
Host the receiver application on a publicly accessible web host through HTTPS.For testing purposes, let’s use NodeJS http-server and ngrok modules.
-
Install necessary node modules.
    npm install -g http-server
npm install -g ngrok -
Navigate to the sample receiver application folder.
-
Open up a command prompt and run the node web server.
http-server -
Open a new command prompt and run the ngrok tunnelling.
ngrok http 8080
-
Note down the HTTPS URL given by the ngrok tunnel.
-
Register the Receiver Application
-
Register the receiver application in the https://cast.google.com/publish/. For more information https://developers.google.com/cast/docs/registration#register_your_application
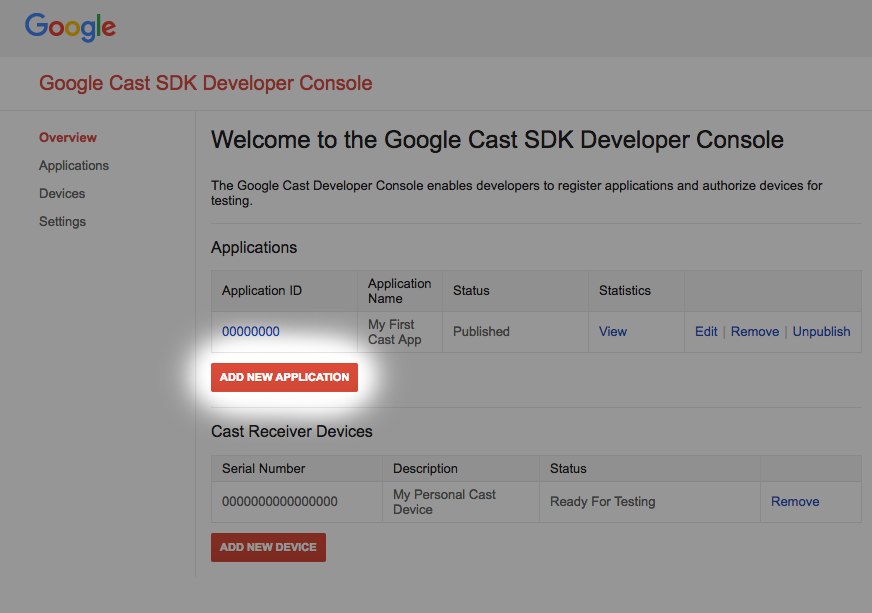
-
Select Custom Receiver
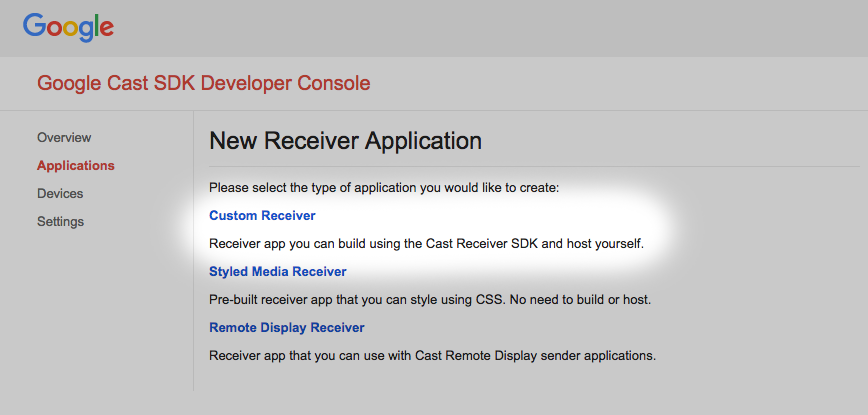
-
Enter the details of your new receiver application.
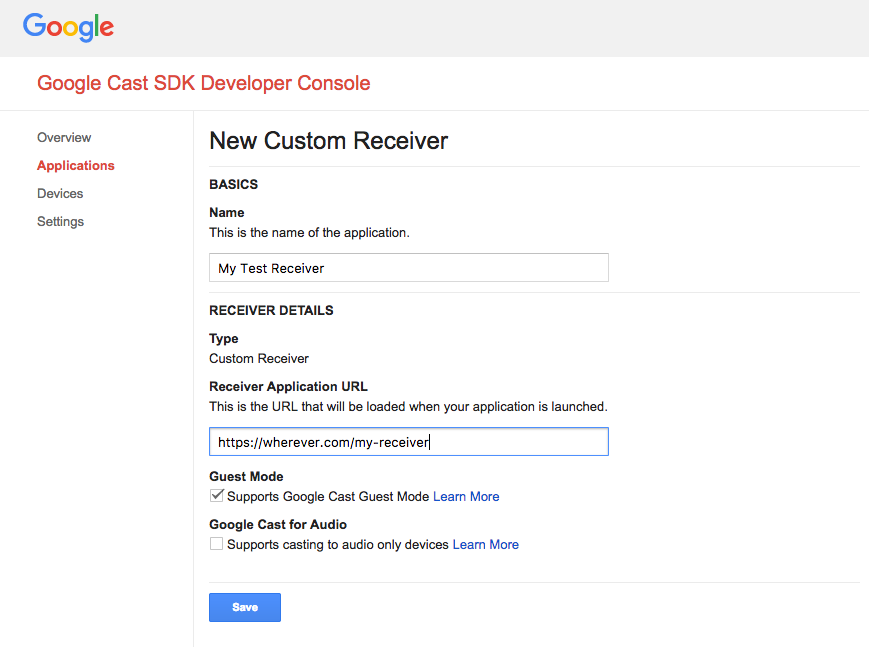
Be sure to use the URL you got with ngrok.
-
Note down the application ID for the newly registered receiver app.
Testing the Playback
-
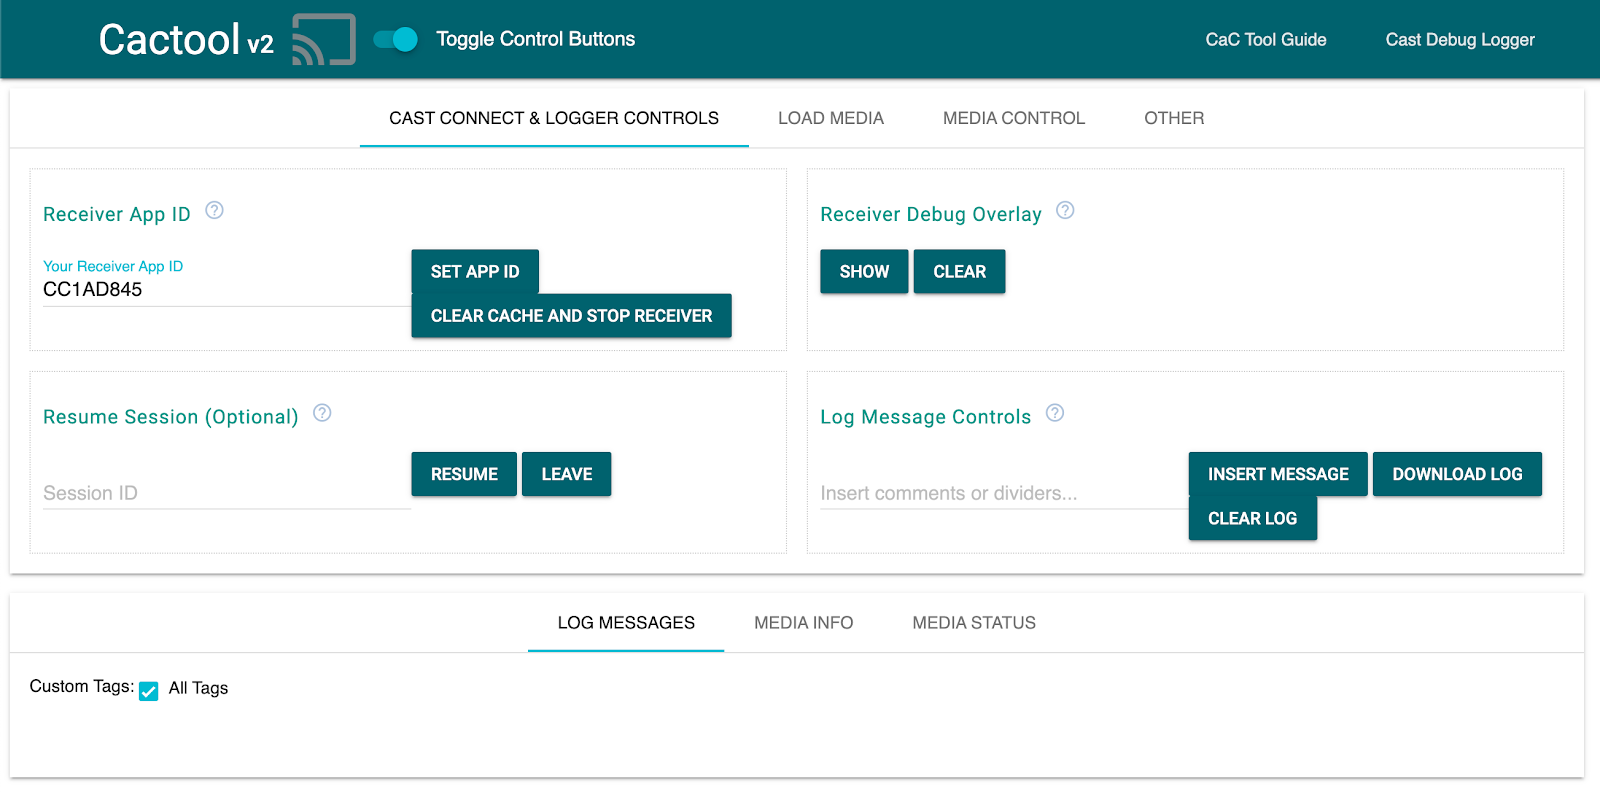
Load the https://casttool.appspot.com/cactool/ provided by Google, which is a sender application that runs on a desktop browser. You can develop your own sender application, but this guide this tool provides ready to go solution.
-
Enter the Receiver App ID, noted above.

-
Click “SET APP ID“ button (Step 2) as shown above.
-
Click the cast button (Step 3) as shown above to connect with the Chromecast. A browser popup should display to select the device.
-
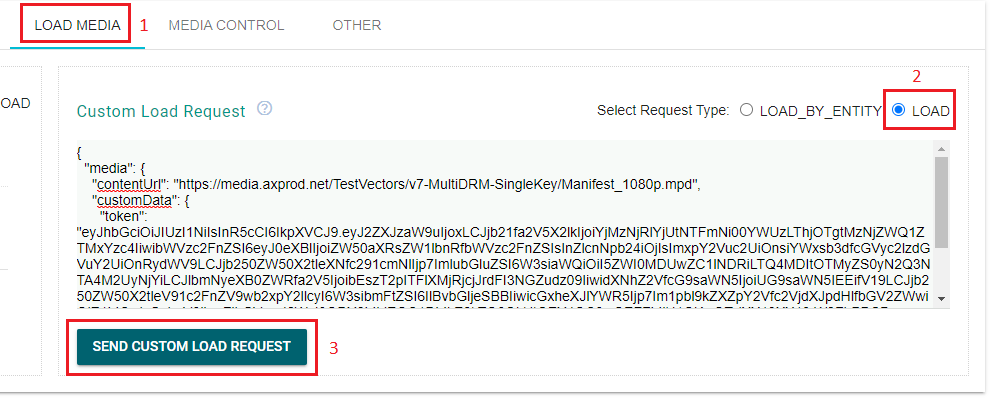
Goto the “LOAD MEDIA” tab.
-
Select LOAD option as shown above.
-
Enter the cast message containing the media and DRM token.
	{
  	"media":
	{
    	"contentUrl": "https://media.axprod.net/TestVectors/v7-MultiDRM-SingleKey/Manifest_1080p.mpd",
    	"customData":
		{
      	"token": "eyJhbGciOiJIUzI1NiIsInR5cCI6IkpXVCJ9.eyJ2ZXJzaW9uIjoxLCJjb21fa2V5X2lkIjoiYjMzNjRlYjUtNTFmNi00YWUzLThjOTgtMzNjZWQ1ZTMxYzc4IiwibWVzc2FnZSI6eyJ0eXBlIjoiZW50aXRsZW1lbnRfbWVzc2FnZSIsInZlcnNpb24iOjIsImxpY2Vuc2UiOnsiYWxsb3dfcGVyc2lzdGVuY2UiOnRydWV9LCJjb250ZW50X2tleXNfc291cmNlIjp7ImlubGluZSI6W3siaWQiOiI5ZWI0MDUwZC1lNDRiLTQ4MDItOTMyZS0yN2Q3NTA4M2UyNjYiLCJlbmNyeXB0ZWRfa2V5IjoibEszT2pITFlXMjRjcjJrdFI3NGZudz09IiwidXNhZ2VfcG9saWN5IjoiUG9saWN5IEEifV19LCJjb250ZW50X2tleV91c2FnZV9wb2xpY2llcyI6W3sibmFtZSI6IlBvbGljeSBBIiwicGxheXJlYWR5Ijp7Im1pbl9kZXZpY2Vfc2VjdXJpdHlfbGV2ZWwiOjE1MCwicGxheV9lbmFibGVycyI6WyI3ODY2MjdEOC1DMkE2LTQ0QkUtOEY4OC0wOEFFMjU1QjAxQTciXX19XX19.W2FbPDSDaq-LeeLfOnbpTMa-zCmXh8RLChEVDYvdcVw"
    	}
  	}
	}
The custom receiver application is developed to handle the custom data that contains the authentication token required for the Axinom DRM license service and PlayReady DRM System can be set through this as well if required. (Refer to the source code).
-
Click “SEND CUSTOM LOAD REQUEST“ button.
-
The video should play through the TV now.
See also
- Chromecast development getting started - https://developers.google.com/cast/docs/developers
- Web Receiver API reference - https://developers.google.com/cast/docs/reference/web_receiver
- Custom receiver and Sender application development tutorials - https://developers.google.com/cast/docs/tutorials (Check Web Receiver and Web Sender tutorials).