Message Publishers
Axinom Encoding progress tracking is built on the "push" model. This means that Encoding sends events to defined endpoints when a job’s state changes. Each such event contains useful information. It is up to your application to listen for these events and to define the handling behavior.
To start receiving events during job processing, you should specify target
endpoints in the API request’s MessagePublishers section. Encoding broadcasts
the same event message to all defined endpoints. Here is a quick example:
{
    "MessagePublishers": [
        {
            "Type" : "rabbitmq",
            "Protocol": "amqps", // amqp or amqps
            "Host" : "localhost",
            "VirtualHost" : "your-rabbitmq-vhost",
            "Queue": "messages",
            "Port": 5672,
            "CredentialsName" : "PLAINTEXT_USER",
            "CredentialsSecret" : "ENCRYPTED_PASSWORD",
            "CredentialsProtection": "Encrypted"
        },
        {
            "Type": "AzureServiceBusQueue",
            "Connection": "ENCRYPTED_CONNECTION_STRING",
            "CredentialsProtection": "Encrypted"
        }
    ]
}
In this case, a RabbitMQ message publisher is used. Axinom Encoding supports a variety of message publishers, each has its own properties. Also, all message publishers support credentials protection via the CredentialsProtection property.
You can have a maximum of 5 message publishers.
RabbitMQ
This publisher pushes messages to a single target queue. The actual JSON serialized message body is placed in the payload, while its type name is placed in the AMQP message properties, under the type field.
Target queue should be manually created before using. This client uses default exchange and queue name as the routing key.
{
    "Type" : "rabbitmq",
    "Protocol": "amqps", // amqp or amqps
    "Host" : "localhost",
    "VirtualHost" : "your-rabbitmq-vhost",
    "Queue": "messages",
    "Port": 5672,
    "CredentialsName" : "PLAINTEXT_USER",
    "CredentialsSecret" : "ENCRYPTED_PASSWORD",
    "CredentialsProtection": "Encrypted"
}
Note that the "VirtualHost" property is optional. If it is omitted, the default value
is used. However, if it has already been set in the Job Request, the value cannot be
empty. If it is set and empty, the Job Request is not accepted and the following error
is displayed: "VirtualHost value for RabbitMQ message publisher is not valid - is empty".
Azure Service Bus
Messages are published to Azure Service Bus Queues. You need to create a Azure Service Bus with a preferred name.
Azure supports two kind of queues: Service Bus Queues and Storage Queues (part of a Storage Account). Only the former are supported by Axinom Encoding as a Message Publisher.
Use the key and endpoint to fill in the MessagePublishers section of the
encoding job. The snippet below is an example. Replace the service bus name and
secret key with actual values.
{
    "Type": "AzureServiceBusQueue",
    "Connection": "ENCRYPTED_CONNECTION_STRING"
}
You can find the connection string of the Service Bus Queue from the Azure Service Bus page.
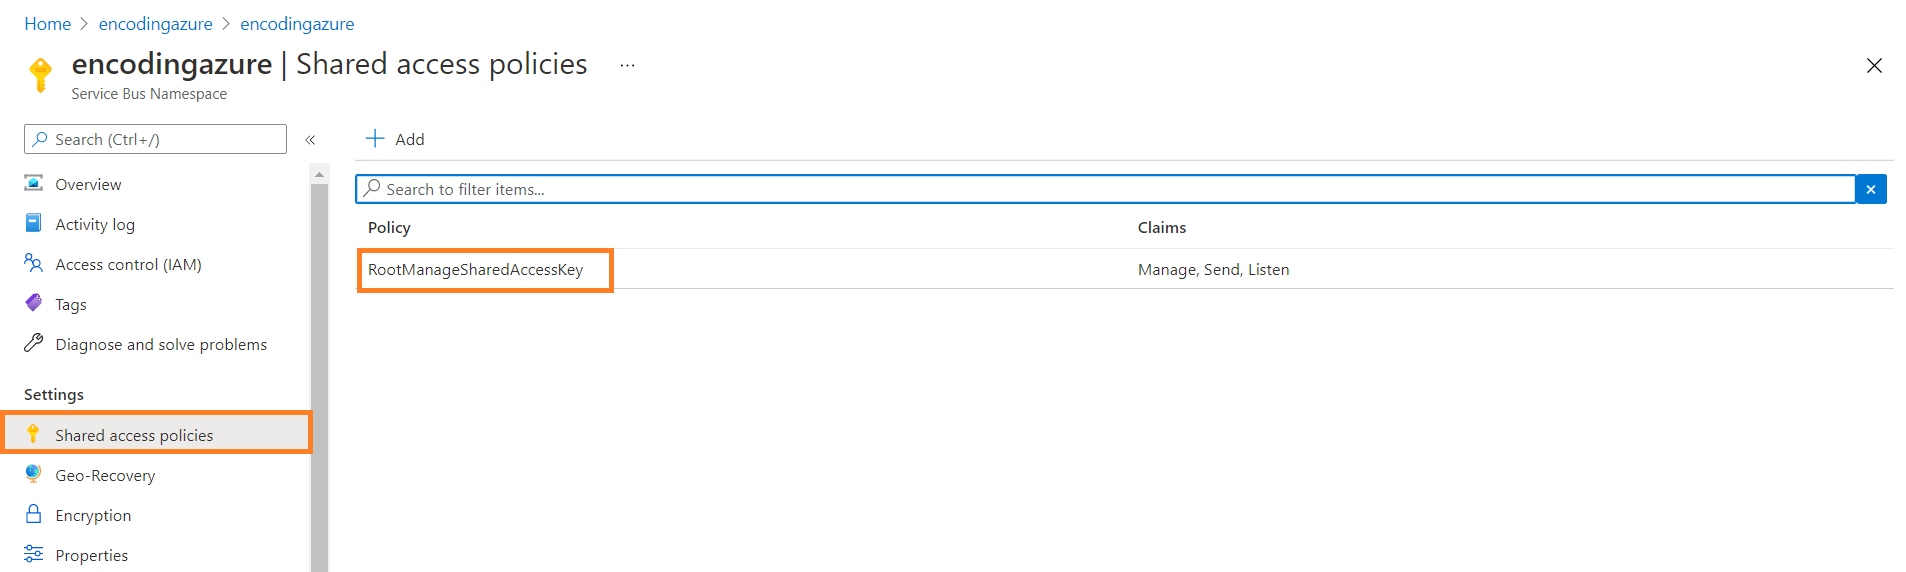
In the left-hand menu, under Settings, click Shared access policies.
If you are using RootManageSharedAccessKey policy, then you can select the connection string
for that policy. If you wish to use another policy, you need to change the SharedAccessKeyName
also according to the policy you select.
Find the policy from the list
Then you can get the connection string of the policy. The keys and connection strings are displayed on the right. Copy the value by clicking the relevant icon on the row.
The primary and secondary key have been excluded from this example but you should see your values
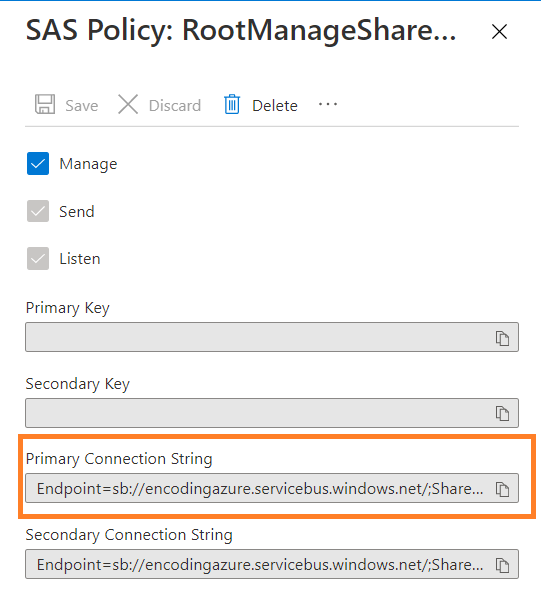
We recommend you to use credentials protection via the CredentialsProtection property. For instance, in the connection string above, you need to use credentials protection for the Shared Access key.
For each message type, you need to create a new queue with the "queue" postfix
in its name. For instance, for the message of the type "jobcreated", there will
be a queue called the "jobcreated***queue***". In addition, a message has a custom
property "OriginalMessageType", which reflects the message type, for example,
"JobCreated".
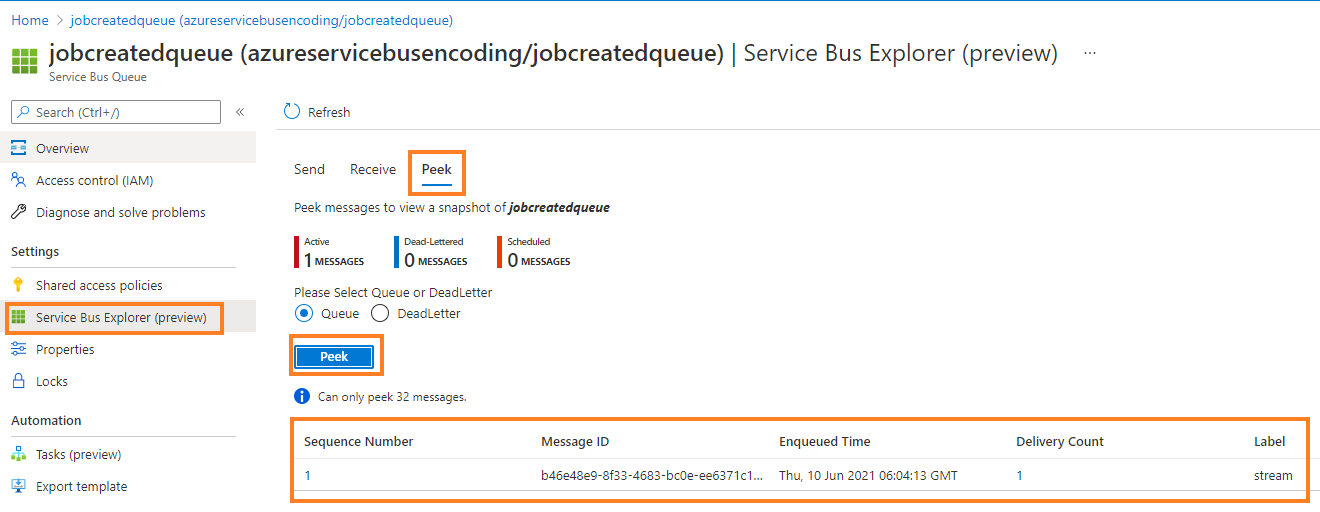
You can see the details of the message queue if you click the queue, then click Service Bus Explorer (preview), click Peek at the top (next to Send and Receive) and then click Peek again at the bottom.
This is how you see the message details
Further, you can copy the message and check message body using a Json formatter (e.g. https://jsonformatter.org/).
See also: Message Publishers with Azure
Amazon SQS Queue
Messages are published to the Amazon SQS target queue. You need to create an Amazon SQS Queue with a preferred name. You have to replace uri Path, credentials Name and credentials Secret with actual values.
{
    "Type": "AmazonSqs",
    "UriPath": "https://sqs.us-east-2.amazonaws.com/<your_account-id>/<your_Queue-path>",
    "CredentialsName": "PLAINTEXT_AWS_ACCESS_KEY_ID",
    "CredentialsSecret": "ENCRYPTED_AWS_SECRET_ACCESS_KEY",
    "CredentialsProtection": "Encrypted"
}
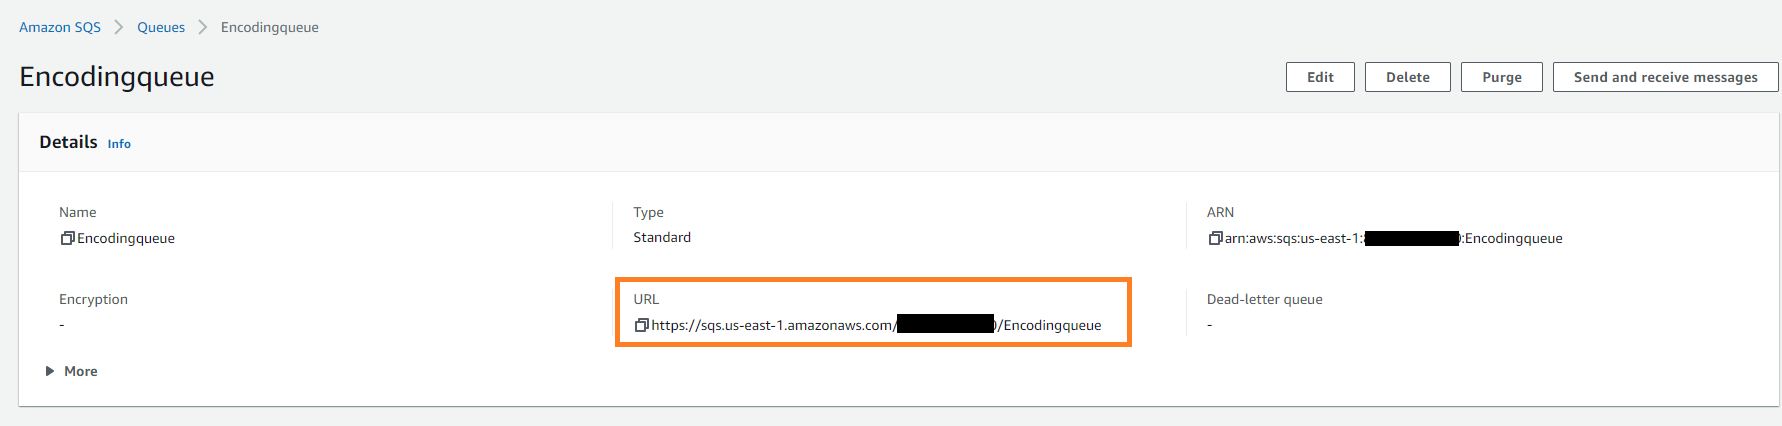
From the queue details section, you can find the URL of the queue you just created.
Queue details
We recommend you to use credentials protection with the CredentialsProtection property.
For instance, in the connection string you are using for Amazon SQS, you need to use credentials protection for CredentialsSecret.
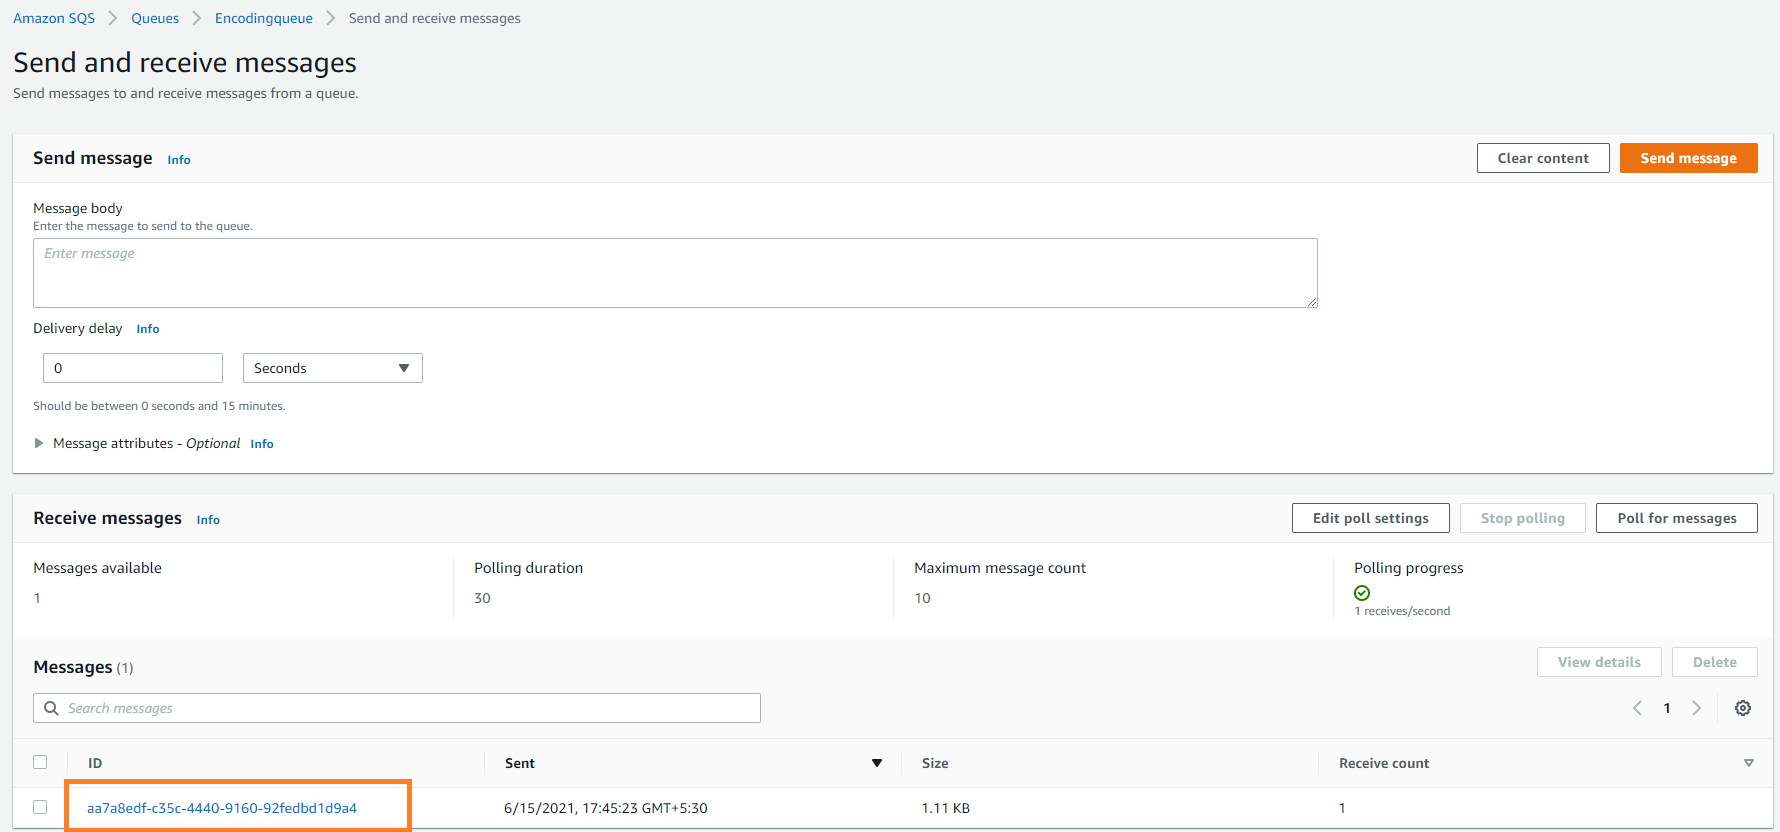
To see the incoming messages,go to "Send and receive messages" panel. Under the Receive messages section, click Poll for messages to see the messages. You may have to poll time to time to receive the list of messages when there are a lot of messages. You can click a message and see the details of each message.
Message list
See also: Message Publishers with AWS
FTPS
Create log files and store them on FTP.
{
    "Type": "Ftps",
    "UriPath": "ftps://some.server.com/some/path/logs",
    "CredentialsName": "PLAINTEXT_USER",
    "CredentialsSecret": "ENCRYPTED_PASSWORD",
    "CredentialsProtection": "Encrypted",
    "LogFileName": "all.txt",
    "SuccessFileName": "success.txt",
    "ErrorFileName": "errors.txt"
}
Amazon S3
Create log files and store them on Amazon S3.
{
    "Type": "AmazonS3",
    "UriPath": "https://<your_bucket-name>.s3.us-east-2.amazonaws.com/<log-folder-path>/",
    "CredentialsName": "PLAINTEXT_AWS_ACCESS_KEY_ID",
    "CredentialsSecret": "ENCRYPTED_AWS_SECRET_ACCESS_KEY",
    "CredentialsProtection": "Encrypted",
    "LogFileName": "all.txt",
    "SuccessFileName": "success.txt",
    "ErrorFileName": "errors.txt"
}
S3-Compatible Storage
Create log files and store them on an S3-compatible storage.
{
    "Type": "S3Compatible",
    "ServiceUrl": "https://example.com",
    "Bucket": "<your_bucket-name>",
    "FolderPath": "<log-folder-path>",
    "CredentialsName": "PLAINTEXT_USER",
    "CredentialsSecret": "ENCRYPTED_PASSWORD",
    "CredentialsProtection": "Encrypted",
    "LogFileName": "all.txt",
    "SuccessFileName": "success.txt",
    "ErrorFileName": "errors.txt"
}
Please note that instead of using the UriPath field, it is required that the ServiceUrl, Bucket and FolderPath fields (all three are required) are used to define the service.
PS. FolderPath must not be empty and it must not begin or end with a dash ("/").