Welcome to Axinom Mosaic!
Axinom Mosaic is a modular, service-oriented platform that allows you to create powerful and flexible backend solutions. It provides you with everything you need to build up your tailored digital asset management and deployment.
Axinom Mosaic works for a variety of applications, from OTT streaming platforms in the media industry to in-flight entertainment and IoT systems in transportation sector. Any content- or data-oriented use cases (including DRM) are supported by Axinom Mosaic.
Our platform enables you to take full control of your software solution. Pick and choose the components you need, and customize, enhance, and develop them further with your own team.
Key Concepts
Microservices
Mosaic is built using a Microservice Architecture, where applications are arranged as a collection of loosely coupled, fine-grained Services. Each Service has its own data. The Services communicate over defined interfaces (Web API, GraphQL, Service Bus). The Services can be developed and deployed independently.
Services
Service is a fundamental concept in Mosaic, as it is built using a microservice architecture. Each service is designed to perform a specific task or a set of related tasks and runs as a separate process.
We distinguish different types of services:
- Managed Services - are developed and operated by Axinom, for example, Image Service, Video Service, and DRM Service. They are also called SaaS (Software-as-a-Service).
- Customizable Services - are provided by Axinom in source code under an open-source license and can be used as-is or with individual customization, for example Media Service, Catalog Service, Entitlement Service.
- 3rd Party Services - are provided and operated by Customer or by 3rd party vendors. They are not built on Mosaic stack but can be easily integrated into the Mosaic eco-system using defined interfaces.
Service Types in Mosaic
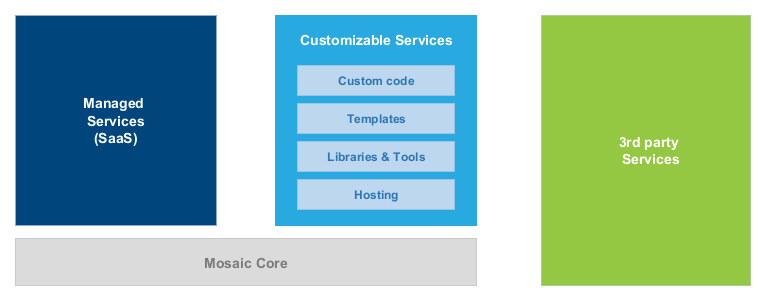
Mosaic Core Services are such managed services that are necessary for Mosaic Platform to operate, such as orchestration, identity, authentication, authorization, reporting.
Mosaic is especially strong in building OTT / Video Portal solutions. Based on a stereotypical architecture of such solutions, we can distinguish the (content) Management side and the (content) Provisioning side.
Management and Provisioning Services
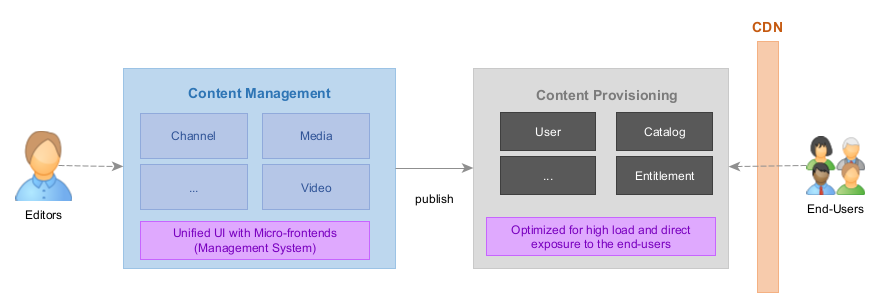
Typical properties of the management services:
- Management side for editors and other content preparation processes
- Unified UI
- Complex workflows
- Publication step for verifying business rules
Services on the management side usually provide their UI in form of a microfrontend integrated into the Mosaic Management System.
Typical properties of the provisioning services:
- Provisioning side for End-User clients
- Frontend-facing
- Optimized data storage
- Prepared for high load; behind CDN
Microfrontends
Microfrontends bring the idea of microservices further into the area of user interfaces. Each service can provide a part of a frontend-application, called Microfrontend. All microfrontends are - at runtime - loaded and executed together in a single web application.
In Mosaic, the UI of all the management services is available through a central application called Management System. It’s a shell hosting microfrontends. A few belong to the platform (Home, Navigation), others are provided by the managed and customizable services.
Management System with microfrontends
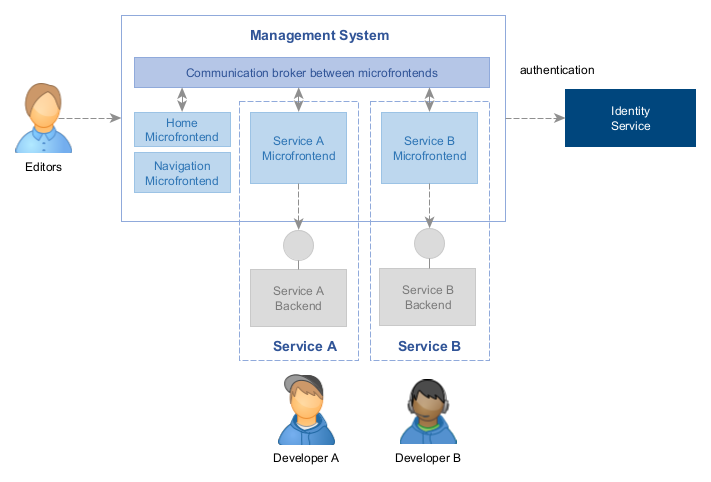
Microfrontends can expose extensions which can be integrated by other microfrontends.
Environments
Mosaic is a multi-tenant system, i.e. it supports multiple customers ("tenants").
A tenant can have one or more Environments. An environment provides a context where multiple services can run together, isolated from all other environments. Each environment has a distrinct set of users and service accounts that can access the environment. Fine-granular permissions can be set for users to access specific services and specific features inside the services.
All resources which are generated within Mosaic have an environment-level isolation.
Service Communication
Mosaic Services communicate with each other using defined interfaces.
For synchronous communication, each service exposes a GraphQL API.
For asynchronous communication, services can use RabbitMQ message broker. We distinguish between commands (sent from one service to another) and events (emitted by a service and consumed by other services). See Messaging for more details.
Service Communication - GraphQL and RabbitMQ
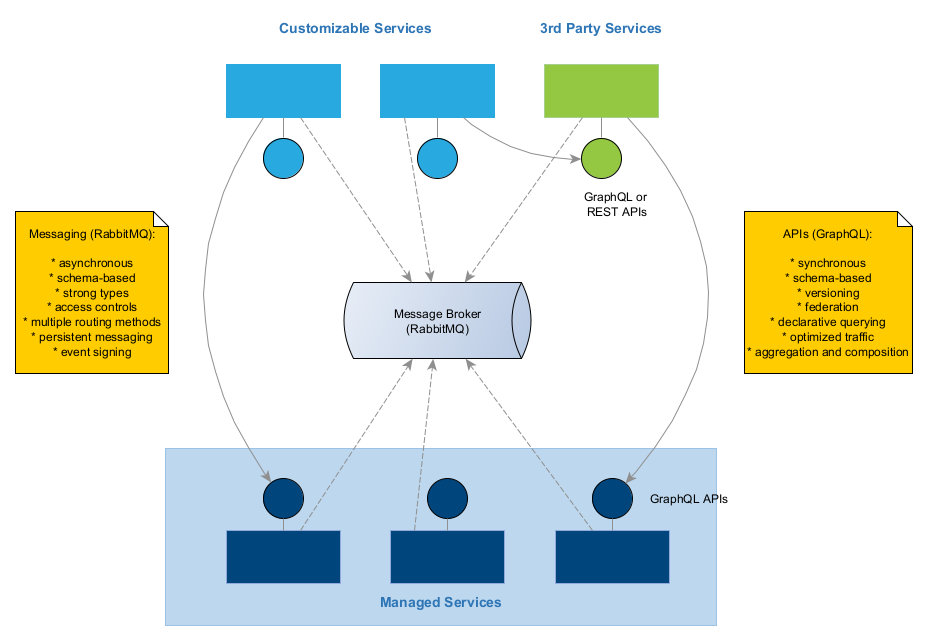
All communication is protected by the same layer of authentication and authorization based on Mosaic users, service accounts, and roles.
All communication is strongly-typed and schema-based.
Mosaic extensively uses code generation to ensure type safety and consistency. For example, most of the GraphQL schemas are derived from the databases schemas using Postgraphile.
Development with Mosaic
Mosaic development principles promote the ease of development.
Technology Stack
Mosaic uses modern software development technologies, tools and practices. See Technology Stack for more details.
Core technologies used by Mosaic
Mosaic Media Template
Mosaic Media Template provides a good starting point for your own development. It contains several Customizable Services together with everything you need to develop, build, and deploy your services. All services are provided as source code under an open-source (MIT) license. You can freely adjust it to cater to your specific business needs.
The following services are a part of the Mosaic Media Template:
- Media Service - manage metadata for movies, TV shows, linear streams, etc. with integrated image and video workflows
- Catalog Service - manage and expose catalogs of media entities, such as movies, TV shows, seasons, episodes, etc., for the frontend apps
- Entitlement Service - provides entitlements for the video playback requests. The generated entitlement message can be exchanged for a valid DRM license by the Axinom DRM License Service.
- Channel Service - allows curation of channels and playlists
- VOD-to-Live Service - creates streams from the playlists created in the Channel Service.
The services are targeted to a OTT/Media Platform scenario, but can be easily adjusted to other use cases.
Starting development based on the Media Template is as easy as typing:
npx -p @axinom/mosaic-cli mosaic create
If you want to see the services in action before you start with any development, you can deploy them to your test environment using the Hosting Service.
Development Tools
A lot of tools and libraries help you during development:
- Libraries - Mosaic provides libraries for both backend and frontend developers. The packages encapsulate all heavy operations and the details of communication with the managed services.
- Command Line Interface (CLI) - a command-line utility that provides many commands for streamlining Mosaic development.
- Storybook - living demonstration for all UI components used in Mosaic.
- Typedocs - full API reference for all Mosaic libraries
- Frontend Samples - a set of code snippets, which demonstrate how a frontend can interact with Mosaic services.
- PlayWright Test Model
- A lot of auxiliary tools are avaiable on Axinom Portal, see Tools.
Tutorials
Many tutorials explain how to complete frequently needed tasks, such as Creating a new entity or organize the database migrations.
Hosting
Services developed with Mosaic can be self-hosted or hosted by Axinom.
Axinom provides a Hosting Service which handles the deployment process and runs services in production.
Hosting service also provides a cloud storage which can be used together with any Mosaic service, and CDN, to reduce the load on the provisioning (frontend-facing) services.
See Hosting for more details on hosting plans and other included services.
Pricing
In Mosaic, you pay only for what you consume. Every Managed Service defines its Billing Metrics. For each metric, there is a defined price (which is usually a tiered price depending on the level of consumption, but sometimes it is just a simple per-unit price). The tier is selected automatically based on the monthly consumption.