Sign In on Smart TVs and Other Devices
Introduction
Typing an email address and password is awkward on devices with no keyboard, such as smart TVs, streaming boxes, and game consoles. The User Service Device Authorization flow solves this: the device shows a short code and a web address, the user opens that address on a phone or laptop they already use, signs in there, and approves the device. The device is then signed in, without ever collecting credentials itself.
Two applications work together:
- The device app (for example, the TV app) is configured as a Native application in the User Service. It starts the flow and is the party that ends up signed in.
- The activation page is a web page you build (as a separate Web application) where the user enters the code and approves the device. The device points the user to it, and the user opens it on their phone or laptop.
Because both applications belong to the same tenant and environment, they share one user store, so the user who signs in on the phone becomes the user signed in on the device. Both sides use the @axinom/mosaic-user-auth library.
How it works
- The device asks the User Service to start a device authorization. It receives a device code (a secret it keeps), a short user code, and a verification URL (your activation page).
- The device displays the user code and the verification URL to the user. It can also render the verification URL as a QR code so the user can scan it.
- The user opens the verification URL on a second device, signs in with any configured identity provider, reviews what is being authorized, and approves the device (or denies it).
- While waiting, the device polls the User Service. Once the user approves, the poll returns a refresh token, the device's long-lived credential.
- The device exchanges the refresh token for an access token (the same access token used across the Mosaic end-user APIs), both immediately and whenever it later needs to renew.
Configure the application
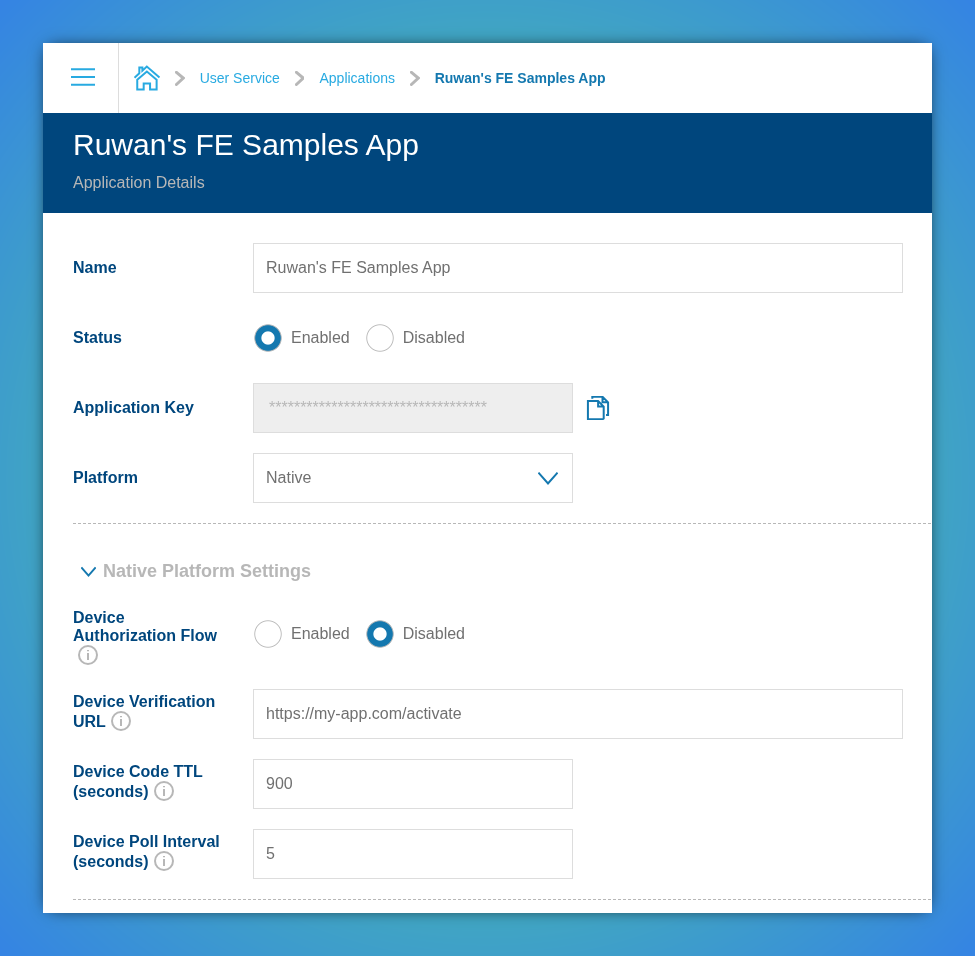
Device Authorization is available only for Native applications. On the Native application in the Admin Portal, set the following fields:
- Device Authorization Flow - enable it.
- Device Verification URL - the address of your activation page: the page where the user enters the code and approves the device (see On the activation page). The device displays this URL to the user and can render it as a QR code. It is set by an administrator and cannot be supplied by the device (this is what prevents a rogue device from sending users to a page it controls).
- Device Code TTL (seconds) - how long a code stays valid before the user must start over. Defaults to 900 (15 minutes). Keep it long enough to cover a sign-in that includes reading a verification email or a redirect to an external identity provider.
- Device Poll Interval (seconds) - the minimum time a device must wait between polls. The service enforces this: polling faster returns a "slow down" response instead of a status update. Defaults to 5.
The activation page is your own Web application. Build it in the same environment (so it shares the user store), point it at the device endpoints as shown in On the activation page, and set its address as the Device Verification URL above.
On the device
The device app starts the flow, shows the code, then polls until the user approves. On success it receives a refresh token, which it stores and uses to obtain access tokens.
import { useUserService } from "@axinom/mosaic-user-auth";
import {
  DeviceAuthorizationResponseCode,
  DevicePollResponseCode,
} from "@axinom/mosaic-user-auth-utils";

const DeviceSignIn: React.FC = () => {
  const {
    requestDeviceAuthorization,
    pollDeviceRefreshToken,
    getDeviceAccessToken,
  } = useUserService();

  const signIn = async (): Promise<void> => {
    // 1. Start the flow. `deviceLabel` is optional and shown to the user on the approval screen.
    const authorization = await requestDeviceAuthorization({
      deviceLabel: "Living Room TV",
    });
    if (authorization.code !== DeviceAuthorizationResponseCode.SUCCESS) {
      return; // Device Authorization is not enabled for this application, or the request failed.
    }

    // 2. Show `authorization.userCode` and `authorization.verificationUri` to the user
    //    (optionally render `authorization.verificationUriComplete` as a QR code).

    // 3. Poll until the user approves on the activation page. The helper honours the poll interval
    //    and backs off automatically when asked to slow down.
    const poll = await pollDeviceRefreshToken(authorization.deviceCode!, {
      intervalSeconds: authorization.interval ?? 5,
    });
    if (poll.code !== DevicePollResponseCode.SUCCESS) {
      return; // The request was denied or expired.
    }

    // 4. Store the refresh token securely on the device, then get an access token.
    const refreshToken = poll.refreshToken!;
    const token = await getDeviceAccessToken(refreshToken);
    // `token.user?.token.accessToken` is now usable against the Mosaic end-user APIs.
  };

  return <button onClick={signIn}>Sign in</button>;
};
On the activation page
The activation page needs a signed-in user, because approving a device is done on that user's
behalf. Sign the user in first with any of the existing flows (see
Sign in with External IDPs or
Sign in with AxAuth IDP) and obtain their access token with
getToken.
With a signed-in user, look up the code so you can show the user what they are about to authorize, then approve or deny it.
import { useUserService } from "@axinom/mosaic-user-auth";
import {
  DeviceVerificationResponseCode,
  DeviceApprovalResponseCode,
} from "@axinom/mosaic-user-auth-utils";

const Activate: React.FC<{ userCode: string; accessToken: string }> = ({
  userCode,
  accessToken,
}) => {
  const { getDeviceVerification, approveDevice, denyDevice } = useUserService();

  const confirm = async (): Promise<void> => {
    // Show what the code will authorize (the device label the device supplied).
    const verification = await getDeviceVerification(userCode);
    if (verification.code !== DeviceVerificationResponseCode.SUCCESS) {
      return; // The code is unknown or has expired.
    }

    // Approve on behalf of the signed-in user (or call `denyDevice` to reject).
    const result = await approveDevice(accessToken, userCode);
    if (result.code === DeviceApprovalResponseCode.ACCESS_TOKEN_EXPIRED) {
      // The access token expired: refresh it with `getToken` and retry.
    }
  };

  return <button onClick={confirm}>Allow this device</button>;
};
The device label is supplied by the device and is display-only, meant to help the user recognize their device. The real safeguard is the explicit approval combined with the code shown on the device, so always show the user what they are approving.
Getting and renewing the access token
The device never receives an access token directly from the poll; it receives only the refresh
token. Use getDeviceAccessToken to exchange the refresh token for an access token, both for the
first token right after approval and for every later renewal. The refresh token is reused each
time (it is not replaced), so keep it in secure device storage.
The device session lasts as long as the Native application's refresh-token lifetime. Set that lifetime higher on the device (Native) application than on a web application for the long "stay signed in" experience users expect on a TV. When the refresh token eventually expires, the device simply runs the flow again.
Handling responses
Every call returns a { code } value you should branch on:
- Starting the flow (
requestDeviceAuthorization):SUCCESS, orDEVICE_FLOW_NOT_ENABLED/APPLICATION_NOT_ACTIVEif the application is not a Native app with the flow enabled. - Polling (
pollDeviceRefreshToken): resolves withSUCCESS(and therefreshToken),ACCESS_DENIED(denied or the account is not active), orEXPIRED(the code timed out). The helper handles the intermediateAUTHORIZATION_PENDINGandSLOW_DOWNstates for you, and calls the optionalonPendingcallback on each one. - Looking up a code (
getDeviceVerification):SUCCESS,NOT_FOUND, orEXPIRED. - Approving or denying (
approveDevice/denyDevice):SUCCESS;NOT_FOUND,ALREADY_USED, orEXPIRED; or, when the caller is not authenticated,ACCESS_TOKEN_EXPIRED(refresh the access token withgetTokenand retry) versusNEEDS_LOGIN(the user must sign in again).
Reference and example
- Full method signatures and interface types: @axinom/mosaic-user-auth - Device Authorization.
- A runnable end-to-end example (both the device and activation-page roles in one sample app) is in
the mosaic-frontend-samples repository, under
src/scenarios/user-authentication/DeviceAuthorization. - Not using the React library? The same flow as plain HTTP calls is documented in Integrate Without the React Library - Device Authorization flow.